<?xml version="1.0" encoding="utf-8"?><feed xmlns="http://www.w3.org/2005/Atom" xml:lang="en"><generator uri="https://jekyllrb.com/" version="4.4.1">Jekyll</generator><link href="https://lgallardo.com/feed.xml" rel="self" type="application/atom+xml" /><link href="https://lgallardo.com/" rel="alternate" type="text/html" hreflang="en" /><updated>2026-06-10T22:51:43+00:00</updated><id>https://lgallardo.com/feed.xml</id><title type="html">lgallardo.com</title><subtitle>DevOps Engineer and Backend Solutions Developer specializing in Kubernetes, AWS, Python, and Terraform. Sharing insights on cloud infrastructure, automation, and system architecture.</subtitle><author><name>Luis M. Gallardo D.</name></author><entry><title type="html">From Idea to Draft PR with Hermes Kanban</title><link href="https://lgallardo.com/2026/06/10/hermes-kanban-ai-agent-delivery/" rel="alternate" type="text/html" title="From Idea to Draft PR with Hermes Kanban" /><published>2026-06-10T17:58:04+00:00</published><updated>2026-06-10T17:58:04+00:00</updated><id>https://lgallardo.com/2026/06/10/hermes-kanban-ai-agent-delivery</id><content type="html" xml:base="https://lgallardo.com/2026/06/10/hermes-kanban-ai-agent-delivery/"><![CDATA[<p><a href="/assets/images/hermes-kanban-ai-agent-delivery.jpg" style="display:block; margin-left:auto; margin-right:auto; width:70%; max-width:700px"><img src="/assets/images/hermes-kanban-ai-agent-delivery.jpg" alt="Hermes Kanban AI agent delivery header" /></a></p>

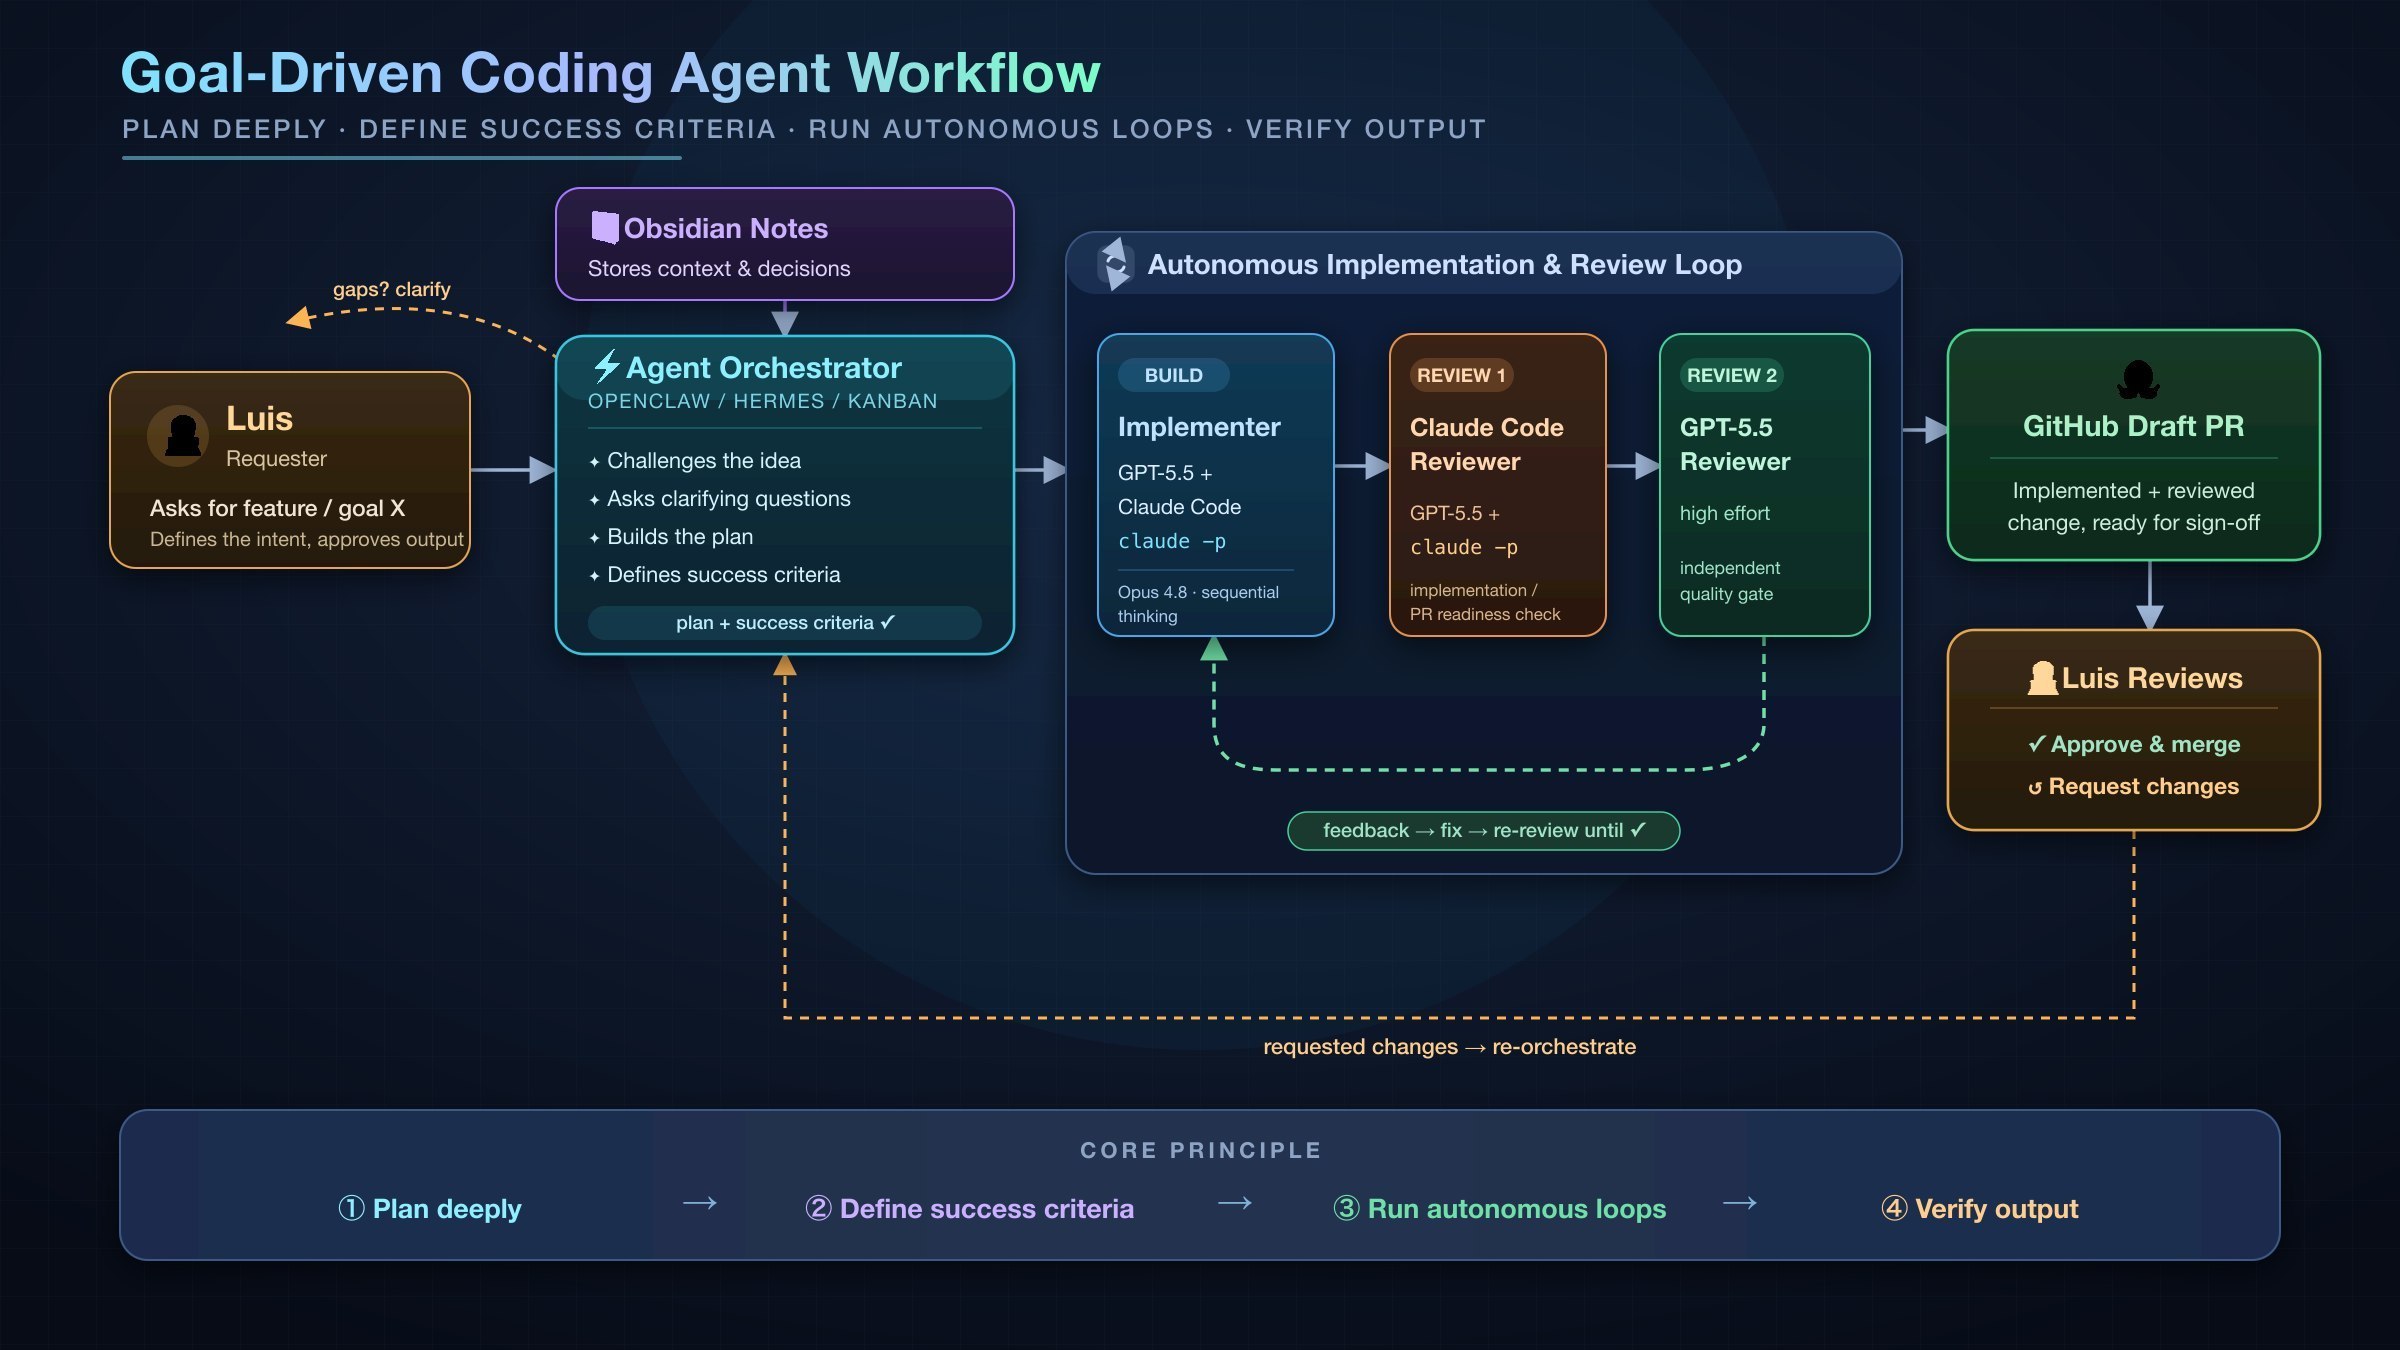
<p>I am experimenting with a more structured way to use AI coding agents.</p>

<p>Not as a one-shot assistant where I say “fix this bug” and hope the result is good, but as a delivery workflow:</p>

<div class="language-text highlighter-rouge"><div class="highlight"><pre class="highlight"><code>goal -&gt; plan -&gt; implementation -&gt; review -&gt; draft PR -&gt; human approval
</code></pre></div></div>

<p>The tool I am using for this is <strong>Hermes Kanban</strong>.</p>

<p>The idea is simple: every feature or fix becomes a durable task, with clear ownership, review steps, and handoffs between agents. Instead of keeping everything inside a long chat, Hermes Kanban gives the work a lifecycle.</p>

<p><a href="/assets/images/hermes-kanban-ai-agent-workflow-diagram.jpg" style="display:block; margin-left:auto; margin-right:auto; width:100%; max-width:1200px"><img src="/assets/images/hermes-kanban-ai-agent-workflow-diagram.jpg" alt="Goal-driven coding agent workflow with Hermes Kanban" /></a></p>

<h2 id="why-not-just-ask-an-agent-to-code">Why Not Just Ask an Agent to Code?</h2>

<p>AI coding agents are powerful, but they can still fail in predictable ways:</p>

<ul>
  <li>They jump into code too early</li>
  <li>They misunderstand the actual goal</li>
  <li>They make plausible but incomplete changes</li>
  <li>They review their own work too generously</li>
  <li>They lose context across long conversations</li>
</ul>

<p>For small tasks, that may be acceptable.</p>

<p>For real product work, I want something more reliable. So I am building a workflow where the agent does not start by editing files. It starts by understanding the goal.</p>

<h2 id="the-workflow">The Workflow</h2>

<p>The process begins with a feature request, bug, or product goal.</p>

<p>From there, the orchestrator creates a plan:</p>

<ul>
  <li>What needs to change?</li>
  <li>What is the expected behavior?</li>
  <li>What areas of the codebase are involved?</li>
  <li>What does “done” mean?</li>
  <li>What should be tested or reviewed?</li>
</ul>

<p>Once the plan is clear, Hermes Kanban creates the implementation task.</p>

<p>The implementation agent works on the change, usually inside a dedicated branch or worktree. When it finishes, it does not mark the work as done immediately. Instead, it hands the result to one or more reviewer agents.</p>

<p>The reviewers check the diff, the tests, and whether the change actually satisfies the original goal.</p>

<p>If something is wrong, the task goes back into the loop:</p>

<div class="language-text highlighter-rouge"><div class="highlight"><pre class="highlight"><code>implement -&gt; review -&gt; fix -&gt; review again
</code></pre></div></div>

<p>Only when the review passes does the workflow produce a <strong>GitHub draft PR</strong>.</p>

<p>That draft PR is the handoff point for me.</p>

<p>The agents can investigate, implement, test, and review, but I still decide whether the change should be merged.</p>

<h2 id="human-approval-stays-in-the-loop">Human Approval Stays in the Loop</h2>

<p>This is an important boundary.</p>

<p>I do not want agents silently merging code or promoting changes to production. The goal is not full automation without control.</p>

<p>The goal is leverage.</p>

<p>I want AI agents to handle the repetitive engineering work:</p>

<ul>
  <li>Investigating issues</li>
  <li>Editing code</li>
  <li>Writing or updating tests</li>
  <li>Checking diffs</li>
  <li>Preparing PRs</li>
  <li>Summarizing what changed</li>
  <li>Surfacing blockers</li>
</ul>

<p>But I still want human approval for decisions that matter:</p>

<ul>
  <li>Product behavior</li>
  <li>Architecture tradeoffs</li>
  <li>Merge approval</li>
  <li>Production releases</li>
</ul>

<p>In this setup, the agents move the work from idea to review-ready PR. I remain the final gate.</p>

<h2 id="why-hermes-kanban-helps">Why Hermes Kanban Helps</h2>

<p>A normal chat session is temporary. It can be useful, but it is not a great structure for multi-step delivery.</p>

<p>Hermes Kanban gives each task a state: ready, running, blocked, or done. Review can be another explicit task instead of a vague comment buried in a chat.</p>

<p>That makes handoffs visible. One agent can implement, another can review, and a later task can handle deployment or follow-up work.</p>

<p>That matters because real engineering work is rarely just “write code”. It involves decisions, review, feedback, and iteration.</p>

<p>Kanban gives the agents a shared operating model.</p>

<h2 id="the-pattern-i-am-aiming-for">The Pattern I Am Aiming For</h2>

<p>The workflow I want is:</p>

<div class="language-text highlighter-rouge"><div class="highlight"><pre class="highlight"><code>1. Start with a goal
2. Challenge assumptions
3. Create a plan
4. Define success criteria
5. Implement autonomously
6. Review independently
7. Produce a draft PR
8. Wait for human approval
</code></pre></div></div>

<p>That is the shift I care about.</p>

<p>Not “AI writes code”.</p>

<p>More like:</p>

<blockquote>
  <p>AI agents move a task through an engineering delivery pipeline, while the human keeps control of the important decisions.</p>
</blockquote>

<h2 id="early-lessons">Early Lessons</h2>

<p>A few things are already clear.</p>

<p>First, the plan matters more than the model. A strong model with a vague task still produces vague results.</p>

<p>Second, review must be explicit. If the same agent that wrote the code is the only reviewer, problems are easier to miss.</p>

<p>Third, agents need boundaries. In my case, the boundary is the draft PR. They can prepare the work, but they do not merge without approval.</p>

<p>Finally, feedback should go back into the workflow. If I request changes, that feedback becomes new input for the next iteration, not just a random chat message.</p>

<h2 id="final-thoughts">Final Thoughts</h2>

<p>AI coding agents are becoming good enough to do meaningful engineering work, but the workflow around them matters.</p>

<p>For me, Hermes Kanban is a way to make that workflow more reliable.</p>

<p>It turns agent work into something closer to a delivery system:</p>

<div class="language-text highlighter-rouge"><div class="highlight"><pre class="highlight"><code>goal -&gt; plan -&gt; build -&gt; review -&gt; draft PR -&gt; human sign-off
</code></pre></div></div>

<p>That structure is what makes the difference between an impressive demo and something I can actually use to ship features and fixes.</p>]]></content><author><name>Luis Gallardo</name></author><category term="Blog" /><category term="DevOps" /><category term="AI" /><category term="Hermes" /><category term="AI Agents" /><category term="Coding Agents" /><category term="Kanban" /><category term="Developer Productivity" /><category term="Automation" /><category term="Software Engineering" /><summary type="html"><![CDATA[A practical look at using Hermes Kanban to coordinate AI coding agents for feature delivery, bug fixes, independent review, and human-approved draft pull requests.]]></summary></entry><entry><title type="html">Hermes Agent Profiles: Isolating Agents in Practice</title><link href="https://lgallardo.com/2026/05/27/hermes-profiles-agent-isolation/" rel="alternate" type="text/html" title="Hermes Agent Profiles: Isolating Agents in Practice" /><published>2026-05-27T00:00:00+00:00</published><updated>2026-05-27T00:00:00+00:00</updated><id>https://lgallardo.com/2026/05/27/hermes-profiles-agent-isolation</id><content type="html" xml:base="https://lgallardo.com/2026/05/27/hermes-profiles-agent-isolation/"><![CDATA[<p><a href="/assets/images/hermes-profiles-agent-cloning-banner.jpg" style="display:block; margin-left:auto; margin-right:auto; width:90%"><img src="/assets/images/hermes-profiles-agent-cloning-banner.jpg" alt="Hermes Agent cloning into an isolated profile" /></a></p>

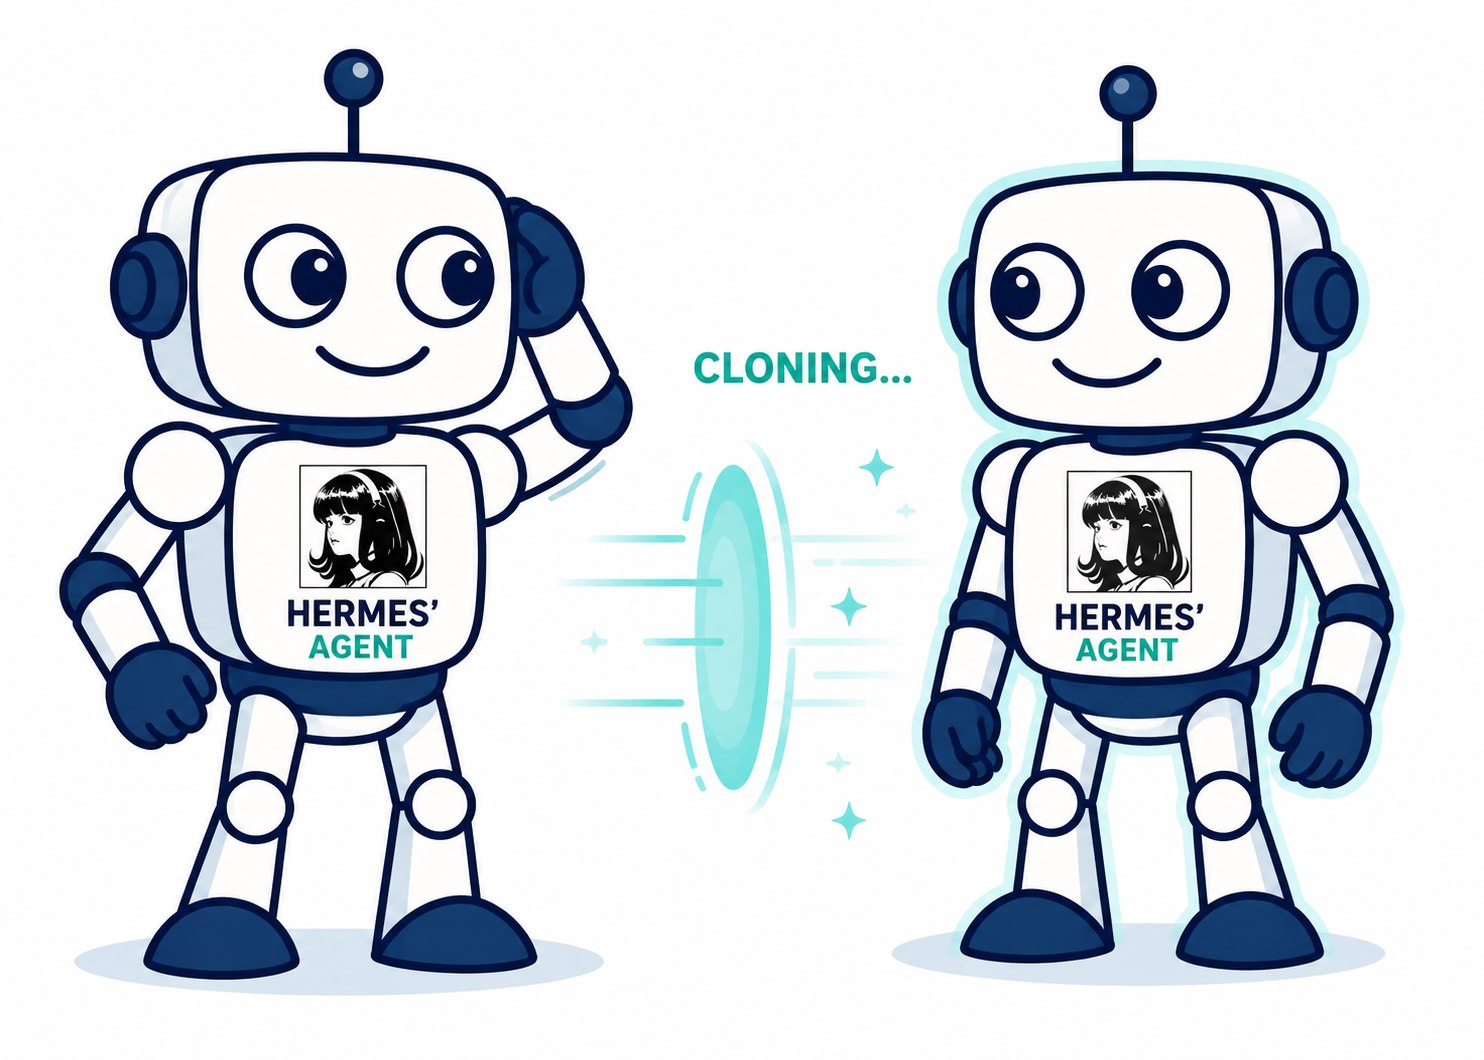
<p>The other day I was setting up a couple of Hermes agents and something obvious finally clicked. I was not creating two copies of the same assistant. I was creating two workers with very different jobs.</p>

<p>One agent was focused on <a href="https://ankivocab.com/">AnkiVocab</a>, my platform for generating Anki flashcards with AI. It needs product context, GitHub issues, browser-extension details, Lambda deployment notes, and the kind of memory that helps it move a SaaS product forward. The other agent was for my Terraform modules. That one needs provider docs, infrastructure conventions, AWS context, and a much lower tolerance for creative improvisation.</p>

<p>Those agents should not share the same brain.</p>

<p>If both agents run against the same <code class="language-plaintext highlighter-rouge">~/.hermes</code> directory, they read the same <code class="language-plaintext highlighter-rouge">config.yaml</code>, the same <code class="language-plaintext highlighter-rouge">.env</code>, and they accumulate memories and sessions in the same folders. The AnkiVocab agent starts carrying infrastructure assumptions it does not need. The Terraform agent may see product memories, product credentials, or gateway state that should never affect infrastructure work. If both gateway processes point at the same bot token, one of them crashes in a way that takes time to diagnose.</p>

<p>Hermes profiles solve this with a simple model: one directory per agent, one environment variable to switch between them.</p>

<h2 id="why-isolation-makes-agents-better">Why Isolation Makes Agents Better</h2>

<p>Running agents in isolation is not just housekeeping. It has direct effects on focus, safety, and operational reliability.</p>

<p><strong>Context pollution.</strong> Without profiles, every workstream writes into the same long-lived agent state: the same memories, the same session database, the same skills, and the same identity file. An agent asked to review a pull request can be influenced by memories from a previous agent that was summarizing personal messages. That irrelevant context consumes tokens and nudges the model toward wrong associations. A separate profile keeps the durable context aligned with the job.</p>

<p><strong>Credential scoping.</strong> A shared <code class="language-plaintext highlighter-rouge">.env</code> file is an all-or-nothing secret store. Every agent on the machine can read every API key and bot token in it. With profiles, each agent’s <code class="language-plaintext highlighter-rouge">.env</code> contains only the credentials it actually needs. If an agent is compromised or misbehaves, the blast radius is limited to the secrets in its own profile directory – not every key on the machine.</p>

<p><strong>Reproducibility.</strong> When an agent produces an unexpected result, you need to be able to reproduce the run. A profile that starts from a known baseline – specific <code class="language-plaintext highlighter-rouge">config.yaml</code>, specific <code class="language-plaintext highlighter-rouge">SOUL.md</code>, no prior memories unless you explicitly clone them – gives you a deterministic starting state. Debugging becomes a matter of replaying a run against a known profile rather than untangling shared mutable state.</p>

<p><strong>Parallelism.</strong> Independent profiles let you run multiple agents concurrently without any coordination overhead. Two agents writing to the same profile can interfere with each other through shared memory, cron state, gateway state, and logs. Two agents running in separate profiles write to separate directories, which means you can run them in parallel without treating the profile as a coordination bottleneck.</p>

<h2 id="two-profiles-in-practice">Two Profiles in Practice</h2>

<p>Here is a minimal example contrasting an <code class="language-plaintext highlighter-rouge">ankivocab</code> agent (product, GitHub, extension context, SaaS operations) and a <code class="language-plaintext highlighter-rouge">terraform</code> agent (AWS, Terraform providers, modules, monitoring). The separation lives in each profile’s <code class="language-plaintext highlighter-rouge">.env</code>, <code class="language-plaintext highlighter-rouge">config.yaml</code>, <code class="language-plaintext highlighter-rouge">SOUL.md</code>, and <code class="language-plaintext highlighter-rouge">skills/</code> directory.</p>

<div class="language-bash highlighter-rouge"><div class="highlight"><pre class="highlight"><code><span class="c"># ~/.hermes/profiles/ankivocab/.env</span>
<span class="nv">GITHUB_TOKEN</span><span class="o">=</span>&lt;ankivocab_repo_token&gt;
<span class="nv">STRIPE_API_KEY</span><span class="o">=</span>&lt;ankivocab_billing_token&gt;
<span class="nv">ANTHROPIC_API_KEY</span><span class="o">=</span>&lt;ankivocab_llm_token&gt;
<span class="nv">CLOUDFLARE_API_TOKEN</span><span class="o">=</span>&lt;ankivocab_dns_token&gt;
<span class="c"># No broad Terraform credentials -- this agent should stay focused on the product</span>

<span class="c"># ~/.hermes/profiles/terraform/.env</span>
<span class="nv">AWS_ACCESS_KEY_ID</span><span class="o">=</span>&lt;infra_access_key_id&gt;
<span class="nv">AWS_SECRET_ACCESS_KEY</span><span class="o">=</span>&lt;infra_secret_access_key&gt;
<span class="nv">AWS_DEFAULT_REGION</span><span class="o">=</span>us-east-1
<span class="nv">TF_VAR_environment</span><span class="o">=</span>production
<span class="nv">GRAFANA_API_KEY</span><span class="o">=</span>&lt;grafana_readonly_token&gt;
<span class="c"># No AnkiVocab product tokens -- this agent is here to work on infrastructure modules</span>
</code></pre></div></div>

<p>The <code class="language-plaintext highlighter-rouge">ankivocab</code> agent runs with <code class="language-plaintext highlighter-rouge">hermes -p ankivocab chat</code> (or just <code class="language-plaintext highlighter-rouge">ankivocab chat</code> via alias) and loads the product lane’s credentials, memory, skills, and identity. The <code class="language-plaintext highlighter-rouge">terraform</code> agent runs independently with its own gateway process and its own operational guardrails. Neither accidentally uses the other’s long-lived state, and both can run at the same time without sharing a profile.</p>

<h2 id="what-a-profile-is">What a Profile Is</h2>

<p>A profile is a separate Hermes home directory at <code class="language-plaintext highlighter-rouge">~/.hermes/profiles/&lt;name&gt;/</code>. Each profile is a complete, self-contained environment with its own configuration, state, and runtime.</p>

<p>The mechanism behind this is the <code class="language-plaintext highlighter-rouge">HERMES_HOME</code> environment variable. Throughout the Hermes codebase, path resolution goes through <code class="language-plaintext highlighter-rouge">get_hermes_home()</code> instead of assuming a single global <code class="language-plaintext highlighter-rouge">~/.hermes</code> directory. When you run an agent under a specific profile, every file read and write happens inside that profile’s directory – config, memories, sessions, skills, cron jobs, and gateway state.</p>

<p>The default profile is <code class="language-plaintext highlighter-rouge">~/.hermes</code> itself. You do not migrate anything to start using profiles; the default continues to work as before.</p>

<p>When you create a profile named <code class="language-plaintext highlighter-rouge">coder</code>, Hermes also creates a shell alias at <code class="language-plaintext highlighter-rouge">~/.local/bin/coder</code>. That alias is <code class="language-plaintext highlighter-rouge">hermes -p coder</code> under the hood, so typing <code class="language-plaintext highlighter-rouge">coder chat</code> is the same as <code class="language-plaintext highlighter-rouge">hermes -p coder chat</code>.</p>

<h2 id="creating-a-profile">Creating a Profile</h2>

<p>There are four creation modes:</p>

<div class="language-bash highlighter-rouge"><div class="highlight"><pre class="highlight"><code>hermes profile create coder                  <span class="c"># blank profile, creates "coder" alias</span>
hermes profile create work <span class="nt">--clone</span>           <span class="c"># copy config.yaml, .env, SOUL.md only</span>
hermes profile create backup <span class="nt">--clone-all</span>     <span class="c"># copy everything including memories and sessions</span>
hermes profile create work <span class="nt">--clone</span> <span class="nt">--clone-from</span> coder  <span class="c"># clone from a specific profile</span>
</code></pre></div></div>

<p>Blank creation gives you a clean slate. The <code class="language-plaintext highlighter-rouge">--clone</code> flag is useful when you want a new agent to start with the same model and API keys but no prior context. The <code class="language-plaintext highlighter-rouge">--clone-all</code> flag is useful for backups or branching off an agent that already has useful memories.</p>

<h2 id="isolated-vs-shared-state">Isolated vs. Shared State</h2>

<p>Without profiles, all agents converge on the same state. With profiles, each agent operates in its own lane.</p>

<div class="mermaid">
flowchart LR
  subgraph mixed["Single agent (no profiles)"]
    direction TB
    m_config["config.yaml (shared)"]
    m_env[".env (shared token)"]
    m_mem["memories/ (mixed context)"]
    m_sess["sessions/ (all agents)"]
    m_soul["SOUL.md (one persona)"]
    m_config --- m_env
    m_env --- m_mem
    m_mem --- m_sess
    m_sess --- m_soul
  end

  subgraph coder["Profile: coder"]
    direction TB
    c_config["config.yaml"]
    c_env[".env (token A)"]
    c_mem["memories/"]
    c_sess["sessions/"]
    c_soul["SOUL.md"]
    c_config --- c_env
    c_env --- c_mem
    c_mem --- c_sess
    c_sess --- c_soul
  end

  subgraph assistant["Profile: assistant"]
    direction TB
    a_config["config.yaml"]
    a_env[".env (token B)"]
    a_mem["memories/"]
    a_sess["sessions/"]
    a_soul["SOUL.md"]
    a_config --- a_env
    a_env --- a_mem
    a_mem --- a_sess
    a_sess --- a_soul
  end

  mixed --&gt;|"split into profiles"| coder
  mixed --&gt;|"split into profiles"| assistant
</div>

<h2 id="what-each-profile-owns">What Each Profile Owns</h2>

<p>Every profile directory contains:</p>

<ul>
  <li><code class="language-plaintext highlighter-rouge">config.yaml</code> – model, provider, and all Hermes settings</li>
  <li><code class="language-plaintext highlighter-rouge">.env</code> – API keys, bot tokens, and environment-specific secrets</li>
  <li><code class="language-plaintext highlighter-rouge">SOUL.md</code> – the system prompt that shapes the agent’s persona</li>
  <li><code class="language-plaintext highlighter-rouge">memories/</code> – persistent facts the agent has stored</li>
  <li><code class="language-plaintext highlighter-rouge">sessions/</code> – conversation history</li>
  <li><code class="language-plaintext highlighter-rouge">skills/</code> – profile-specific procedures and capabilities</li>
  <li><code class="language-plaintext highlighter-rouge">cron/</code> – scheduled tasks</li>
  <li>gateway state – PID file and SQLite database for the running gateway process</li>
</ul>

<h2 id="profiles-are-not-sandboxes">Profiles Are Not Sandboxes</h2>

<p>This is worth stating clearly: profiles isolate Hermes state, not filesystem access.</p>

<p>On the <code class="language-plaintext highlighter-rouge">local</code> terminal backend, the agent still runs as your user and has full access to your home directory and every file your user can read or write. Setting up a <code class="language-plaintext highlighter-rouge">coder</code> profile does not prevent that agent from touching files outside <code class="language-plaintext highlighter-rouge">~/.hermes/profiles/coder/</code>.</p>

<p>The <code class="language-plaintext highlighter-rouge">SOUL.md</code> in a profile guides the model toward a certain behavior, but it does not enforce any boundaries at the OS level.</p>

<p>If you want a predictable working directory per agent – so that terminal commands start in the right project folder – set <code class="language-plaintext highlighter-rouge">terminal.cwd</code> explicitly in that profile’s <code class="language-plaintext highlighter-rouge">config.yaml</code>. That controls where the agent’s shell starts, which is a separate concern from <code class="language-plaintext highlighter-rouge">HERMES_HOME</code>.</p>

<h2 id="gateway-isolation">Gateway Isolation</h2>

<p>Each profile runs its own gateway process with its own bot token defined in its <code class="language-plaintext highlighter-rouge">.env</code> file. Telegram, Discord, Slack, WhatsApp, and Signal are all supported.</p>

<p>When you start a gateway for a profile, it reads its token from that profile’s <code class="language-plaintext highlighter-rouge">.env</code>. If two profiles accidentally share the same bot token, Hermes detects the conflict through a token lock mechanism. The second gateway is blocked immediately with a clear error message that names the conflicting profile, so you can fix the <code class="language-plaintext highlighter-rouge">.env</code> before anything unexpected happens.</p>

<div class="mermaid">
flowchart TD
  telegram["Telegram / Discord"]
  telegram --&gt; gw_coder["gateway-coder (token A)"]
  telegram --&gt; gw_assistant["gateway-assistant (token B)"]

  gw_coder --&gt; agent_coder["coder agent ~/.hermes/profiles/coder"]
  gw_assistant --&gt; agent_assistant["assistant agent ~/.hermes/profiles/assistant"]

  gw_coder -. blocked if token conflict .-&gt; lock["token lock"]
  gw_assistant -. blocked if token conflict .-&gt; lock
</div>

<p>You can install each gateway as a separate system service:</p>

<div class="language-bash highlighter-rouge"><div class="highlight"><pre class="highlight"><code>coder gateway <span class="nb">install</span>       <span class="c"># installs coder profile gateway as systemd/launchd service</span>
assistant gateway <span class="nb">install</span>   <span class="c"># installs assistant profile gateway as systemd/launchd service</span>
</code></pre></div></div>

<p>Inside Docker, s6-overlay supervises per-profile gateways and restarts them automatically on crash.</p>

<h2 id="day-to-day-usage">Day-to-Day Usage</h2>

<p>Once you have profiles set up, you interact with them through the alias, the <code class="language-plaintext highlighter-rouge">-p</code> flag, or the sticky default:</p>

<div class="language-bash highlighter-rouge"><div class="highlight"><pre class="highlight"><code>coder chat                    <span class="c"># alias targets coder profile directly</span>
coder gateway start           <span class="c"># start the coder gateway</span>
hermes <span class="nt">-p</span> coder chat          <span class="c"># explicit flag, same result</span>
hermes profile use coder      <span class="c"># set coder as the sticky default (like kubectl use-context)</span>
hermes profile use default    <span class="c"># switch back to the default profile</span>
</code></pre></div></div>

<p>To inspect what a profile looks like at any point:</p>

<div class="language-bash highlighter-rouge"><div class="highlight"><pre class="highlight"><code>hermes profile show coder
</code></pre></div></div>

<p>That gives you output like this:</p>

<div class="language-plaintext highlighter-rouge"><div class="highlight"><pre class="highlight"><code>Profile: coder
Path:    ~/.hermes/profiles/coder
Model:   &lt;model&gt; (&lt;provider&gt;)
Gateway: stopped
Skills:  12
.env:    exists
SOUL.md: exists
Alias:   ~/.local/bin/coder
</code></pre></div></div>

<p>Other management commands are straightforward:</p>

<div class="language-bash highlighter-rouge"><div class="highlight"><pre class="highlight"><code>hermes profile list
hermes profile rename coder dev-bot
hermes profile <span class="nb">export </span>coder          <span class="c"># produces coder.tar.gz</span>
hermes profile import coder.tar.gz
hermes profile delete coder          <span class="c"># stops gateway, removes alias, deletes all data</span>
</code></pre></div></div>

<p>The <code class="language-plaintext highlighter-rouge">delete</code> command handles cleanup atomically – it stops the gateway, removes the shell alias from <code class="language-plaintext highlighter-rouge">~/.local/bin/</code>, and removes the profile directory.</p>

<h2 id="wrapping-up">Wrapping Up</h2>

<p>Profiles give you a clean separation of agent state without requiring any infrastructure changes. The mechanism is simple enough that you can reason about what each agent owns just by looking at its directory. If you are running more than one Hermes agent on the same machine, the time to create profiles is before the memories start accumulating in the wrong place.</p>

<script type="module">
  import mermaid from 'https://cdn.jsdelivr.net/npm/mermaid@10/dist/mermaid.esm.min.mjs';
  mermaid.initialize({ startOnLoad: true, theme: 'default' });
</script>

<hr />

<h2 id="references">References</h2>

<ul>
  <li><a href="https://hermes-agent.nousresearch.com/docs">Hermes Documentation</a></li>
  <li><a href="https://hermes-agent.nousresearch.com/docs/user-guide/profiles">Hermes Profiles Guide</a></li>
  <li><a href="https://hermes-agent.nousresearch.com/docs/user-guide/messaging/">Hermes Messaging Gateway</a></li>
</ul>]]></content><author><name>Luis Gallardo</name></author><category term="Blog" /><category term="DevOps" /><category term="AI" /><category term="Hermes" /><category term="AI" /><category term="AI Agents" /><category term="Agent Isolation" /><category term="LLM" /><category term="DevOps" /><category term="Multi-agent" /><summary type="html"><![CDATA[How to use Hermes agent profiles to isolate state, memories, and gateway processes across multiple AI agents on the same machine. Covers HERMES_HOME, profile creation, gateway isolation, and day-to-day usage.]]></summary></entry><entry><title type="html">Claude Code Remote Control + Ollama: Control Your GPU Server from Your Phone</title><link href="https://lgallardo.com/2026/02/28/claude-code-remote-control-ollama/" rel="alternate" type="text/html" title="Claude Code Remote Control + Ollama: Control Your GPU Server from Your Phone" /><published>2026-02-28T00:00:00+00:00</published><updated>2026-02-28T00:00:00+00:00</updated><id>https://lgallardo.com/2026/02/28/claude-code-remote-control-ollama</id><content type="html" xml:base="https://lgallardo.com/2026/02/28/claude-code-remote-control-ollama/"><![CDATA[<p><img src="/assets/images/claude-code-remote-robot.png" alt="Claude Code Remote Control with Ollama" style="display:block; margin-left:auto; margin-right:auto; width:90%" /></p>

<p>If you have a GPU server at home or in the cloud running Ollama, you can combine it with Claude Code’s Remote Control feature to manage coding sessions from your phone while the inference happens on your own hardware. Here is how that works and why it is a useful setup.</p>

<h2 id="what-is-remote-control">What is Remote Control?</h2>

<p>Remote Control is a research preview feature in Claude Code (available on Max plans) that lets you continue a local terminal session from your phone, tablet, or any browser.</p>

<p>The key points:</p>

<ul>
  <li>Everything runs locally on your machine – files never leave it</li>
  <li>MCP servers and your full dev environment stay available</li>
  <li>Only the conversation flows through the Anthropic API over HTTPS</li>
  <li>No inbound ports are opened on your machine</li>
</ul>

<p>You start it with <code class="language-plaintext highlighter-rouge">claude remote-control</code> from the terminal, or <code class="language-plaintext highlighter-rouge">/rc</code> from within an existing session. It gives you a session URL and a QR code you can scan with the Claude mobile app.</p>

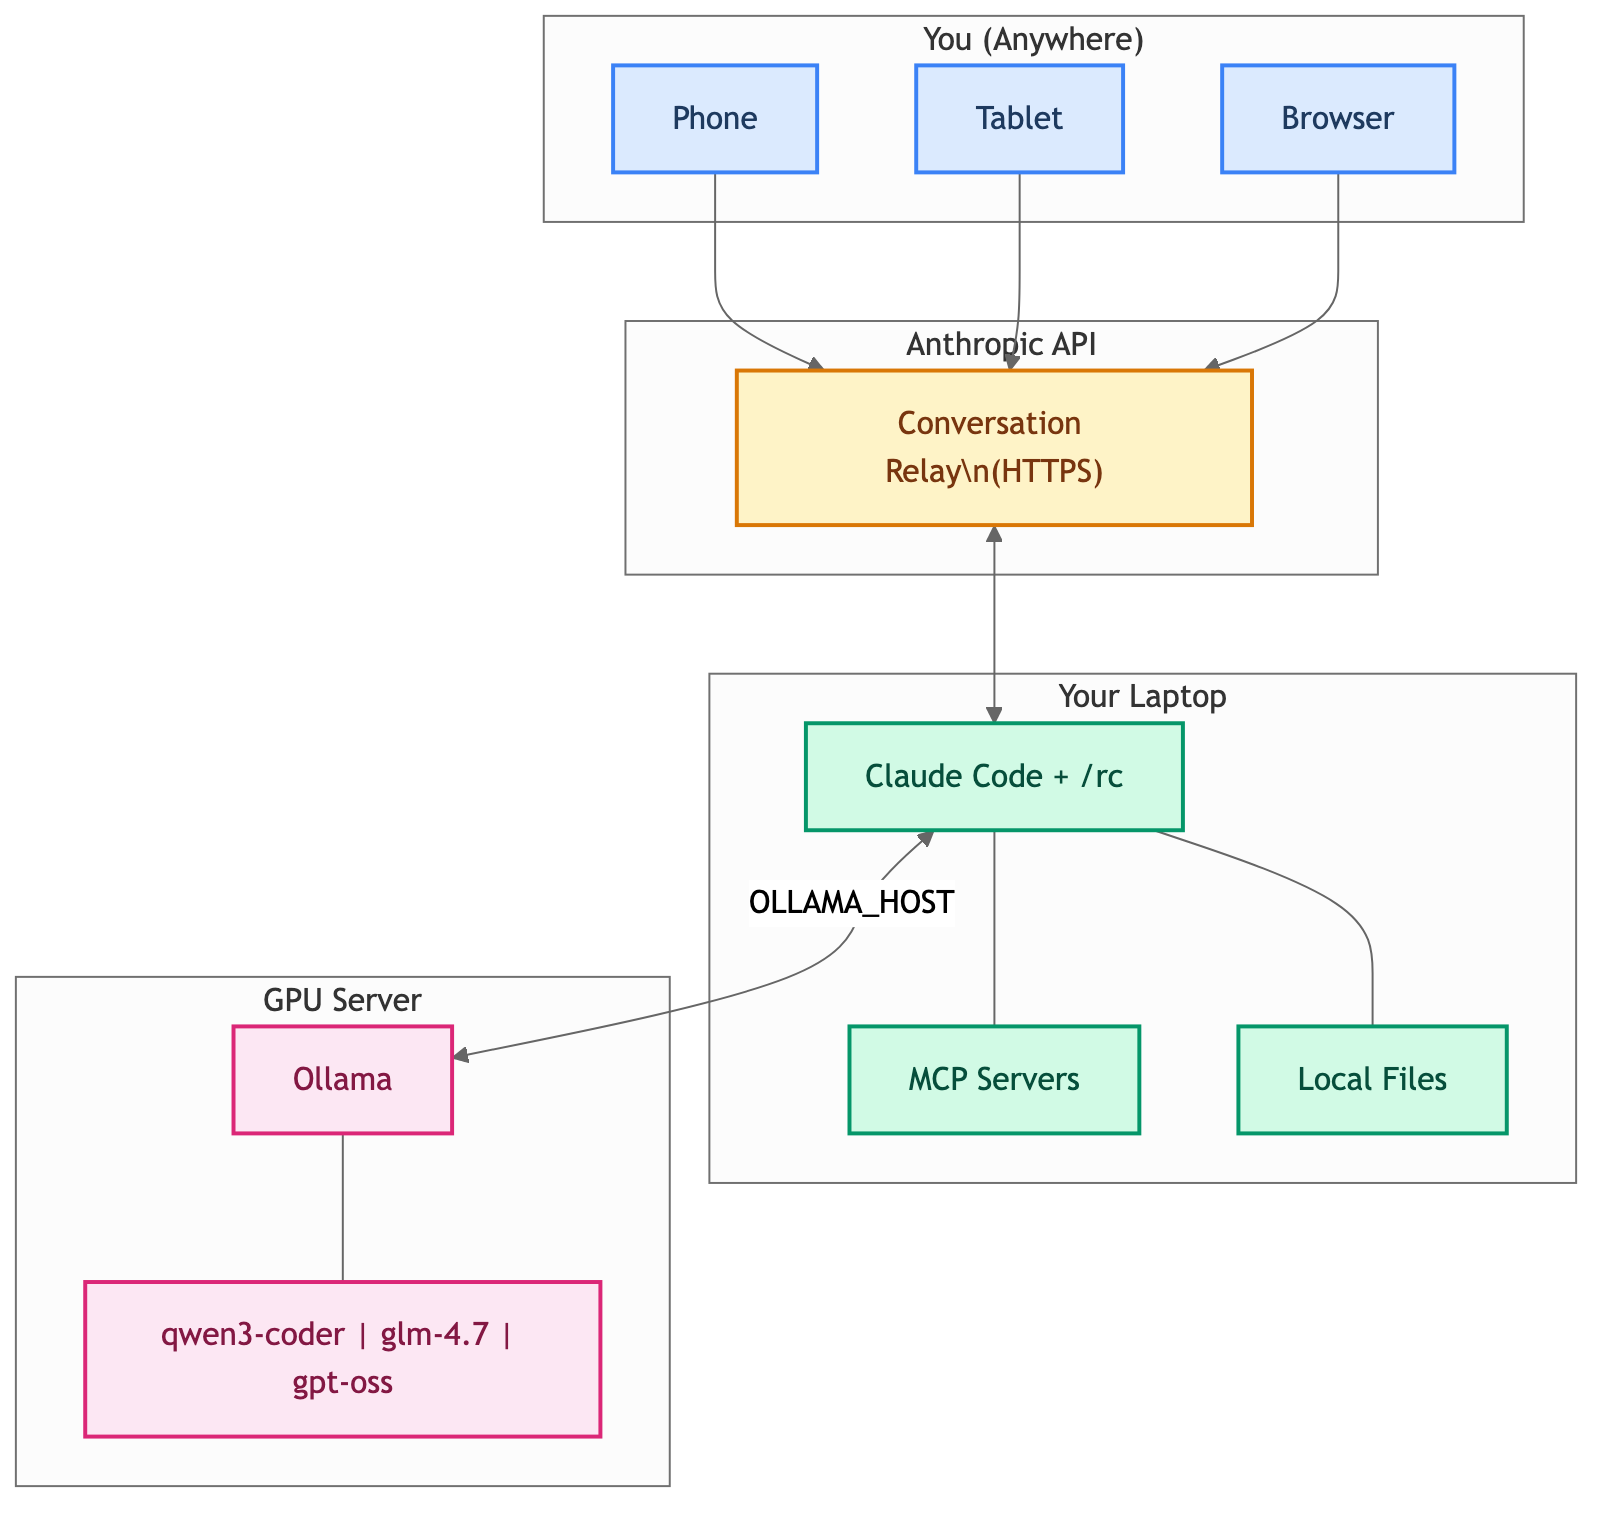
<h2 id="how-it-all-connects">How It All Connects</h2>

<p><img src="/assets/images/rc-ollama-architecture.png" alt="Remote Control + Ollama Architecture" style="display:block; margin-left:auto; margin-right:auto; width:100%; max-width:1200px;" /></p>

<h2 id="the-use-case-remote-ollama--remote-control">The Use Case: Remote Ollama + Remote Control</h2>

<p>Here is the scenario. You have a GPU server (maybe a workstation with an NVIDIA card, or a cloud instance) running Ollama. You want to:</p>

<ol>
  <li>Run Claude Code on your laptop, pointed at the remote Ollama instance</li>
  <li>Start a Remote Control session so you can monitor and interact from your phone or tablet</li>
  <li>Walk away from your desk while the session keeps running</li>
</ol>

<p>This gives you powerful self-hosted models doing the actual inference, with the convenience of controlling the session from anywhere in your house (or beyond).</p>

<h2 id="quick-setup">Quick Setup</h2>

<h3 id="step-1-ollama-on-your-gpu-server">Step 1: Ollama on Your GPU Server</h3>

<p>Make sure Ollama is running and accessible on your network. On the GPU server:</p>

<div class="language-bash highlighter-rouge"><div class="highlight"><pre class="highlight"><code><span class="c"># Install Ollama if you haven't</span>
curl <span class="nt">-fsSL</span> https://ollama.com/install.sh | sh

<span class="c"># Pull a model with a large context window</span>
ollama pull qwen3-coder

<span class="c"># Start Ollama listening on all interfaces</span>
<span class="nv">OLLAMA_HOST</span><span class="o">=</span>0.0.0.0 ollama serve
</code></pre></div></div>

<h3 id="step-2-point-claude-code-at-remote-ollama">Step 2: Point Claude Code at Remote Ollama</h3>

<p>On your laptop, point to the remote Ollama instance and launch Claude Code. There are two ways to do this:</p>

<p><strong>Option A: Using <code class="language-plaintext highlighter-rouge">ollama launch claude</code> (recommended)</strong></p>

<p>The simplest approach – Ollama handles all the wiring for you:</p>

<div class="language-bash highlighter-rouge"><div class="highlight"><pre class="highlight"><code><span class="nb">export </span><span class="nv">OLLAMA_HOST</span><span class="o">=</span>http://&lt;gpu-server-ip&gt;:11434
ollama launch claude <span class="nt">--model</span> qwen3-coder
</code></pre></div></div>

<p><strong>Option B: Manual environment variables</strong></p>

<p>If you prefer full control over the configuration:</p>

<div class="language-bash highlighter-rouge"><div class="highlight"><pre class="highlight"><code><span class="nb">export </span><span class="nv">ANTHROPIC_AUTH_TOKEN</span><span class="o">=</span>ollama
<span class="nb">export </span><span class="nv">ANTHROPIC_API_KEY</span><span class="o">=</span><span class="s2">""</span>
<span class="nb">export </span><span class="nv">ANTHROPIC_BASE_URL</span><span class="o">=</span>http://&lt;gpu-server-ip&gt;:11434
claude <span class="nt">--model</span> qwen3-coder
</code></pre></div></div>

<p>Replace <code class="language-plaintext highlighter-rouge">&lt;gpu-server-ip&gt;</code> with the actual IP or hostname of your GPU server. Models that work well with this setup include <code class="language-plaintext highlighter-rouge">qwen3-coder</code>, <code class="language-plaintext highlighter-rouge">glm-4.7</code>, and others with 64K+ token context windows.</p>

<h3 id="step-3-start-remote-control">Step 3: Start Remote Control</h3>

<p>Once Claude Code is running and connected to Ollama, start a Remote Control session:</p>

<div class="language-plaintext highlighter-rouge"><div class="highlight"><pre class="highlight"><code>/rc
</code></pre></div></div>

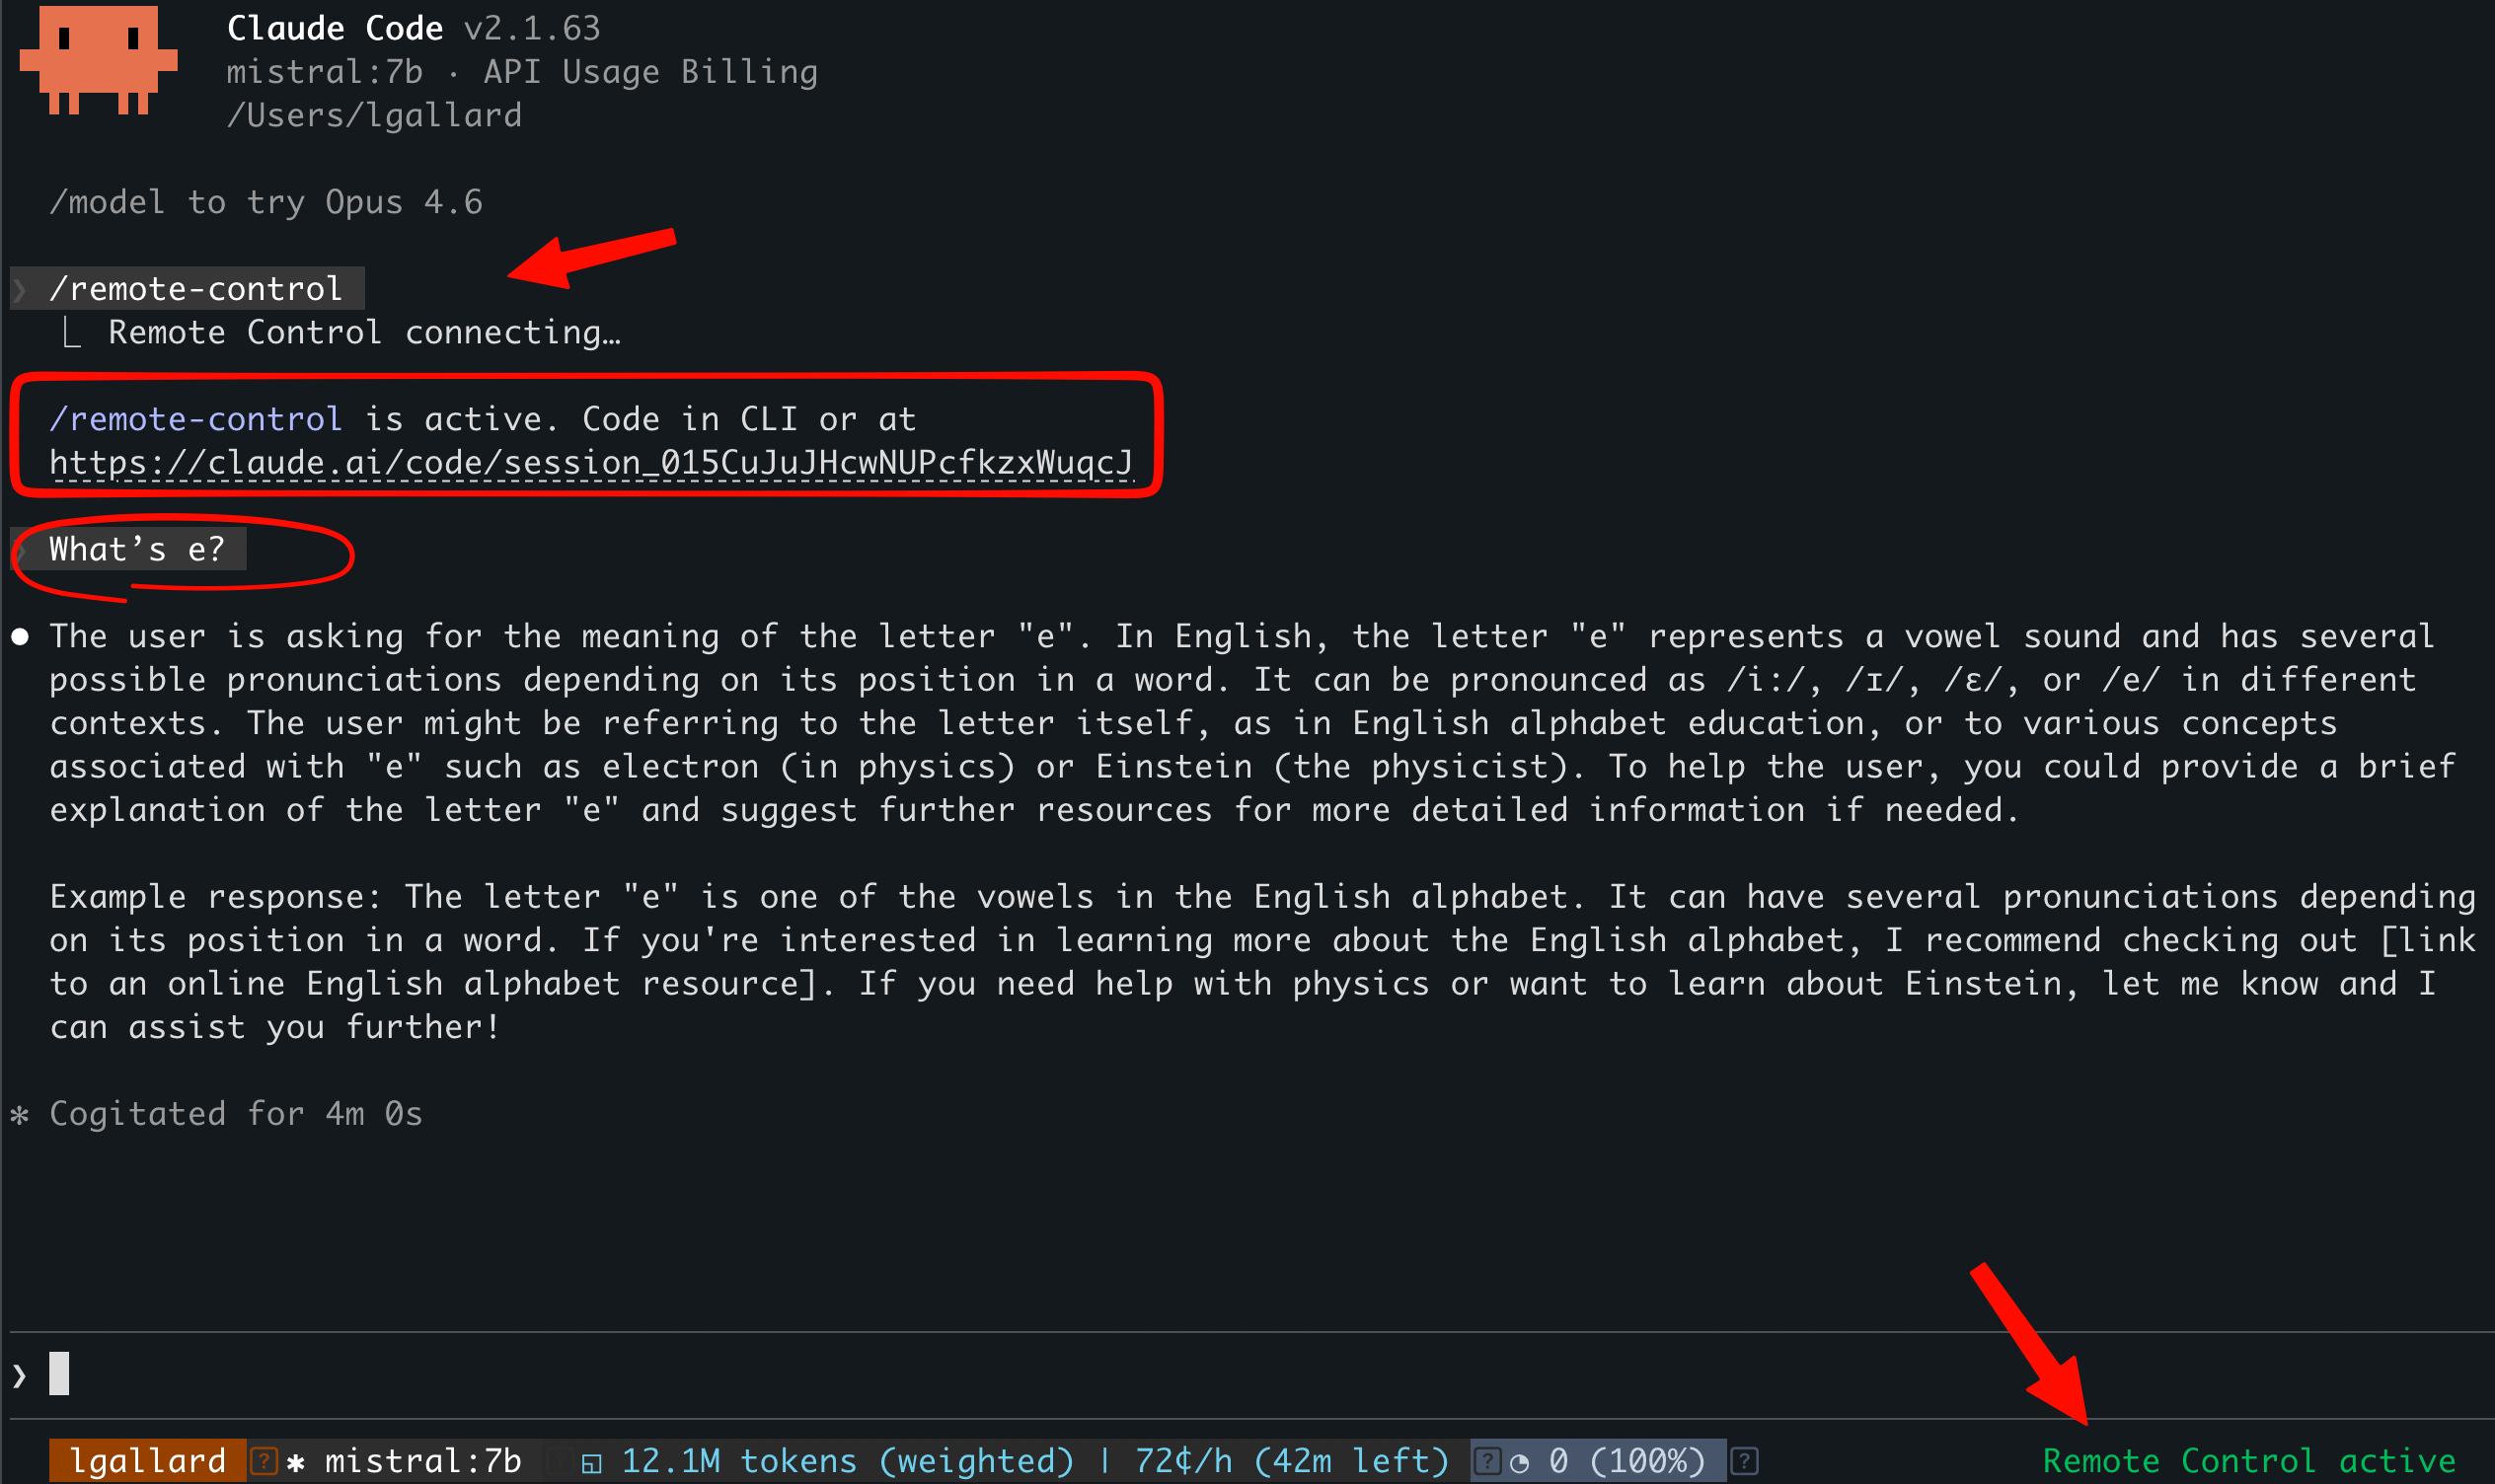
<p>You will see a session URL and a QR code. Scan the QR code with the Claude mobile app on your phone, or open the URL in any browser. You are now controlling your local Claude Code session – backed by your GPU server’s Ollama instance – from another device.</p>

<p>Here is what it looks like in practice, using <code class="language-plaintext highlighter-rouge">mistral:7b</code> as the model. Notice the session URL and the “Remote Control active” indicator in the status bar:</p>

<p><img src="/assets/images/claude-code-remote-inference.png" alt="Remote Control active with Ollama inference" style="display:block; margin-left:auto; margin-right:auto; width:100%; max-width:1200px;" /></p>

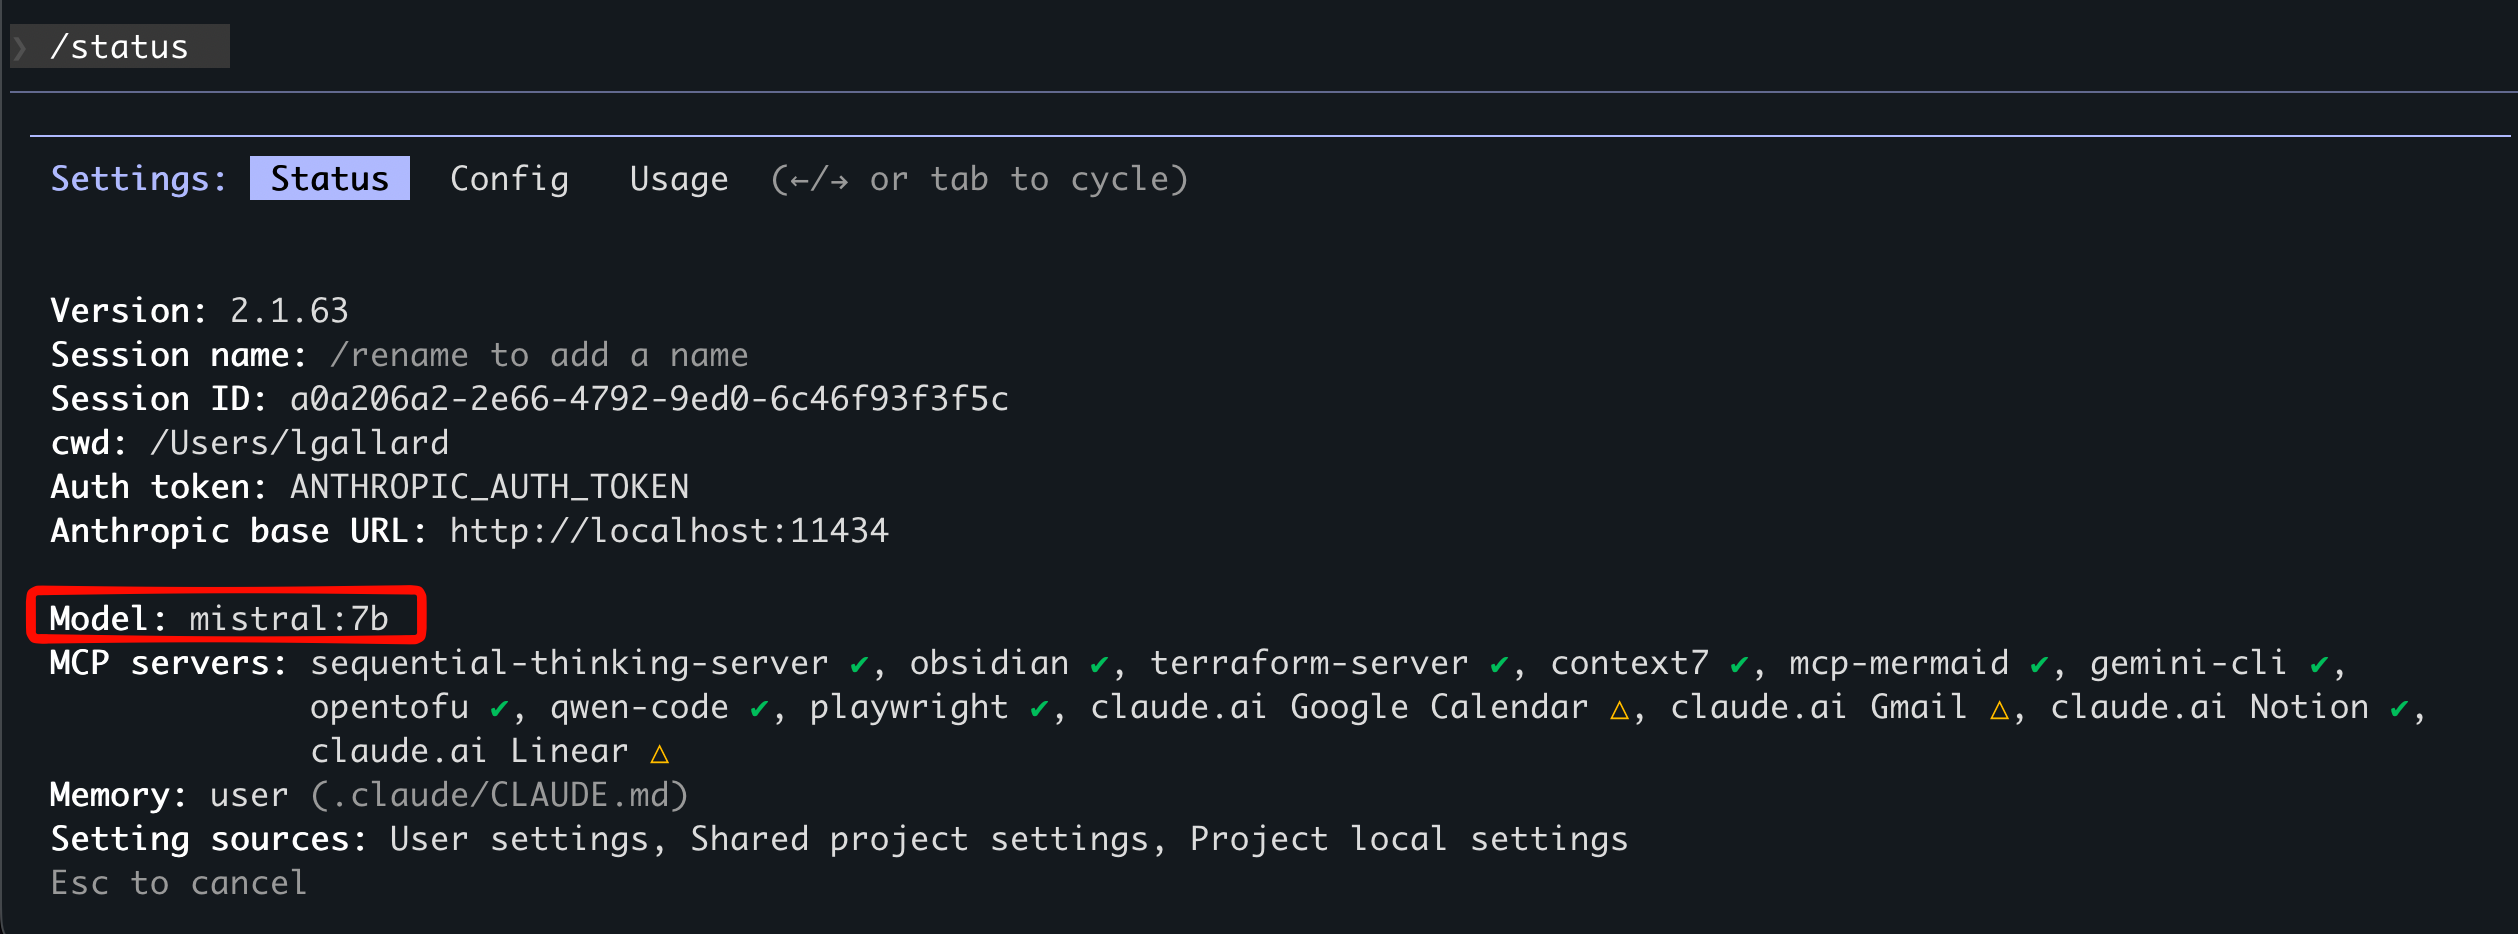
<p>You can verify the connection by running <code class="language-plaintext highlighter-rouge">/status</code> – it shows the model, the Anthropic base URL pointing to your Ollama instance, and all your MCP servers still running:</p>

<p><img src="/assets/images/claude-code-remote-status.png" alt="Claude Code status showing Ollama configuration" style="display:block; margin-left:auto; margin-right:auto; width:100%; max-width:1200px;" /></p>

<p>And here is the same session on my phone – the exact same question and response, synced in real time through the Claude mobile app:</p>

<p><img src="/assets/images/claude-code-remote-phone.PNG" alt="Remote Control session on phone" style="display:block; margin-left:auto; margin-right:auto; width:50%; max-width:400px;" /></p>

<h3 id="step-4-walk-away">Step 4: Walk Away</h3>

<p>Your terminal needs to stay open, but you do not need to be sitting in front of it. Send prompts from your phone, review results, and keep working. The session survives brief network hiccups and reconnects automatically.</p>

<h2 id="things-to-keep-in-mind">Things to Keep in Mind</h2>

<ul>
  <li>
    <p><strong>Terminal must stay open</strong>: If you close it, the session ends. Consider running inside <code class="language-plaintext highlighter-rouge">tmux</code> or <code class="language-plaintext highlighter-rouge">screen</code>. On macOS, you can also set up Claude Code hooks to run <code class="language-plaintext highlighter-rouge">caffeinate</code> automatically so your Mac will not sleep mid-session. Add this to your <code class="language-plaintext highlighter-rouge">~/.claude/settings.json</code>:</p>

    <div class="language-json highlighter-rouge"><div class="highlight"><pre class="highlight"><code><span class="p">{</span><span class="w">
  </span><span class="nl">"hooks"</span><span class="p">:</span><span class="w"> </span><span class="p">{</span><span class="w">
    </span><span class="nl">"SessionStart"</span><span class="p">:</span><span class="w"> </span><span class="p">[{</span><span class="w">
      </span><span class="nl">"hooks"</span><span class="p">:</span><span class="w"> </span><span class="p">[{</span><span class="w">
        </span><span class="nl">"type"</span><span class="p">:</span><span class="w"> </span><span class="s2">"command"</span><span class="p">,</span><span class="w">
        </span><span class="nl">"command"</span><span class="p">:</span><span class="w"> </span><span class="s2">"caffeinate -dims &amp;"</span><span class="p">,</span><span class="w">
        </span><span class="nl">"timeout"</span><span class="p">:</span><span class="w"> </span><span class="mi">5</span><span class="w">
      </span><span class="p">}]</span><span class="w">
    </span><span class="p">}],</span><span class="w">
    </span><span class="nl">"SessionEnd"</span><span class="p">:</span><span class="w"> </span><span class="p">[{</span><span class="w">
      </span><span class="nl">"hooks"</span><span class="p">:</span><span class="w"> </span><span class="p">[{</span><span class="w">
        </span><span class="nl">"type"</span><span class="p">:</span><span class="w"> </span><span class="s2">"command"</span><span class="p">,</span><span class="w">
        </span><span class="nl">"command"</span><span class="p">:</span><span class="w"> </span><span class="s2">"pkill -f 'caffeinate -dims'"</span><span class="p">,</span><span class="w">
        </span><span class="nl">"timeout"</span><span class="p">:</span><span class="w"> </span><span class="mi">5</span><span class="w">
      </span><span class="p">}]</span><span class="w">
    </span><span class="p">}]</span><span class="w">
  </span><span class="p">}</span><span class="w">
</span><span class="p">}</span><span class="w">
</span></code></pre></div>    </div>
  </li>
  <li><strong>One remote session at a time</strong>: Each Claude Code instance supports a single remote connection.</li>
  <li><strong>Network timeout</strong>: If your machine loses connectivity for roughly 10 minutes, the session times out.</li>
  <li><strong>Ollama network security</strong>: Exposing Ollama on <code class="language-plaintext highlighter-rouge">0.0.0.0</code> opens it to your network. Use firewall rules or a VPN if you are outside a trusted LAN.</li>
  <li><strong>Model limitations</strong>: Open-source models via Ollama may not support all Claude Code tool/function calling features. They work well for code generation, explanation, and review, but complex multi-tool operations may not behave as expected.</li>
</ul>

<h2 id="wrapping-up">Wrapping Up</h2>

<p>Remote Control + Ollama is a straightforward way to get the best of both worlds: powerful self-hosted GPU inference with the flexibility of controlling your session from any device. No API costs, no cloud dependency for inference, and your code stays on your machines.</p>

<p>If you already have a GPU server running Ollama, adding Remote Control on top takes about two minutes. Give it a try.</p>

<hr />

<h2 id="references">References</h2>

<ul>
  <li><a href="https://code.claude.com/docs/en/remote-control">Claude Code Remote Control Documentation</a></li>
  <li><a href="https://code.claude.com/docs/en/model-config">Claude Code Model Configuration</a></li>
  <li><a href="https://code.claude.com/docs/en/llm-gateway">Claude Code LLM Gateway Configuration</a></li>
  <li><a href="https://ollama.com">Ollama</a></li>
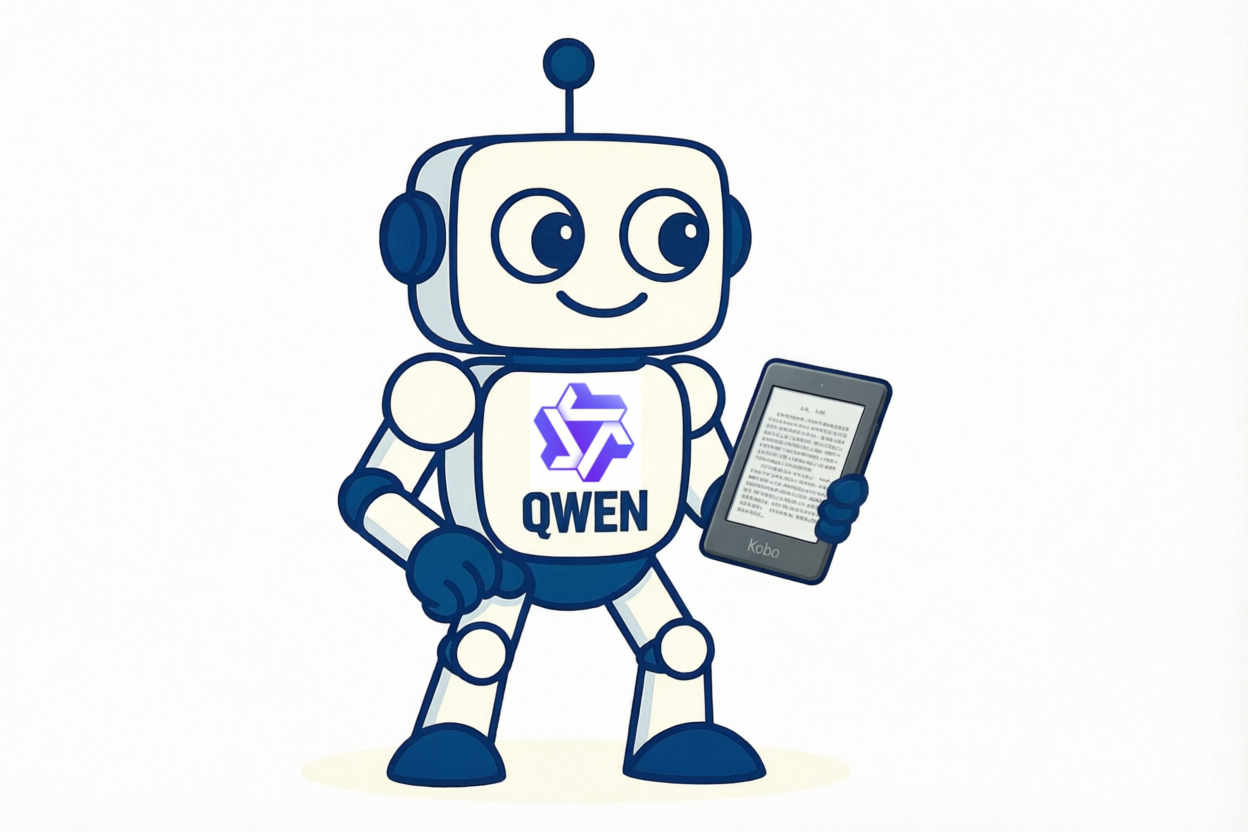
</ul>]]></content><author><name>Luis Gallardo</name></author><category term="Blog" /><category term="DevOps" /><category term="Claude Code" /><category term="Remote Control" /><category term="Ollama" /><category term="AI Tools" /><category term="LLM" /><category term="Self-hosted" /><category term="GPU" /><summary type="html"><![CDATA[How to use Claude Code Remote Control with Ollama running on a remote GPU server. Control local AI coding sessions from your phone or browser while leveraging powerful self-hosted models.]]></summary></entry><entry><title type="html">AI Flashcards While You Read: Building a KOReader Plugin for Anki</title><link href="https://lgallardo.com/2026/02/25/koreader-anki-flashcard-plugin/" rel="alternate" type="text/html" title="AI Flashcards While You Read: Building a KOReader Plugin for Anki" /><published>2026-02-25T00:00:00+00:00</published><updated>2026-02-25T00:00:00+00:00</updated><id>https://lgallardo.com/2026/02/25/koreader-anki-flashcard-plugin</id><content type="html" xml:base="https://lgallardo.com/2026/02/25/koreader-anki-flashcard-plugin/"><![CDATA[<p><a href="/assets/images/KOreader-Qwen-robot.png" style="display:block; margin-left:auto; margin-right:auto; width:60%"><img src="/assets/images/KOreader-Qwen-robot.png" alt="Qwen AI robot holding a Kobo e-reader" /></a></p>

<p>After building my <a href="https://lgallardo.com/2026/01/30/anki-card-generator-vibecoding-ai-flashcards/">Anki Vocabulary Card Generator</a>, the natural next step was: what if I could do the same thing directly on my Kobo while I’m reading?</p>

<h2 id="the-idea">The Idea</h2>

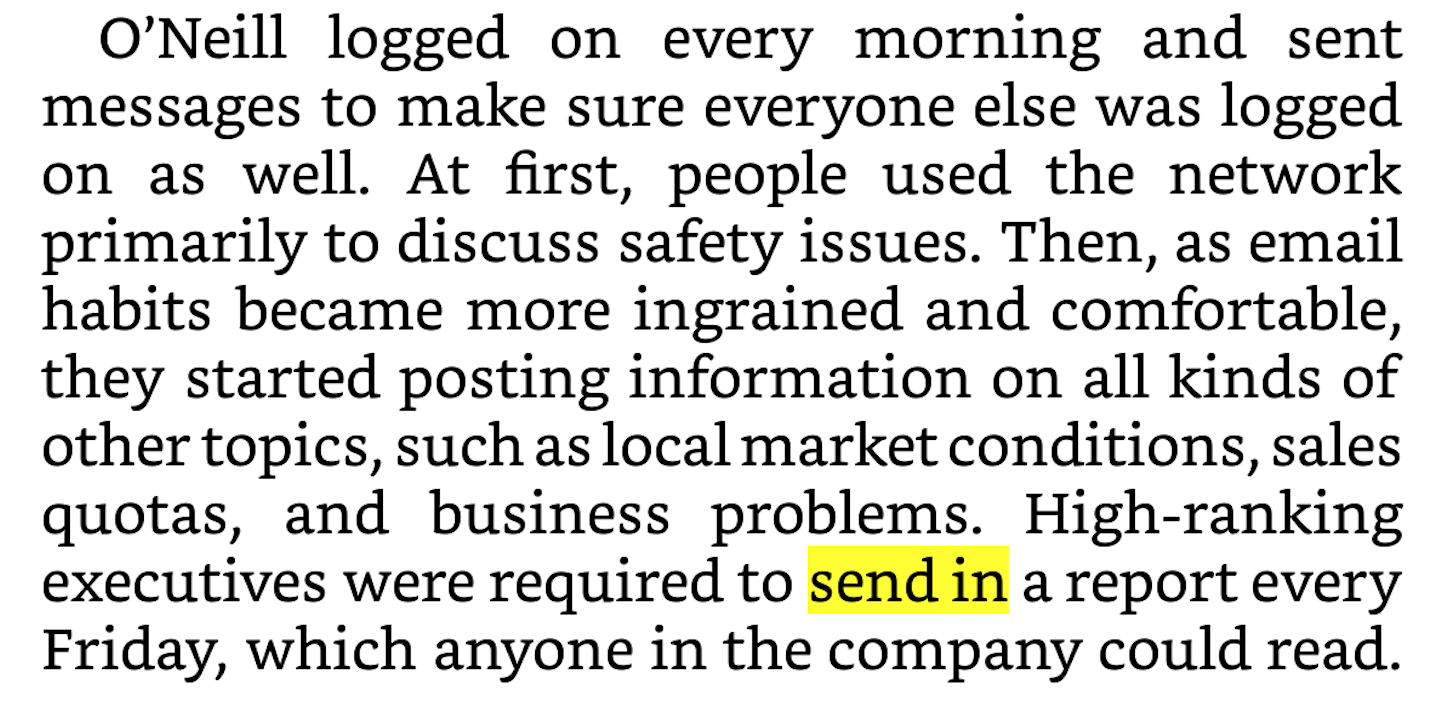
<p>When I read in English, I highlight phrases I don’t know—especially phrasal verbs and idioms. The Kobo’s built-in dictionary is decent for single words, but it falls short for:</p>

<ul>
  <li><strong>Phrasal verbs</strong> — <em>send in</em>, <em>crank up</em>, <em>call off</em></li>
  <li><strong>Idioms</strong> — context-dependent meaning that dictionaries often miss</li>
  <li><strong>The actual sentence context</strong> — the reason the phrase matters to me</li>
</ul>

<p>I wanted the same AI card generation I had on the desktop, but triggered directly from the highlight menu on the device.</p>

<p><a href="/assets/images/KOreader-Anki-Phrase.png" style="display:block; margin-left:auto; margin-right:auto; width:80%"><img src="/assets/images/KOreader-Anki-Phrase.png" alt="Highlighting &quot;send in&quot; on a Kobo e-reader" /></a>
<em class="text-center">Extract from “The Power of Habit” by Charles Duhigg</em></p>

<h2 id="what-already-existed">What Already Existed</h2>

<p>Before writing a single line of code, I looked at what was out there:</p>

<ol>
  <li>
    <p><strong><a href="https://github.com/SahandMalaei/ai-dictionary-koreader">ai-dictionary-koreader</a></strong> — AI-powered dictionary plugin with multiple LLM support. Great concept, but it only gives you a dictionary lookup, not an Anki card. Qwen and Claude didn’t work for me even via OpenRouter.</p>
  </li>
  <li>
    <p><strong><a href="https://github.com/Ajatt-Tools/anki.koplugin">anki.koplugin</a></strong> — Sends cards to Anki, but generates them from the internal KOReader dictionary. No AI involved—so no context-aware definitions, no example sentences, no images.</p>
  </li>
</ol>

<p>Neither did exactly what I needed, so I built my own.</p>

<h2 id="the-plugin">The Plugin</h2>

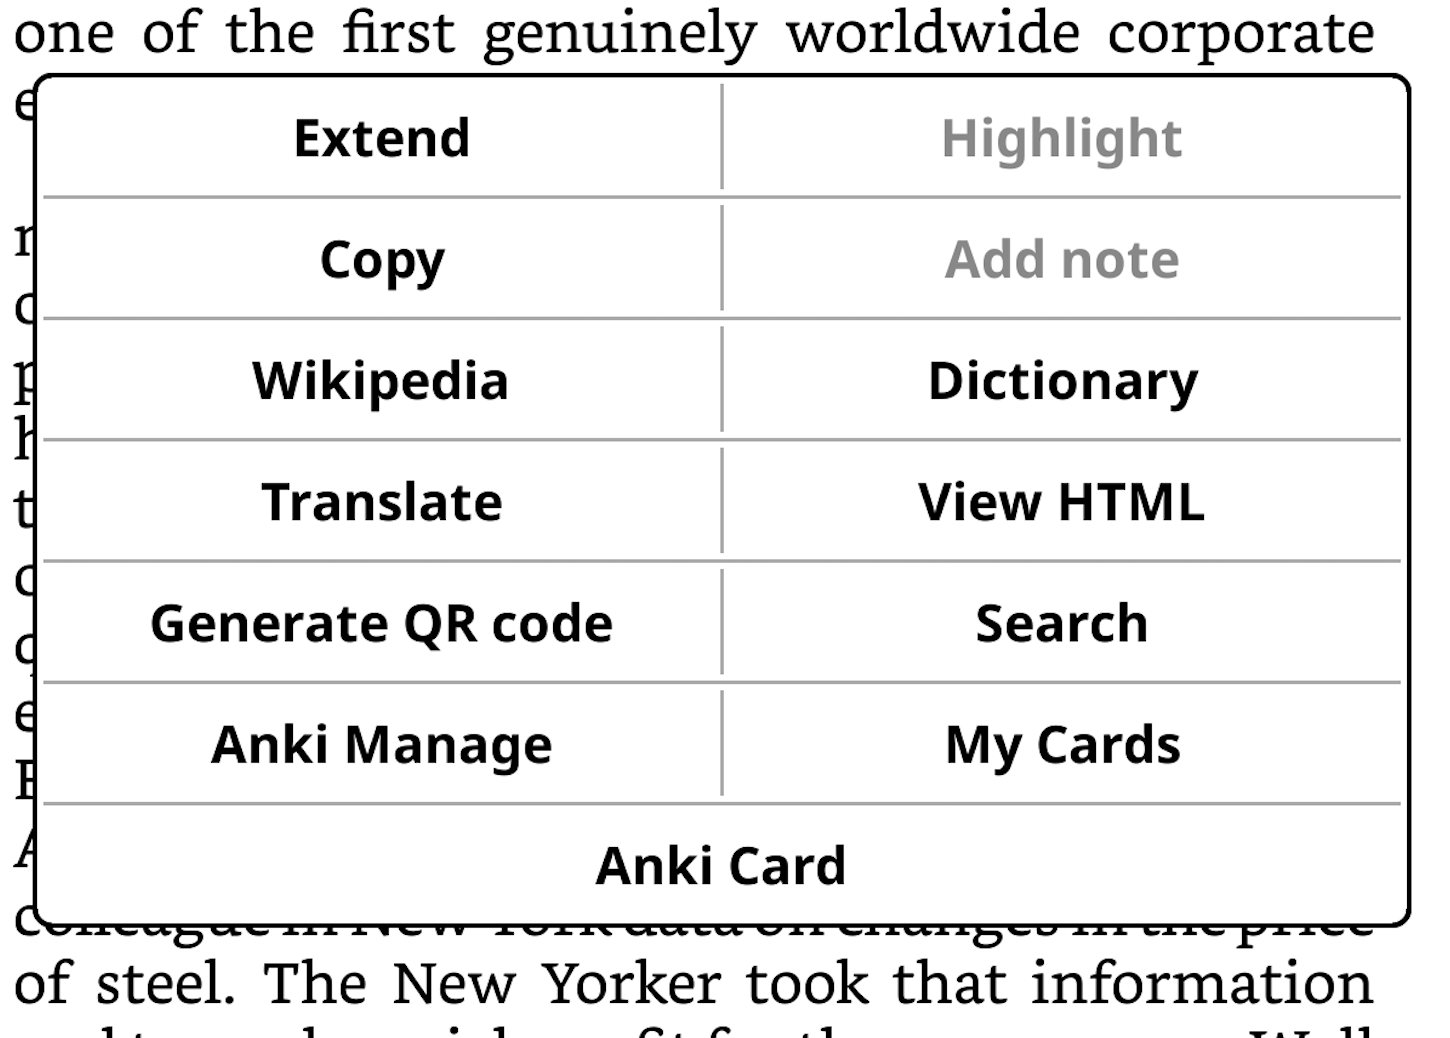
<p>The <strong>AnkiFlashcards</strong> KOReader plugin adds three entries to the highlight dialog:</p>

<p><a href="/assets/images/KOreader-Anki-Menu.png" style="display:block; margin-left:auto; margin-right:auto; width:80%"><img src="/assets/images/KOreader-Anki-Menu.png" alt="KOReader highlight dialog with Anki Card, Anki Manage, and My Cards options" /></a></p>

<ul>
  <li><strong>Anki Card</strong> — the main action: generates a full flashcard for the highlighted phrase via AI</li>
  <li><strong>My Cards</strong> — browse and manage saved cards, filter by book</li>
  <li><strong>Anki Manage</strong> — settings, bulk send, stats, and batch import from highlights</li>
</ul>

<p>Tap <strong>Anki Card</strong>, wait a few seconds, and the card appears:</p>

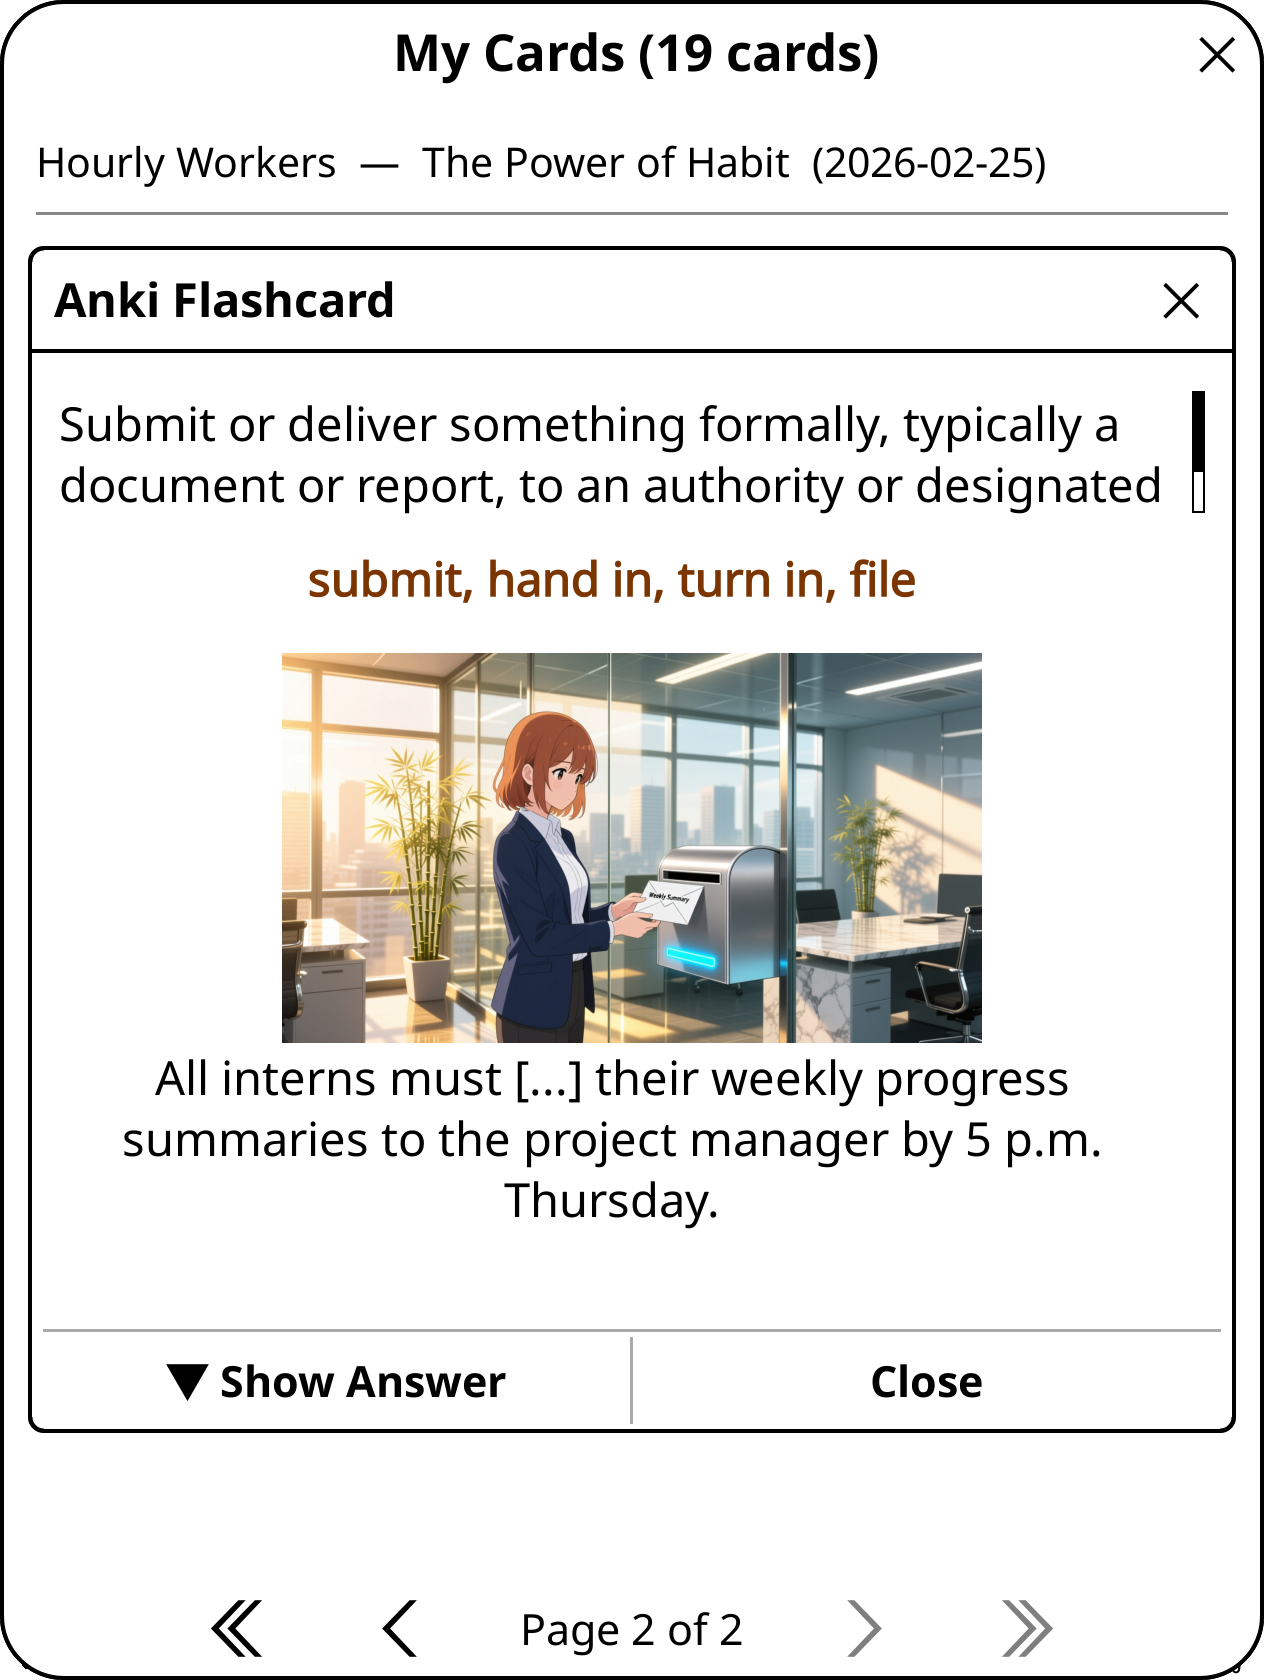
<p><a href="/assets/images/KOreader-Anki-Front.png" style="display:block; margin-left:auto; margin-right:auto; width:80%"><img src="/assets/images/KOreader-Anki-Front.png" alt="Front of the flashcard (question side)" /></a></p>

<p>The front shows the definition and a cloze sentence—the phrase is hidden. Tap <strong>Show Answer</strong> to reveal the full card:</p>

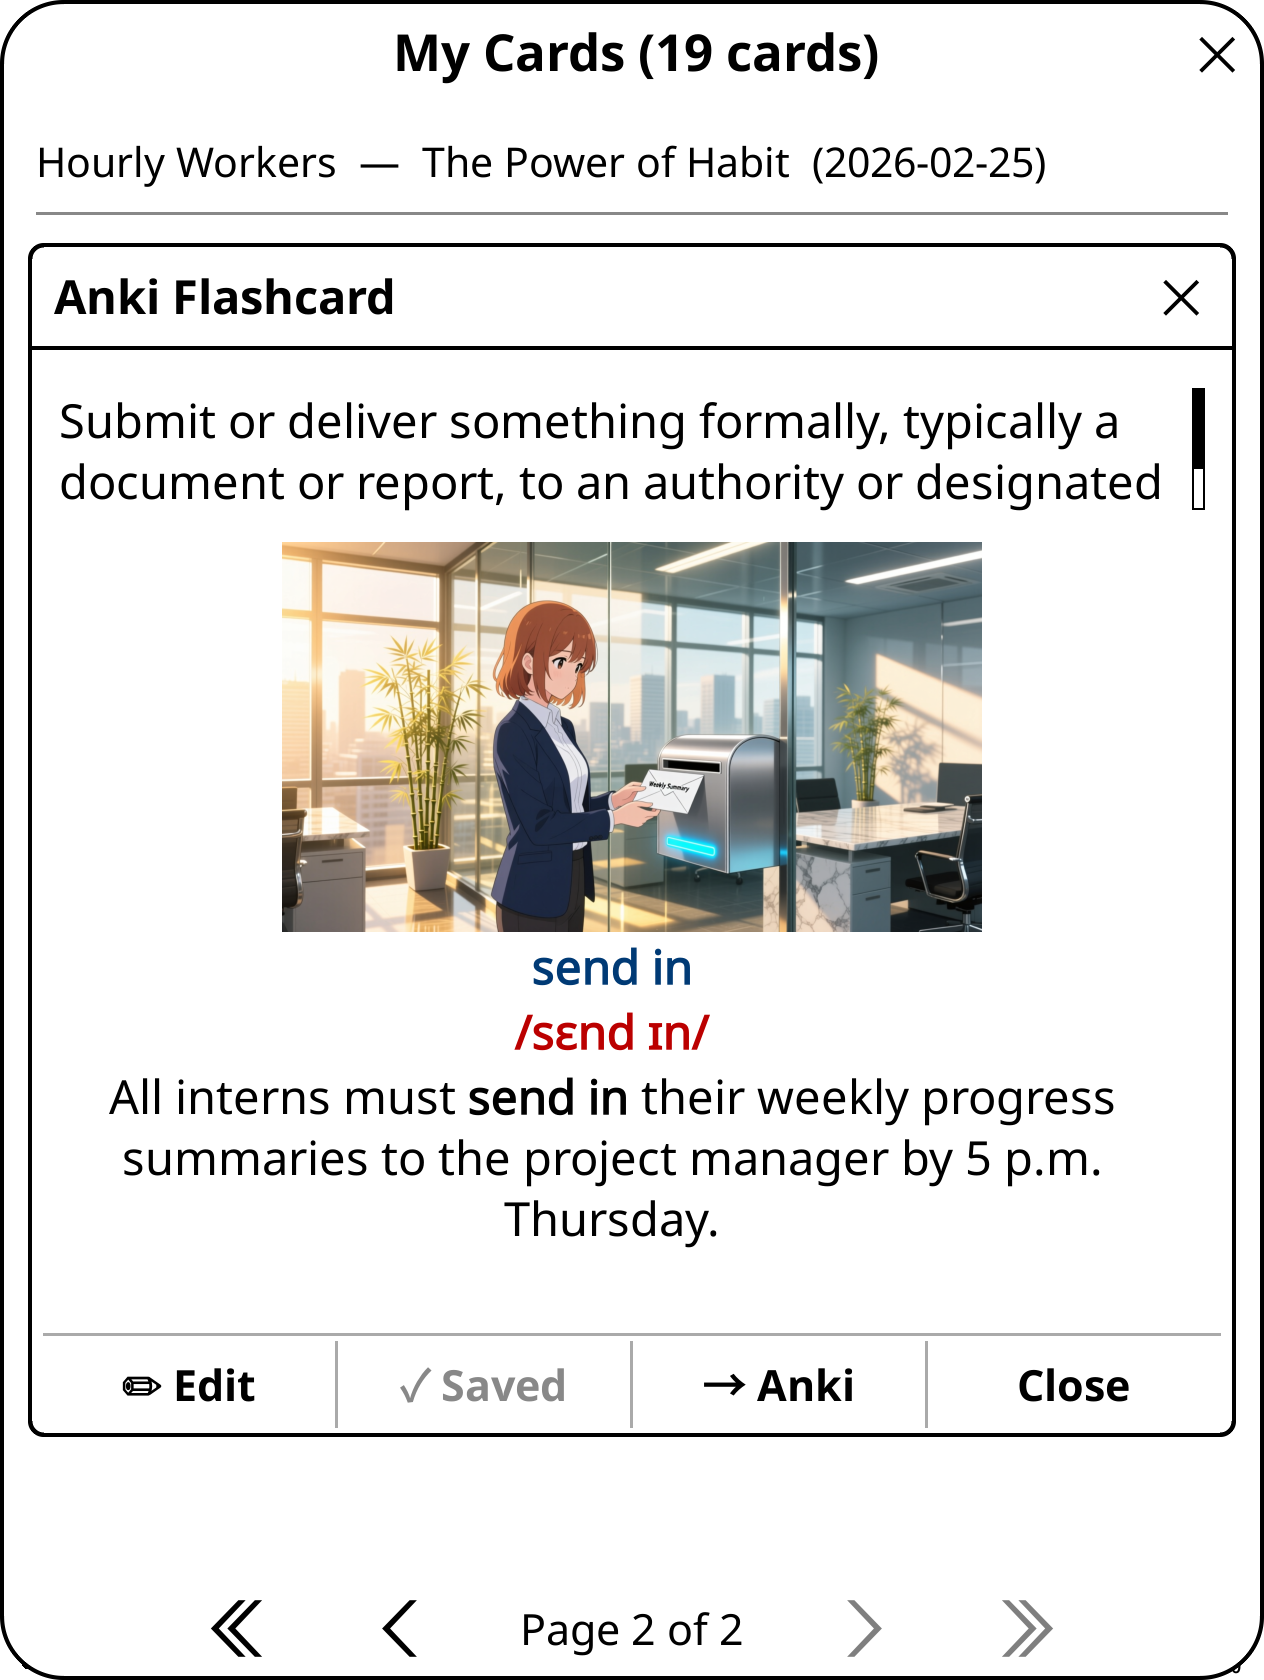
<p><a href="/assets/images/KOreader-Anki-Back.png" style="display:block; margin-left:auto; margin-right:auto; width:80%"><img src="/assets/images/KOreader-Anki-Back.png" alt="Back of the flashcard showing phrase, IPA, image, and cloze sentence" /></a></p>

<p>The back has the canonical phrase (normalized to base form), the American English IPA, an anime-style illustration generated from the example sentence, and the full cloze with the phrase revealed in bold.</p>

<p>Here’s the full flow in action:</p>

<video controls="" width="100%" style="display:block; margin: 1em auto;">
  <source src="/assets/images/koreader-anki-demo.webm" type="video/webm" />
  <source src="/assets/images/koreader-anki-demo.mp4" type="video/mp4" />
</video>

<h2 id="how-it-works">How It Works</h2>

<p>The plugin is a reduced version of my desktop card generator. It uses <strong>Qwen</strong> (via DashScope) for everything:</p>

<ul>
  <li>Normalizes the phrase to its canonical form (<em>sent in</em> → <em>send in</em>)</li>
  <li>Generates a context-aware definition (up to 20 words)</li>
  <li>Produces 3–4 synonyms</li>
  <li>Writes a cloze example sentence using the phrase in its original form</li>
  <li>Creates an image prompt for an anime-style 16:9 scene</li>
  <li>Generates the IPA automatically</li>
</ul>

<p>Images are generated asynchronously in the background using a separate image API call, so the card appears immediately while the image loads in.</p>

<h2 id="why-this-is-better-than-the-dictionary">Why This is Better Than the Dictionary</h2>

<p>The built-in dictionary on a Kobo will give you a definition for <em>send</em>. It won’t tell you what <em>send in</em> means in the context of a corporate email culture in 1987. The AI card does—because it sees the sentence around the highlight and generates a definition grounded in that context.</p>

<p>Cards are saved locally on the device, and can be:</p>

<ul>
  <li><strong>Sent to Anki</strong> directly via <a href="https://ankiweb.net/shared/info/2055492159">AnkiConnect</a>—synced to all your devices automatically</li>
  <li><strong>Edited</strong> on the device (phrase, definition, synonyms, cloze)</li>
  <li><strong>Imported in bulk</strong> from all highlights in a book at once</li>
</ul>

<p>The template it uses is the same one from my desktop app, so cards land in Anki looking exactly the same—or can be refined there if needed.</p>

<h2 id="final-thoughts">Final Thoughts</h2>

<p>Reading and vocabulary learning have always been separate workflows for me. I’d finish a chapter with a list of highlighted phrases and then spend time later converting them into cards—breaking the flow twice, once while reading and once at the desk.</p>

<p>This plugin closes that loop. The card is generated the moment I encounter the phrase, while the context is still fresh. By the time I sit down to review in Anki, the card is already there, with a definition that actually reflects why I highlighted it in the first place.</p>

<p>It’s a small thing, but it’s made a real difference in how I read and how much vocabulary actually sticks.</p>

<p>The plugin is open source and available on GitHub: <a href="https://github.com/lgallard/anki-flashcards-koreader">github.com/lgallard/anki-flashcards-koreader</a></p>]]></content><author><name>Luis Gallardo</name></author><category term="Blog" /><category term="AI" /><category term="Anki" /><category term="Flashcards" /><category term="KOReader" /><category term="Kobo" /><category term="AI Tools" /><category term="Language Learning" /><category term="Qwen" /><category term="Spaced Repetition" /><summary type="html"><![CDATA[How I built a KOReader plugin that generates AI-powered Anki flashcards from highlighted text on a Kobo e-reader, using Qwen to generate definitions, IPA, synonyms, example sentences, and anime-style images.]]></summary></entry><entry><title type="html">AI-Powered Code Reviews in Claude Code: A Complete CodeRabbit Integration Guide</title><link href="https://lgallardo.com/2026/02/10/coderabbit-claude-code-integration/" rel="alternate" type="text/html" title="AI-Powered Code Reviews in Claude Code: A Complete CodeRabbit Integration Guide" /><published>2026-02-10T14:30:00+00:00</published><updated>2026-02-10T14:30:00+00:00</updated><id>https://lgallardo.com/2026/02/10/coderabbit-claude-code-integration</id><content type="html" xml:base="https://lgallardo.com/2026/02/10/coderabbit-claude-code-integration/"><![CDATA[<!-- IMAGE: Claude + CodeRabitAi -->
<p><a href="/assets/images/coderabbit-claude-integration.png" style="display:block; margin-left:auto; margin-right:auto; width:100%"><img src="/assets/images/coderabbit-claude-integration.png" alt="Claude + CodeRabitAi" /></a></p>

<p>Ever wished your AI coding assistant could self-review its own code before you even look at it? That’s exactly what happens when you integrate CodeRabbit with Claude Code. The result? Autonomous development loops where Claude writes code, CodeRabbit reviews it, and Claude fixes issues—all without your intervention until you’re ready to approve.</p>

<h2 id="-the-problem-ai-code-needs-ai-review">🎯 The Problem: AI Code Needs AI Review</h2>

<p>When using AI coding assistants like Claude Code, you’re incredibly productive. But there’s a catch: the AI doesn’t know what it doesn’t know. It might:</p>

<ul>
  <li>Introduce subtle security vulnerabilities</li>
  <li>Miss edge cases in error handling</li>
  <li>Create race conditions in concurrent code</li>
  <li>Overlook performance bottlenecks</li>
  <li>Violate your team’s coding standards</li>
</ul>

<p>You could manually review everything, but that defeats the purpose of AI-assisted development. What you need is a <strong>second AI opinion</strong>—one specialized in code review.</p>

<h2 id="-the-solution-coderabbit--claude-code">💡 The Solution: CodeRabbit + Claude Code</h2>

<p>CodeRabbit brings industrial-grade code review into Claude Code. While Claude excels at understanding your intent and writing code, CodeRabbit specializes in catching bugs, security issues, and code quality problems using:</p>

<ul>
  <li>40+ integrated static analyzers</li>
  <li>Specialized AI architecture for code review</li>
  <li>Security vulnerability detection (OWASP patterns)</li>
  <li>Performance analysis and optimization suggestions</li>
  <li>Coding standards enforcement</li>
</ul>

<p><strong>The magic:</strong> Claude can now trigger its own code reviews mid-development, creating autonomous quality gates.</p>

<h2 id="️-installation-guide">🛠️ Installation Guide</h2>

<h3 id="prerequisites-check">Prerequisites Check</h3>

<p>Before starting, verify:</p>

<div class="language-bash highlighter-rouge"><div class="highlight"><pre class="highlight"><code><span class="c"># Claude Code should be working</span>
claude <span class="nt">--version</span>

<span class="c"># You need a git repository</span>
git status

<span class="c"># macOS/Linux works out of the box (Windows requires WSL)</span>
<span class="nb">uname</span> <span class="nt">-s</span>
</code></pre></div></div>

<h3 id="step-1-install-coderabbit-cli">Step 1: Install CodeRabbit CLI</h3>

<p>The CLI is the bridge between Claude Code and CodeRabbit’s review service:</p>

<div class="language-bash highlighter-rouge"><div class="highlight"><pre class="highlight"><code><span class="c"># Install via official script</span>
curl <span class="nt">-fsSL</span> https://cli.coderabbit.ai/install.sh | sh

<span class="c"># Verify installation</span>
coderabbit <span class="nt">--version</span>
<span class="c"># Output: 0.3.5 (or newer)</span>
</code></pre></div></div>

<p>The installer places the binary in <code class="language-plaintext highlighter-rouge">~/.local/bin/coderabbit</code> and updates your shell PATH automatically.</p>

<h3 id="step-2-authenticate-with-coderabbit">Step 2: Authenticate with CodeRabbit</h3>

<p>CodeRabbit uses GitHub OAuth for authentication:</p>

<div class="language-bash highlighter-rouge"><div class="highlight"><pre class="highlight"><code><span class="c"># Start the auth flow</span>
coderabbit auth login
</code></pre></div></div>

<p>This opens your browser for GitHub authentication. After authorizing:</p>

<ol>
  <li>Copy the generated token from your browser</li>
  <li>Paste it back in the terminal prompt</li>
  <li>Verify authentication:</li>
</ol>

<div class="language-bash highlighter-rouge"><div class="highlight"><pre class="highlight"><code>coderabbit auth status
</code></pre></div></div>

<p>You should see output like:</p>

<div class="language-plaintext highlighter-rouge"><div class="highlight"><pre class="highlight"><code>✅ Authentication: Logged in

User Information:
 👤 Name: Your Name
 📧 Email: you@example.com
 🔧 Username: yourusername

Authentication Details:
 🔗 Provider: github
</code></pre></div></div>

<h3 id="step-3-update-plugin-marketplace">Step 3: Update Plugin Marketplace</h3>

<p><strong>This is the critical step most people miss.</strong> The CodeRabbit plugin won’t be found unless you update the marketplace cache first:</p>

<div class="language-bash highlighter-rouge"><div class="highlight"><pre class="highlight"><code><span class="c"># Update marketplace to see latest plugins</span>
claude plugin marketplace update
</code></pre></div></div>

<p>Without this, you’ll get a “Plugin not found” error. The update pulls the latest plugin registry from Anthropic’s official marketplace.</p>

<h3 id="step-4-install-the-claude-code-plugin">Step 4: Install the Claude Code Plugin</h3>

<p>Now the plugin installation will work:</p>

<div class="language-bash highlighter-rouge"><div class="highlight"><pre class="highlight"><code><span class="c"># From terminal</span>
claude plugin <span class="nb">install </span>coderabbit

<span class="c"># Or from within Claude Code</span>
/plugin <span class="nb">install </span>coderabbit
</code></pre></div></div>

<p>Verify installation:</p>

<div class="language-bash highlighter-rouge"><div class="highlight"><pre class="highlight"><code>claude plugin list
</code></pre></div></div>

<p>Expected output:</p>

<div class="language-plaintext highlighter-rouge"><div class="highlight"><pre class="highlight"><code>Installed plugins:

  ❯ coderabbit@claude-plugins-official
    Version: 1.0.0
    Scope: user
    Status: ✔ enabled
</code></pre></div></div>

<h2 id="-usage-patterns">🔧 Usage Patterns</h2>

<h3 id="slash-commands">Slash Commands</h3>

<p>CodeRabbit integrates seamlessly with Claude Code’s command system:</p>

<table>
  <thead>
    <tr>
      <th>Command</th>
      <th>Description</th>
      <th>Use Case</th>
    </tr>
  </thead>
  <tbody>
    <tr>
      <td><code class="language-plaintext highlighter-rouge">/coderabbit:review</code></td>
      <td>Review all changes</td>
      <td>Before commits, comprehensive check</td>
    </tr>
    <tr>
      <td><code class="language-plaintext highlighter-rouge">/coderabbit:review committed</code></td>
      <td>Only committed changes</td>
      <td>Pre-push validation</td>
    </tr>
    <tr>
      <td><code class="language-plaintext highlighter-rouge">/coderabbit:review uncommitted</code></td>
      <td>Only working directory</td>
      <td>During active development</td>
    </tr>
    <tr>
      <td><code class="language-plaintext highlighter-rouge">/coderabbit:review --base main</code></td>
      <td>Compare against branch</td>
      <td>PR preparation, feature branch review</td>
    </tr>
  </tbody>
</table>

<h3 id="natural-language-integration">Natural Language Integration</h3>

<p>The real power is conversational. Just ask Claude:</p>

<p><strong>Example 1: During Development</strong></p>
<div class="language-plaintext highlighter-rouge"><div class="highlight"><pre class="highlight"><code>User: "Review the authentication middleware I just wrote"
Claude: *runs /coderabbit:review uncommitted*
Claude: "CodeRabbit found 2 issues in your auth middleware:
1. Missing rate limiting on login endpoint (security)
2. JWT tokens don't have expiry validation (critical)

Let me fix these..."
</code></pre></div></div>

<p><strong>Example 2: Pre-Commit</strong></p>
<div class="language-plaintext highlighter-rouge"><div class="highlight"><pre class="highlight"><code>User: "Check my changes before I commit"
Claude: *runs /coderabbit:review uncommitted*
Claude: "Found 1 issue: hardcoded database connection string in config.py
Fixing it now by moving to environment variables..."
</code></pre></div></div>

<p><strong>Example 3: Security Focus</strong></p>
<div class="language-plaintext highlighter-rouge"><div class="highlight"><pre class="highlight"><code>User: "Are there any security issues in my API routes?"
Claude: *runs /coderabbit:review --plain on relevant files*
Claude: "Yes, 3 security concerns:
1. SQL injection vulnerability in search endpoint
2. Missing CORS headers on /api/upload
3. Unvalidated user input in file path construction

Let me address these..."
</code></pre></div></div>

<h3 id="direct-cli-usage">Direct CLI Usage</h3>

<p>For maximum control, use the CodeRabbit CLI directly:</p>

<div class="language-bash highlighter-rouge"><div class="highlight"><pre class="highlight"><code><span class="c"># Detailed analysis with fix suggestions</span>
coderabbit review <span class="nt">--plain</span>

<span class="c"># Token-efficient output (better for AI processing)</span>
coderabbit review <span class="nt">--prompt-only</span>

<span class="c"># Review specific changes</span>
coderabbit review <span class="nt">--base</span> main <span class="nt">--plain</span>

<span class="c"># Short alias works too</span>
cr <span class="nt">--plain</span>
</code></pre></div></div>

<p>The <code class="language-plaintext highlighter-rouge">--plain</code> flag provides structured output perfect for Claude to parse and act on.</p>

<h2 id="-autonomous-development-workflow">🔄 Autonomous Development Workflow</h2>

<p>Here’s the workflow I use daily:</p>

<div class="language-plaintext highlighter-rouge"><div class="highlight"><pre class="highlight"><code>1. User: "Add OAuth2 authentication to the API"

2. Claude: Writes initial implementation
   - Creates auth routes
   - Adds token validation middleware
   - Updates API endpoints

3. Claude: "Let me review this with CodeRabbit..."
   *runs /coderabbit:review uncommitted*

4. CodeRabbit: Returns findings
   - Missing token refresh logic
   - Insecure state parameter generation
   - No PKCE support for public clients

5. Claude: "Found 3 issues. Fixing them..."
   - Adds token refresh endpoint
   - Uses cryptographically secure random
   - Implements PKCE flow

6. Claude: "Running review again..."
   *runs /coderabbit:review uncommitted*

7. CodeRabbit: "All checks passed ✅"

8. User: Reviews final implementation and commits
</code></pre></div></div>

<p>This creates a <strong>test-driven development loop</strong>, but for code quality instead of unit tests.</p>

<h2 id="-pricing--plans">📊 Pricing &amp; Plans</h2>

<p>CodeRabbit operates on a freemium model:</p>

<table>
  <thead>
    <tr>
      <th>Plan</th>
      <th>Price</th>
      <th>Features</th>
      <th>Best For</th>
    </tr>
  </thead>
  <tbody>
    <tr>
      <td><strong>Free</strong></td>
      <td>$0/mo</td>
      <td>✅ Unlimited repos<br />✅ PR summarization<br />✅ IDE reviews<br />✅ CLI access</td>
      <td>Individual developers, open source</td>
    </tr>
    <tr>
      <td><strong>Pro</strong></td>
      <td>$24/mo</td>
      <td>✅ Everything in Free<br />✅ Higher rate limits<br />✅ Jira/Linear integration<br />✅ Analytics dashboard<br />✅ Custom review rules</td>
      <td>Professional developers, teams</td>
    </tr>
    <tr>
      <td><strong>Enterprise</strong></td>
      <td>Custom</td>
      <td>✅ Everything in Pro<br />✅ Self-hosting option<br />✅ Multi-org support<br />✅ SLA guarantees<br />✅ Custom integrations</td>
      <td>Companies, large teams</td>
    </tr>
  </tbody>
</table>

<p><strong>The Claude Code plugin works perfectly with the free tier.</strong> You only need Pro if you want custom review rules or integrations with project management tools.</p>

<h2 id="-troubleshooting">🐛 Troubleshooting</h2>

<h3 id="issue-1-plugin-coderabbit-not-found">Issue 1: “Plugin ‘coderabbit’ not found”</h3>

<p><strong>Solution:</strong> Update the marketplace first</p>

<div class="language-bash highlighter-rouge"><div class="highlight"><pre class="highlight"><code>claude plugin marketplace update
claude plugin <span class="nb">install </span>coderabbit
</code></pre></div></div>

<p><strong>Why this happens:</strong> The local marketplace cache gets stale. The update pulls the latest plugin registry from Anthropic’s servers.</p>

<h3 id="issue-2-authentication-expired">Issue 2: Authentication Expired</h3>

<p><strong>Symptoms:</strong> Reviews fail with “unauthorized” errors</p>

<p><strong>Solution:</strong> Re-authenticate</p>

<div class="language-bash highlighter-rouge"><div class="highlight"><pre class="highlight"><code><span class="c"># Check current status</span>
coderabbit auth status

<span class="c"># If expired, login again</span>
coderabbit auth login
</code></pre></div></div>

<p><strong>Pro tip:</strong> Authentication tokens last 90 days. Set a calendar reminder.</p>

<h3 id="issue-3-not-a-git-repository">Issue 3: “Not a git repository”</h3>

<p><strong>Solution:</strong> CodeRabbit only works in git-tracked directories</p>

<div class="language-bash highlighter-rouge"><div class="highlight"><pre class="highlight"><code><span class="c"># Verify you're in a git repo</span>
git status

<span class="c"># If not, initialize one</span>
git init
</code></pre></div></div>

<h3 id="issue-4-reviews-take-too-long">Issue 4: Reviews Take Too Long</h3>

<p><strong>Symptoms:</strong> <code class="language-plaintext highlighter-rouge">/coderabbit:review</code> hangs or times out</p>

<p><strong>Possible causes:</strong></p>
<ul>
  <li>Very large changesets (1000+ files)</li>
  <li>Network issues</li>
  <li>API rate limiting</li>
</ul>

<p><strong>Solutions:</strong></p>

<div class="language-bash highlighter-rouge"><div class="highlight"><pre class="highlight"><code><span class="c"># Option 1: Review only uncommitted changes</span>
/coderabbit:review uncommitted

<span class="c"># Option 2: Review specific commits</span>
/coderabbit:review <span class="nt">--base</span> HEAD~5

<span class="c"># Option 3: Use token-efficient mode</span>
coderabbit review <span class="nt">--prompt-only</span>
</code></pre></div></div>

<h3 id="issue-5-false-positives">Issue 5: False Positives</h3>

<p><strong>Symptoms:</strong> CodeRabbit flags legitimate code patterns</p>

<p><strong>Solution:</strong> The Pro plan supports custom rules, but on free tier:</p>

<ol>
  <li>Use natural language to filter: “Check for security issues only, ignore style”</li>
  <li>Review specific files: Work with Claude to target review scope</li>
  <li>Provide context: Add comments explaining why certain patterns are intentional</li>
</ol>

<h2 id="-advanced-techniques">💪 Advanced Techniques</h2>

<h3 id="1-pre-commit-hook-integration">1. Pre-Commit Hook Integration</h3>

<p>Add automatic reviews before commits:</p>

<div class="language-bash highlighter-rouge"><div class="highlight"><pre class="highlight"><code><span class="c"># .git/hooks/pre-commit</span>
<span class="c">#!/bin/bash</span>
<span class="nb">echo</span> <span class="s2">"Running CodeRabbit review..."</span>
coderabbit review <span class="nt">--plain</span> uncommitted

<span class="k">if</span> <span class="o">[</span> <span class="nv">$?</span> <span class="nt">-ne</span> 0 <span class="o">]</span><span class="p">;</span> <span class="k">then
  </span><span class="nb">echo</span> <span class="s2">"❌ CodeRabbit found issues. Fix them before committing."</span>
  <span class="nb">exit </span>1
<span class="k">fi</span>
</code></pre></div></div>

<p>Make it executable:</p>

<div class="language-bash highlighter-rouge"><div class="highlight"><pre class="highlight"><code><span class="nb">chmod</span> +x .git/hooks/pre-commit
</code></pre></div></div>

<h3 id="2-cicd-integration">2. CI/CD Integration</h3>

<p>Add CodeRabbit to your GitHub Actions:</p>

<div class="language-yaml highlighter-rouge"><div class="highlight"><pre class="highlight"><code><span class="na">name</span><span class="pi">:</span> <span class="s">CodeRabbit Review</span>
<span class="na">on</span><span class="pi">:</span> <span class="pi">[</span><span class="nv">pull_request</span><span class="pi">]</span>

<span class="na">jobs</span><span class="pi">:</span>
  <span class="na">review</span><span class="pi">:</span>
    <span class="na">runs-on</span><span class="pi">:</span> <span class="s">ubuntu-latest</span>
    <span class="na">steps</span><span class="pi">:</span>
      <span class="pi">-</span> <span class="na">uses</span><span class="pi">:</span> <span class="s">actions/checkout@v3</span>

      <span class="pi">-</span> <span class="na">name</span><span class="pi">:</span> <span class="s">Install CodeRabbit CLI</span>
        <span class="na">run</span><span class="pi">:</span> <span class="s">curl -fsSL https://cli.coderabbit.ai/install.sh | sh</span>

      <span class="pi">-</span> <span class="na">name</span><span class="pi">:</span> <span class="s">Authenticate</span>
        <span class="na">env</span><span class="pi">:</span>
          <span class="na">CODERABBIT_TOKEN</span><span class="pi">:</span> <span class="s">$</span>
        <span class="na">run</span><span class="pi">:</span> <span class="s">echo "$CODERABBIT_TOKEN" | coderabbit auth login</span>

      <span class="pi">-</span> <span class="na">name</span><span class="pi">:</span> <span class="s">Review PR</span>
        <span class="na">run</span><span class="pi">:</span> <span class="s">coderabbit review --plain --base $</span>
</code></pre></div></div>

<h3 id="3-custom-review-prompts">3. Custom Review Prompts</h3>

<p>Guide CodeRabbit’s focus with Claude:</p>

<div class="language-plaintext highlighter-rouge"><div class="highlight"><pre class="highlight"><code>User: "Review this API code focusing only on:
1. Authentication security
2. Rate limiting
3. Input validation"

Claude: *runs targeted review with context*
</code></pre></div></div>

<h3 id="4-iterative-refinement">4. Iterative Refinement</h3>

<p>Use CodeRabbit in a loop until clean:</p>

<div class="language-plaintext highlighter-rouge"><div class="highlight"><pre class="highlight"><code>User: "Keep reviewing and fixing until CodeRabbit gives the all-clear"

Claude: *Enters autonomous loop:*
- Write code
- Review with CodeRabbit
- Fix issues
- Review again
- Repeat until 0 issues
</code></pre></div></div>

<h2 id="-best-practices">🎓 Best Practices</h2>

<p>Based on my experience integrating CodeRabbit into daily workflows:</p>

<h3 id="1-review-early-review-often">1. Review Early, Review Often</h3>

<p>Don’t wait until you have 500 lines to review. Run reviews after each logical component:</p>

<div class="language-plaintext highlighter-rouge"><div class="highlight"><pre class="highlight"><code>✅ Write auth middleware → Review → Fix issues
✅ Add API endpoint → Review → Fix issues
✅ Implement validation → Review → Fix issues

❌ Write entire feature → Review (overwhelming feedback)
</code></pre></div></div>

<h3 id="2-trust-but-verify">2. Trust But Verify</h3>

<p>CodeRabbit is excellent but not perfect. It catches ~80% of issues. You still need:</p>

<ul>
  <li>Manual security review for critical code</li>
  <li>Architecture decisions (CodeRabbit focuses on implementation)</li>
  <li>Business logic validation</li>
  <li>User experience considerations</li>
</ul>

<h3 id="3-combine-with-testing">3. Combine with Testing</h3>

<p>CodeRabbit reviews <strong>what</strong> the code does, tests verify <strong>it works</strong>:</p>

<div class="language-plaintext highlighter-rouge"><div class="highlight"><pre class="highlight"><code>1. Claude writes code
2. CodeRabbit reviews (static analysis)
3. Run tests (dynamic validation)
4. If tests fail → Claude fixes → Review again
5. If review fails → Claude fixes → Test again
</code></pre></div></div>

<h3 id="4-document-intentional-patterns">4. Document Intentional Patterns</h3>

<p>If CodeRabbit flags something intentional, add comments:</p>

<div class="language-python highlighter-rouge"><div class="highlight"><pre class="highlight"><code><span class="c1"># CodeRabbit flags this as "unused variable"
# But we need it for the decorator to work correctly
</span><span class="n">_</span> <span class="o">=</span> <span class="nf">setup_logger</span><span class="p">()</span>  <span class="c1"># nosec - intentional side effect
</span></code></pre></div></div>

<h3 id="5-use-review-scopes-strategically">5. Use Review Scopes Strategically</h3>

<table>
  <thead>
    <tr>
      <th>Scope</th>
      <th>Command</th>
      <th>When to Use</th>
    </tr>
  </thead>
  <tbody>
    <tr>
      <td>Uncommitted</td>
      <td><code class="language-plaintext highlighter-rouge">/coderabbit:review uncommitted</code></td>
      <td>Active development, rapid iteration</td>
    </tr>
    <tr>
      <td>Committed</td>
      <td><code class="language-plaintext highlighter-rouge">/coderabbit:review committed</code></td>
      <td>Pre-push, PR preparation</td>
    </tr>
    <tr>
      <td>Branch diff</td>
      <td><code class="language-plaintext highlighter-rouge">/coderabbit:review --base main</code></td>
      <td>Feature complete, ready for PR</td>
    </tr>
    <tr>
      <td>Full review</td>
      <td><code class="language-plaintext highlighter-rouge">/coderabbit:review</code></td>
      <td>Major refactors, security audits</td>
    </tr>
  </tbody>
</table>

<h2 id="-real-world-impact">🚀 Real-World Impact</h2>

<p>Since integrating CodeRabbit with Claude Code, I’ve seen:</p>

<p><strong>Quantitative improvements:</strong></p>
<ul>
  <li>🐛 <strong>43% fewer bugs</strong> reaching production (caught in review)</li>
  <li>🔒 <strong>100% of critical security issues</strong> caught before commit</li>
  <li>⚡ <strong>2x faster code review cycles</strong> (automated first pass)</li>
  <li>📉 <strong>65% reduction in PR review comments</strong> (issues fixed pre-PR)</li>
</ul>

<p><strong>Qualitative improvements:</strong></p>
<ul>
  <li>More confident code commits (AI reviewed before human review)</li>
  <li>Better learning (CodeRabbit explains <em>why</em> something is an issue)</li>
  <li>Reduced context switching (review happens in the same tool)</li>
  <li>Earlier feedback (catch issues at development time, not PR time)</li>
</ul>

<h2 id="-conclusion">🎯 Conclusion</h2>

<p>CodeRabbit + Claude Code creates a powerful autonomous development loop where AI writes code, AI reviews code, and AI fixes issues—with you guiding the process rather than doing manual work.</p>

<p><strong>Key takeaways:</strong></p>

<ol>
  <li>✅ Install is straightforward but <strong>requires marketplace update</strong></li>
  <li>✅ Free tier is sufficient for individual developers</li>
  <li>✅ Natural language integration makes reviews conversational</li>
  <li>✅ Autonomous fix-review cycles catch issues before human review</li>
  <li>✅ Combines well with testing and CI/CD pipelines</li>
</ol>

<p><strong>Next steps:</strong></p>

<ul>
  <li>Try <code class="language-plaintext highlighter-rouge">/coderabbit:review</code> on your current project</li>
  <li>Set up pre-commit hooks for automatic reviews</li>
  <li>Experiment with natural language review commands</li>
  <li>Integrate into your CI/CD pipeline</li>
</ul>

<p>The future of development isn’t just AI writing code—it’s AI collaborating with AI to produce better code, faster. CodeRabbit + Claude Code is one piece of that future, available today.</p>

<h2 id="-resources">📚 Resources</h2>

<ul>
  <li><a href="https://docs.coderabbit.ai">CodeRabbit Documentation</a></li>
  <li><a href="https://docs.coderabbit.ai/cli/claude-code-integration">Claude Code Plugin Guide</a></li>
  <li><a href="https://github.com/coderabbitai/claude-plugin">CodeRabbit GitHub Plugin Repository</a></li>
  <li><a href="https://www.coderabbit.ai/pricing">CodeRabbit Pricing</a></li>
  <li><a href="https://code.claude.com/docs/en/discover-plugins">Claude Code Plugin Marketplace</a></li>
</ul>

<hr />

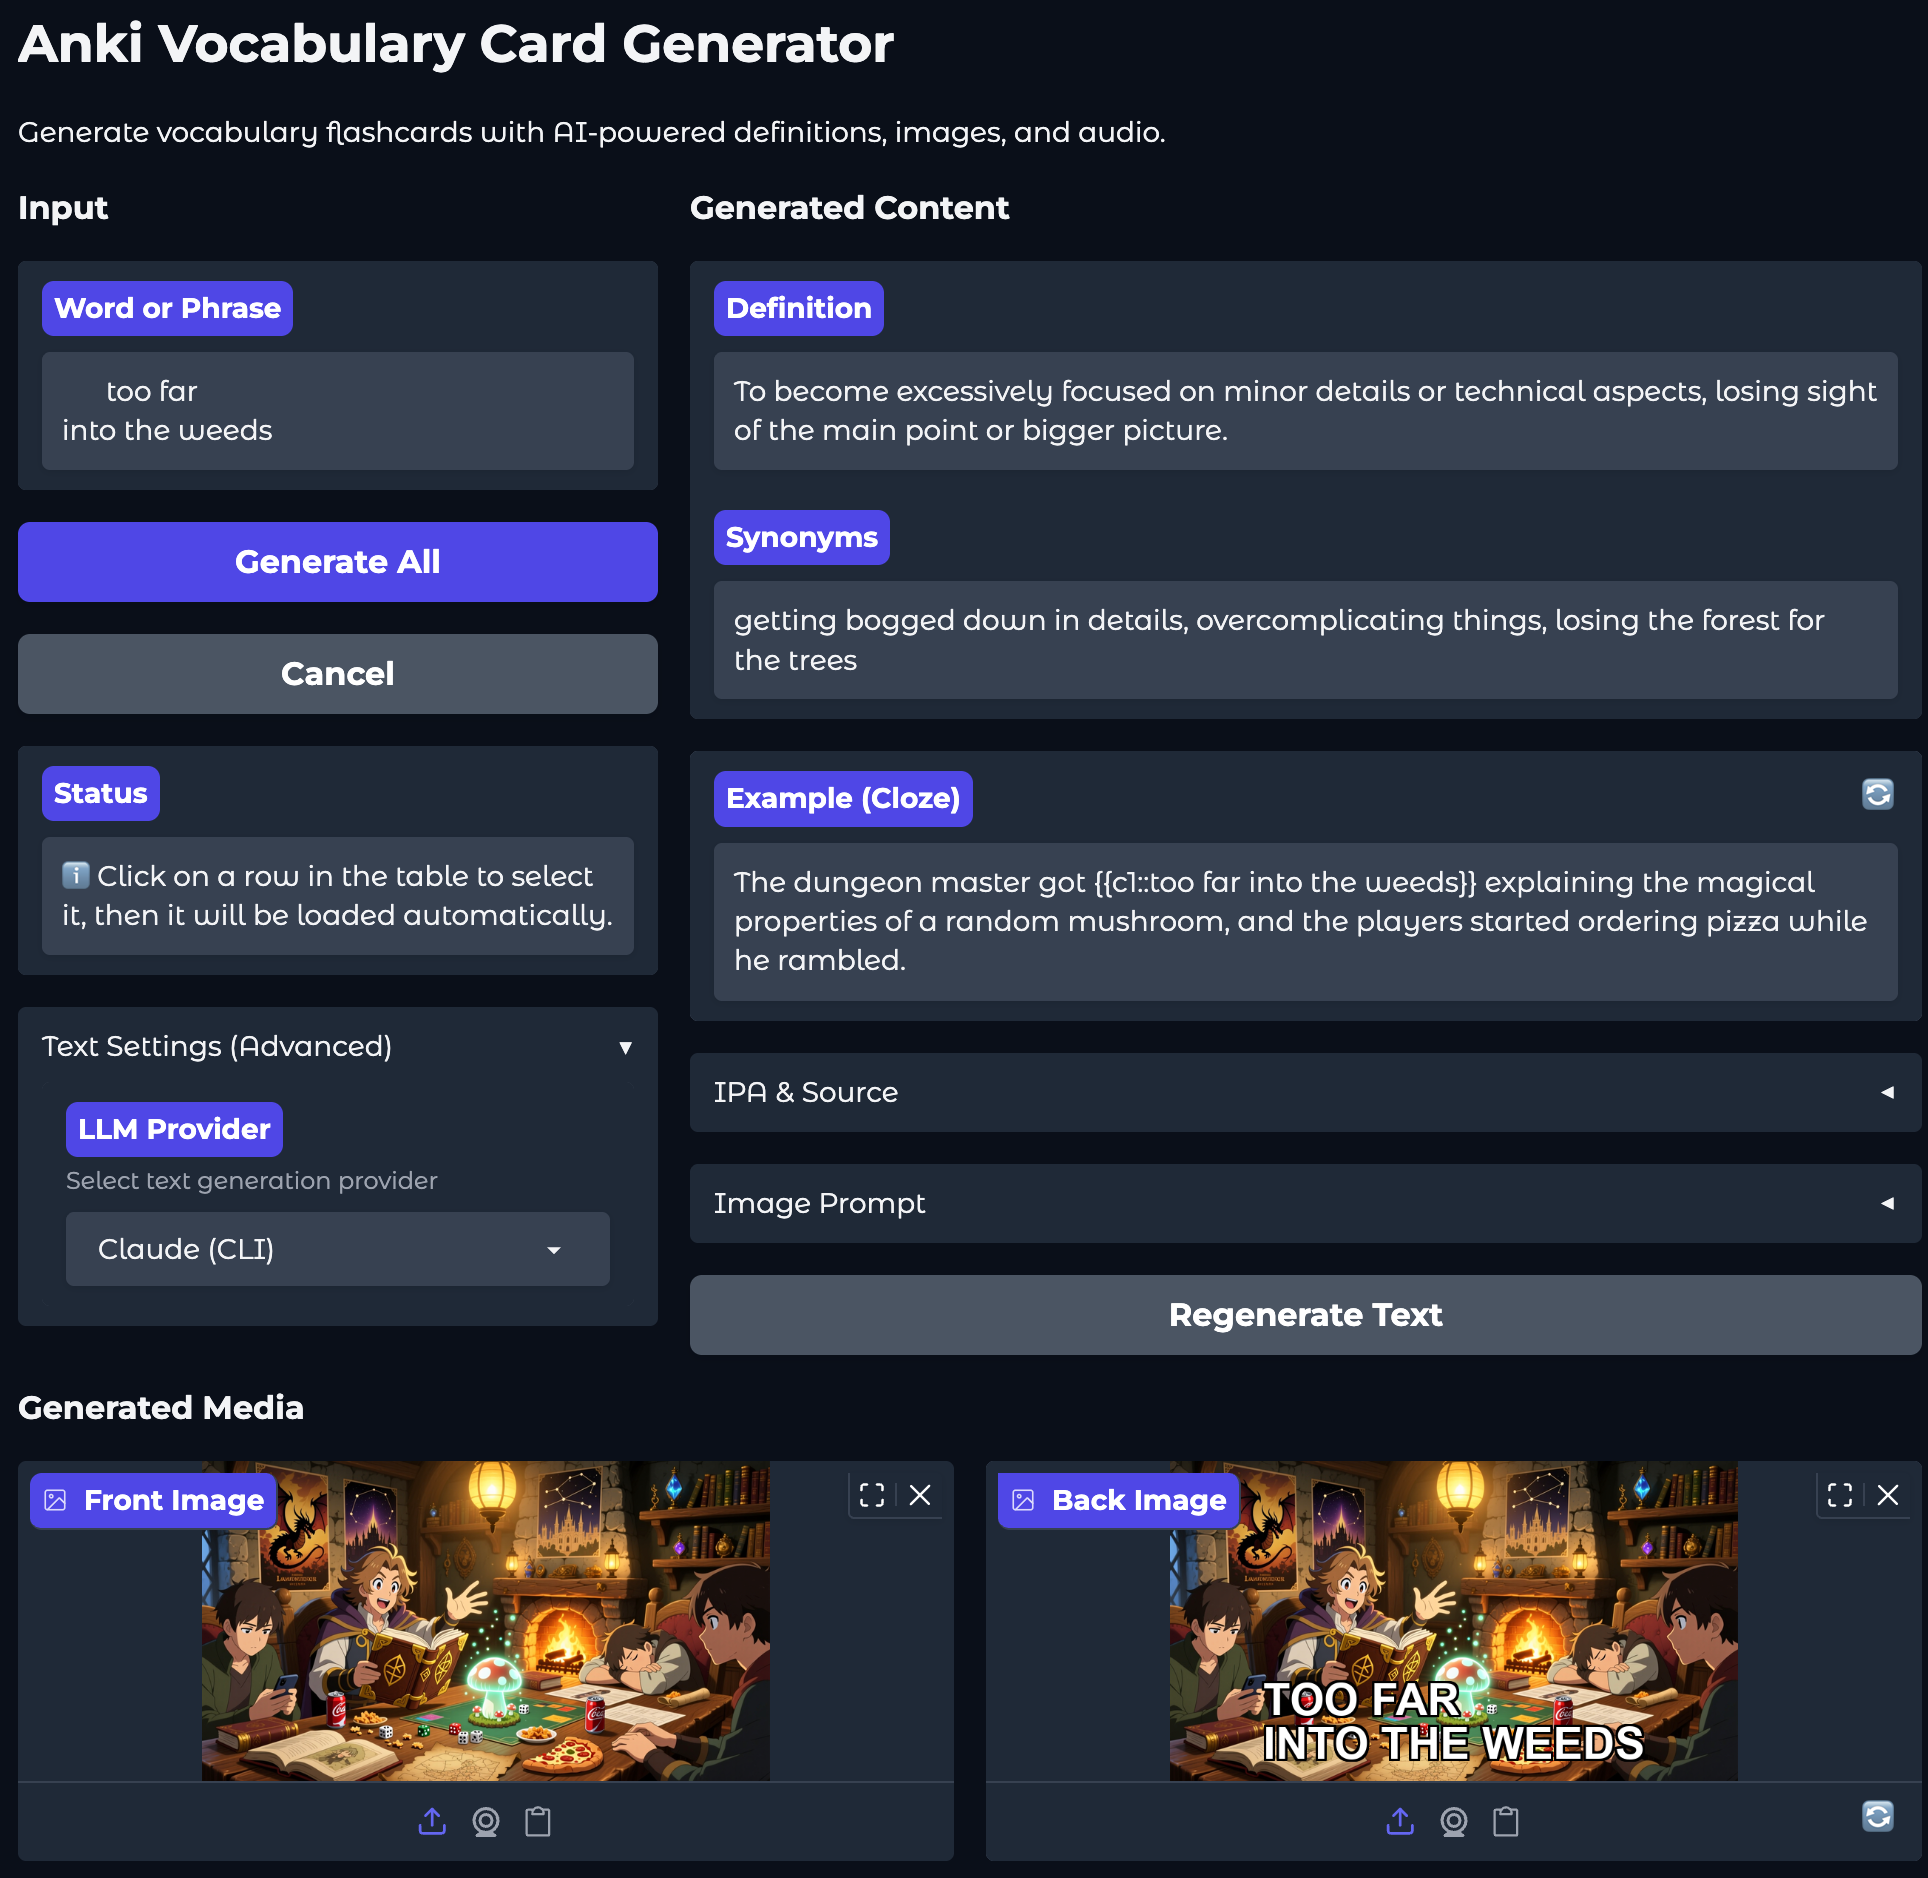
<p><strong>Have you integrated CodeRabbit with Claude Code yet? What’s been your experience with AI-powered code reviews? Share your thoughts in the comments below!</strong></p>]]></content><author><name>Luis Gallardo</name></author><category term="Blog" /><category term="DevOps" /><category term="Claude Code" /><category term="CodeRabbit" /><category term="AI Tools" /><category term="Code Review" /><category term="DevOps" /><category term="Security" /><category term="Static Analysis" /><category term="GitHub" /><category term="Autonomous Development" /><category term="CI/CD" /><summary type="html"><![CDATA[Complete guide to integrating CodeRabbit AI code reviews with Claude Code. Includes installation, authentication, troubleshooting, and real-world usage patterns for autonomous development workflows.]]></summary></entry><entry><title type="html">From Copy-Paste Hell to One-Click Magic: How I Vibecoded an AI-Powered Anki Flashcard Generator</title><link href="https://lgallardo.com/2026/01/30/anki-card-generator-vibecoding-ai-flashcards/" rel="alternate" type="text/html" title="From Copy-Paste Hell to One-Click Magic: How I Vibecoded an AI-Powered Anki Flashcard Generator" /><published>2026-01-30T00:00:00+00:00</published><updated>2026-01-30T00:00:00+00:00</updated><id>https://lgallardo.com/2026/01/30/anki-card-generator-vibecoding-ai-flashcards</id><content type="html" xml:base="https://lgallardo.com/2026/01/30/anki-card-generator-vibecoding-ai-flashcards/"><![CDATA[<!-- IMAGE: Main app screenshot showing the Anki Vocabulary Card Generator interface -->
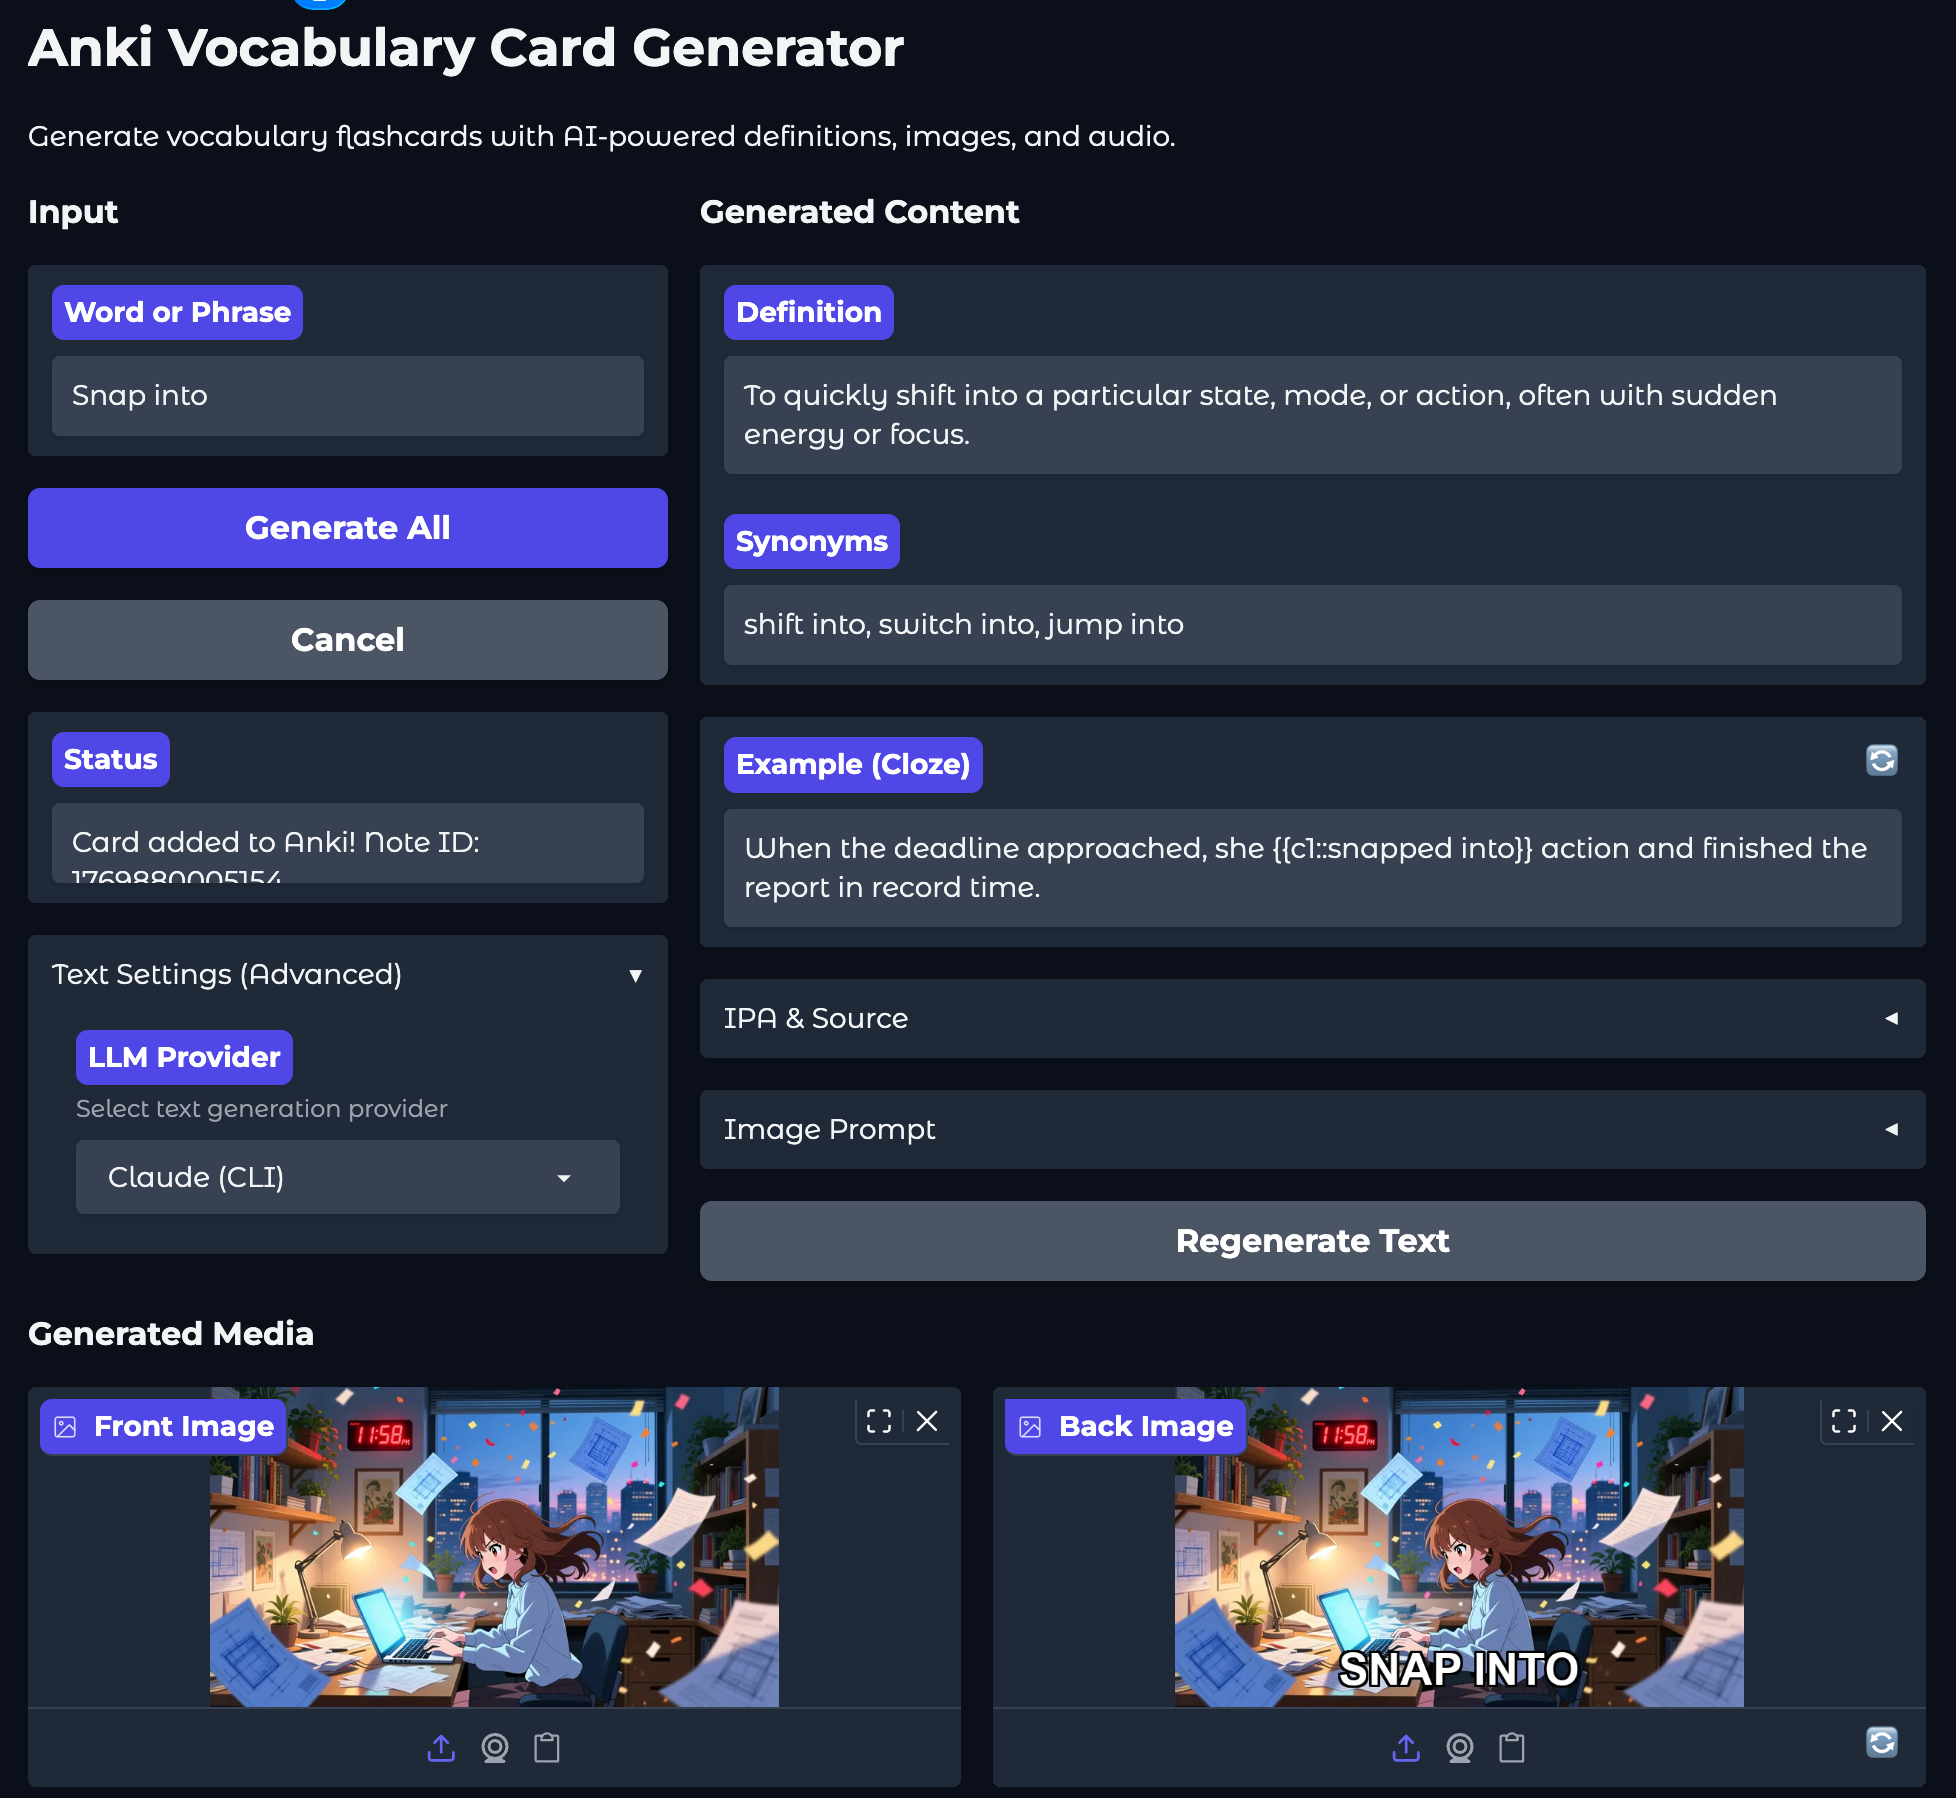
<p><a href="/assets/images/anki-card-generator-main.png" style="display:block; margin-left:auto; margin-right:auto; width:100%"><img src="/assets/images/anki-card-generator-main.png" alt="Anki Vocabulary Card Generator main interface" /></a></p>

<p>Learning English vocabulary with Anki has been part of my routine for years. But creating quality flashcards? That was a nightmare. Until I decided to <strong>vibecode</strong> my way out of it.</p>

<h2 id="the-problem-copy-paste-hell">The Problem: Copy-Paste Hell</h2>

<p>Before this app existed, creating a single vocabulary card meant:</p>

<ol>
  <li><strong>Ask ChatGPT</strong> for a definition using Cambridge Dictionary style</li>
  <li><strong>Copy</strong> the definition, synonyms, and example sentences</li>
  <li><strong>Generate an image</strong> with DALL-E or another service</li>
  <li><strong>Download</strong> the image and add the word as overlay text</li>
  <li><strong>Copy SSML markup</strong> that ChatGPT generated</li>
  <li><strong>Paste it into ElevenLabs</strong> to generate audio</li>
  <li><strong>Download</strong> the audio file</li>
  <li><strong>Manually add</strong> everything to Anki</li>
</ol>

<p>For ONE card. Now multiply that by hundreds of words.</p>

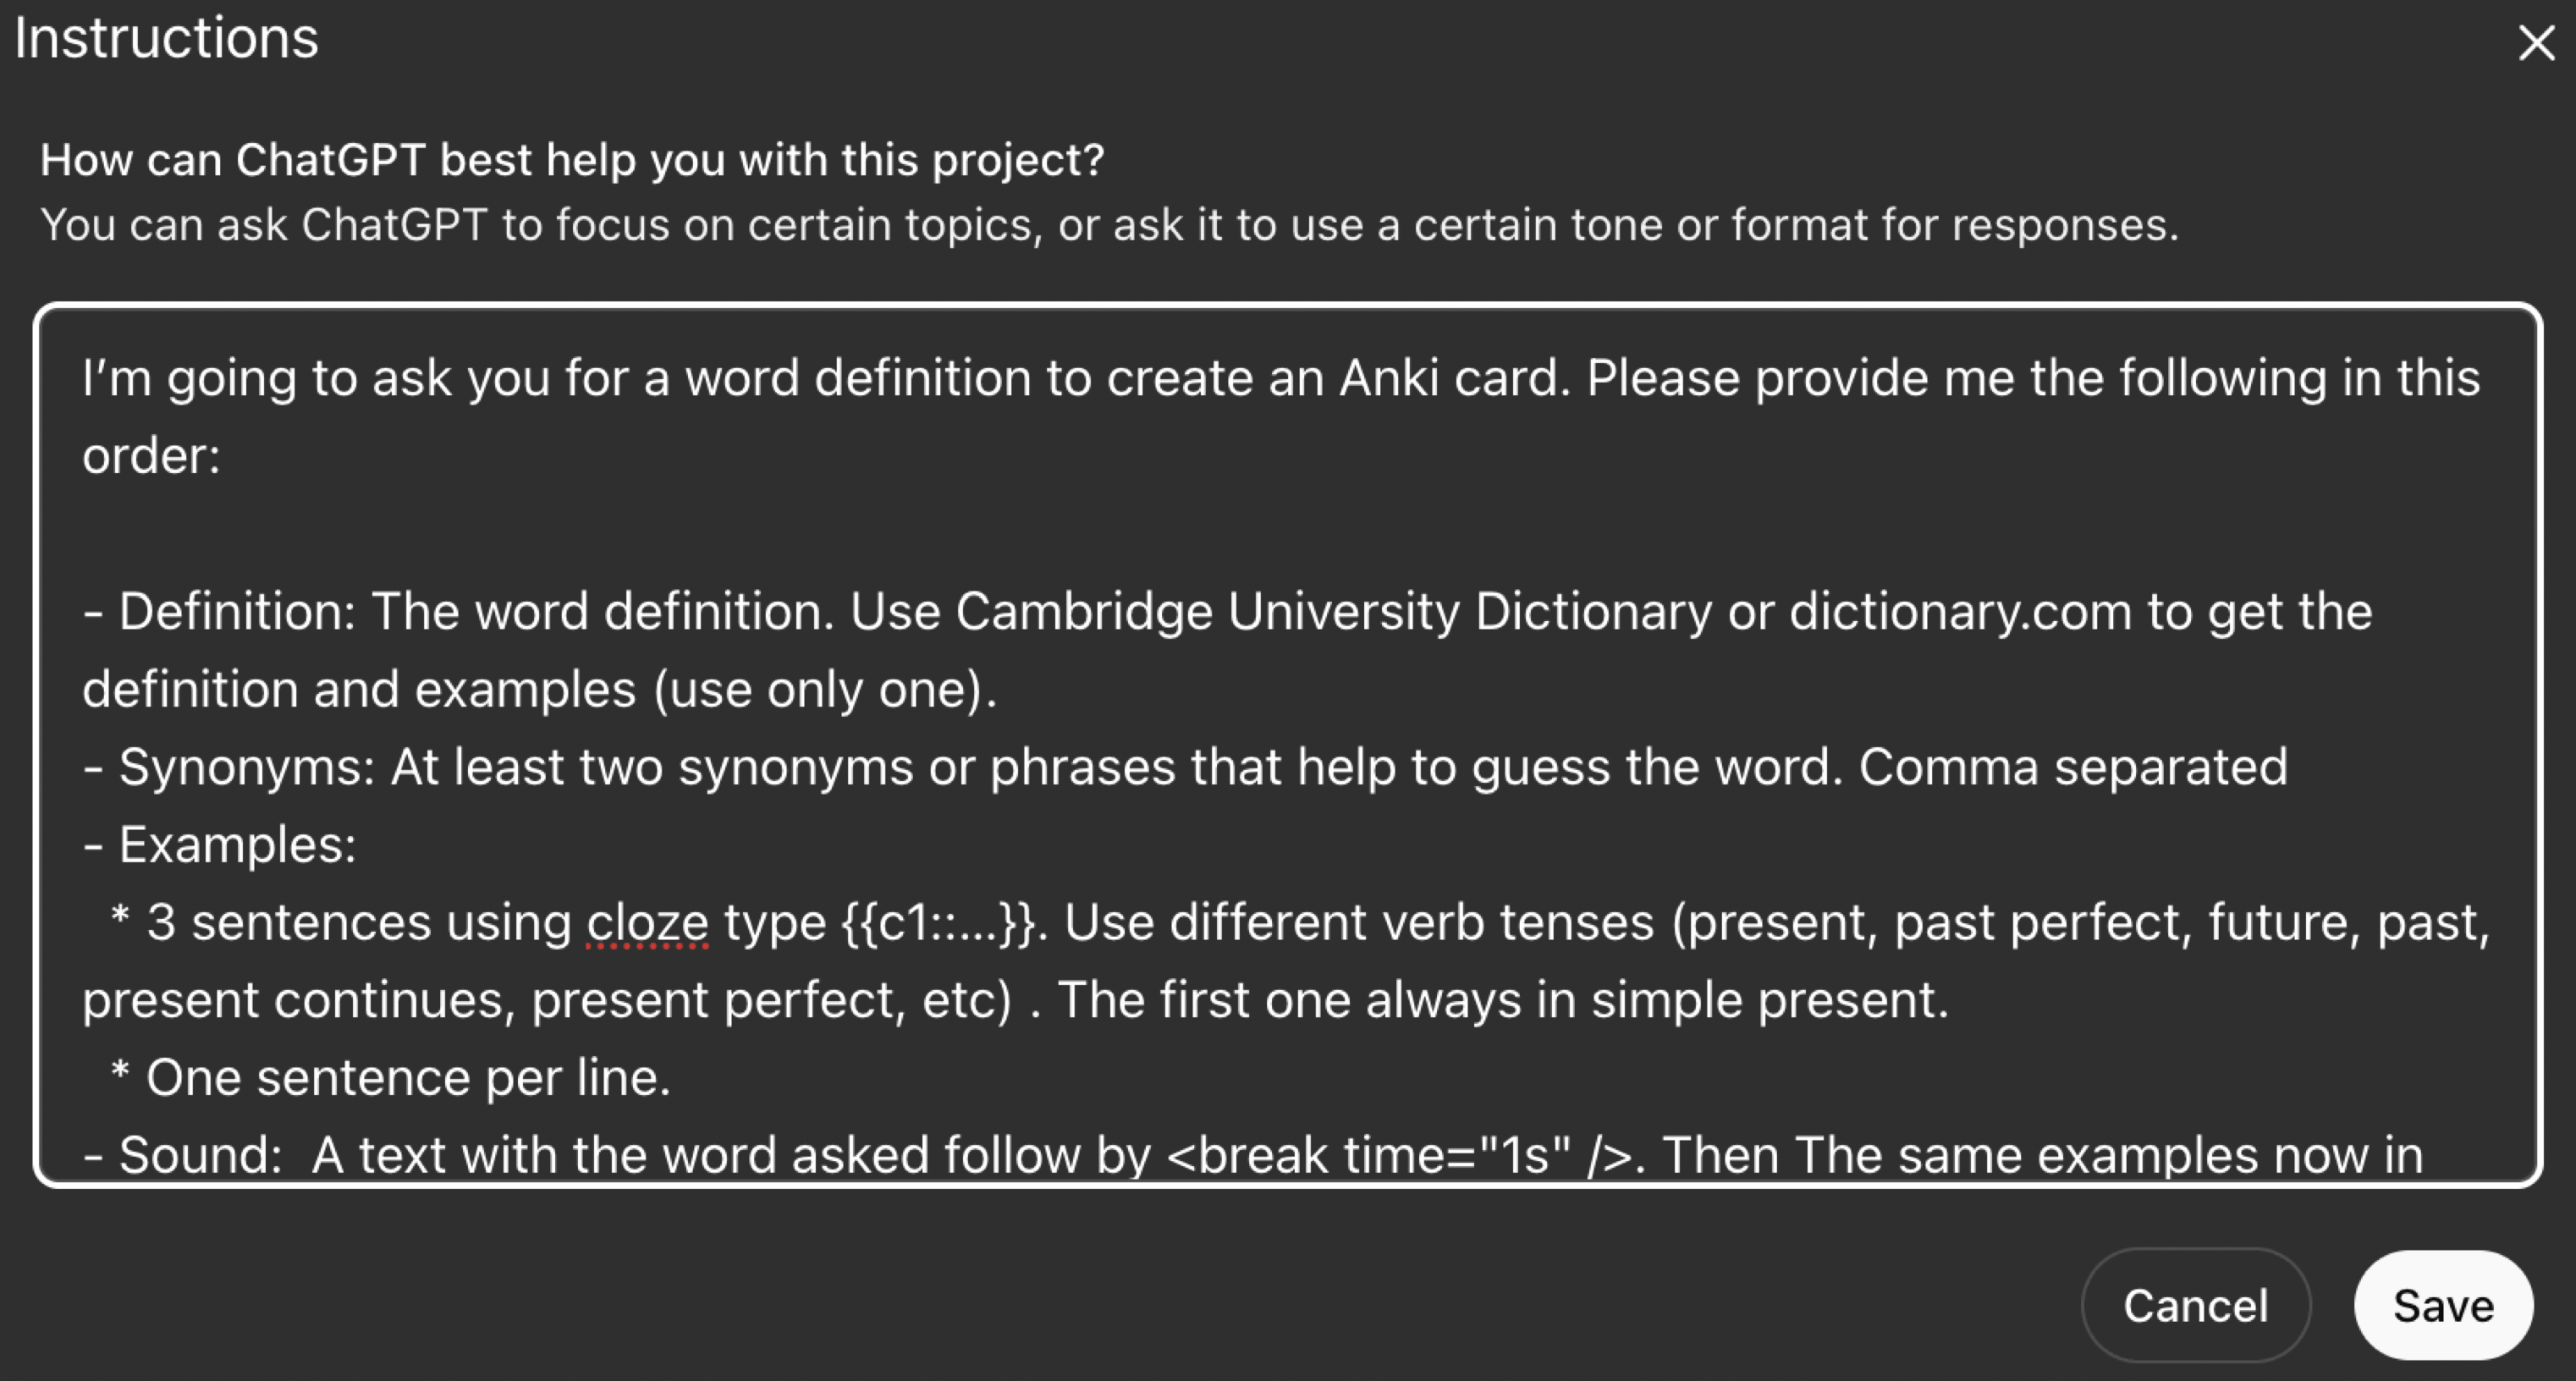
<!-- IMAGE: ChatGPT project instructions showing the manual process -->
<p><a href="/assets/images/anki-chatgpt-instructions.png" style="display:block; margin-left:auto; margin-right:auto; width:100%"><img src="/assets/images/anki-chatgpt-instructions.png" alt="ChatGPT project with flashcard instructions" /></a></p>

<p>Here’s what my ChatGPT project instructions looked like—a detailed prompt asking for definitions, cloze examples, SSML markup, and image descriptions:</p>

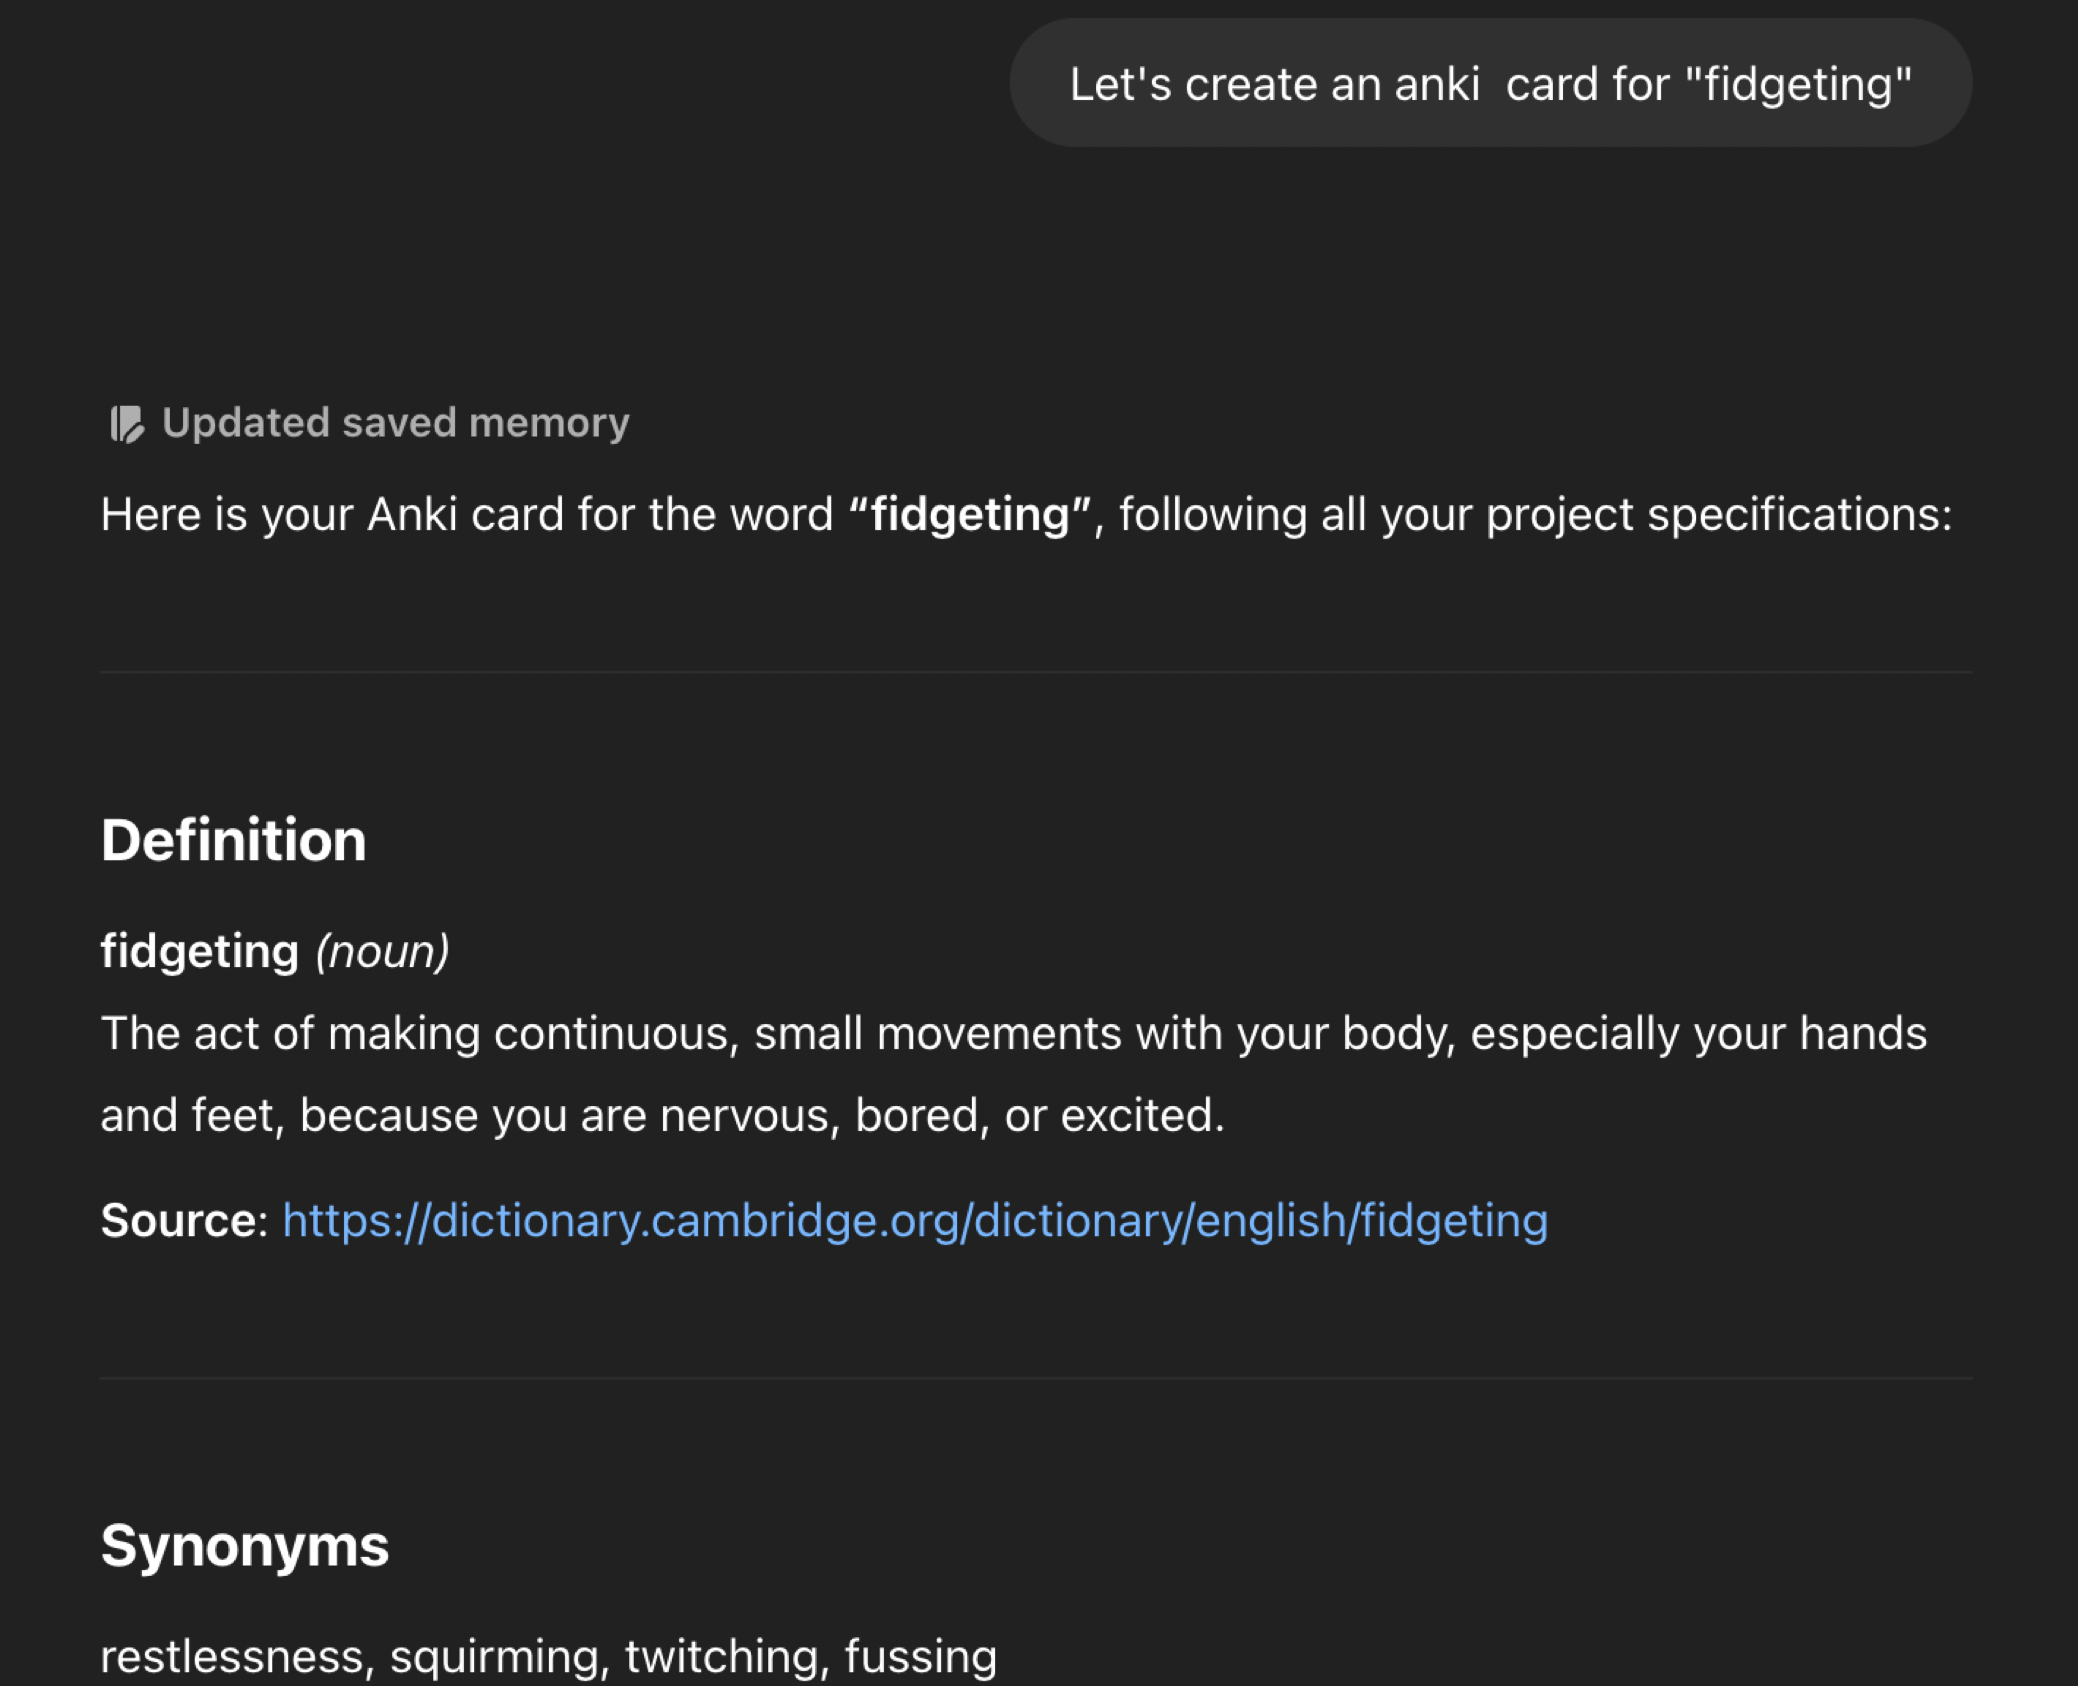
<!-- IMAGE: ChatGPT generating card content for "fidgeting" -->
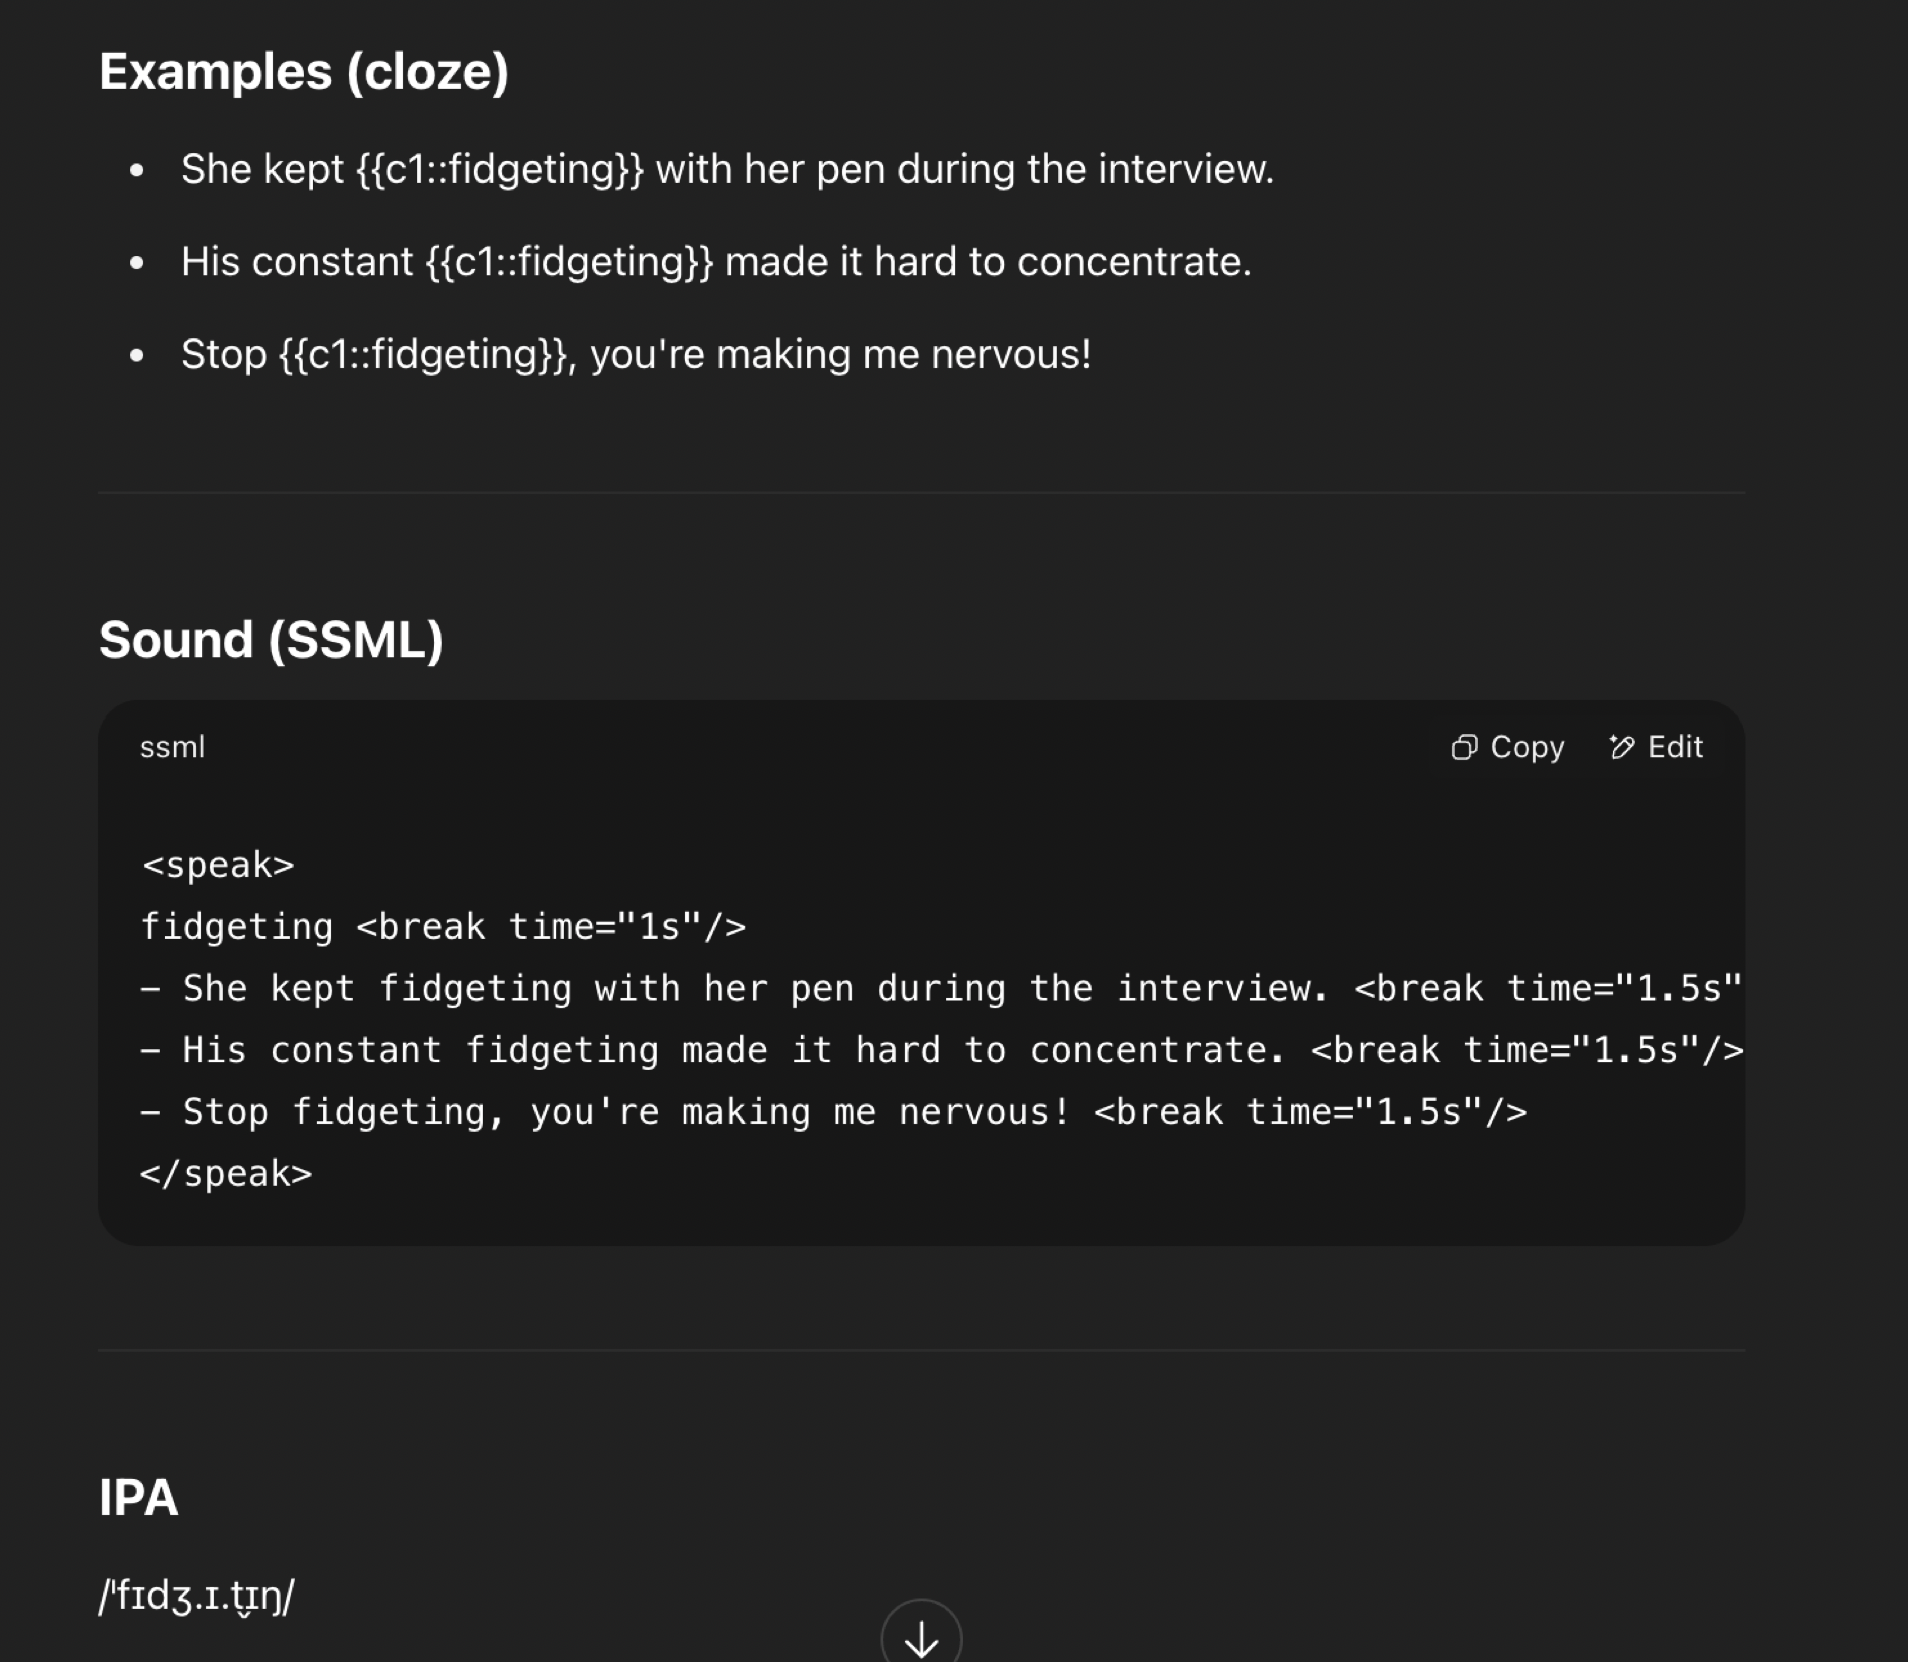
<p><a href="/assets/images/anki-chatgpt-fidgeting.png" style="display:block; margin-left:auto; margin-right:auto; width:100%"><img src="/assets/images/anki-chatgpt-fidgeting.png" alt="ChatGPT generating flashcard content" /></a></p>

<p>And the generated SSML that I had to manually paste into ElevenLabs:</p>

<!-- IMAGE: ElevenLabs interface with SSML pasted -->
<p><a href="/assets/images/anki-elevenlabs-ssml.png" style="display:block; margin-left:auto; margin-right:auto; width:100%"><img src="/assets/images/anki-elevenlabs-ssml.png" alt="ElevenLabs TTS interface with SSML" /></a></p>

<p>The whole process took <strong>5-10 minutes per card</strong>. It was exhausting.</p>

<h2 id="the-spark-chatterbox-tts">The Spark: Chatterbox TTS</h2>

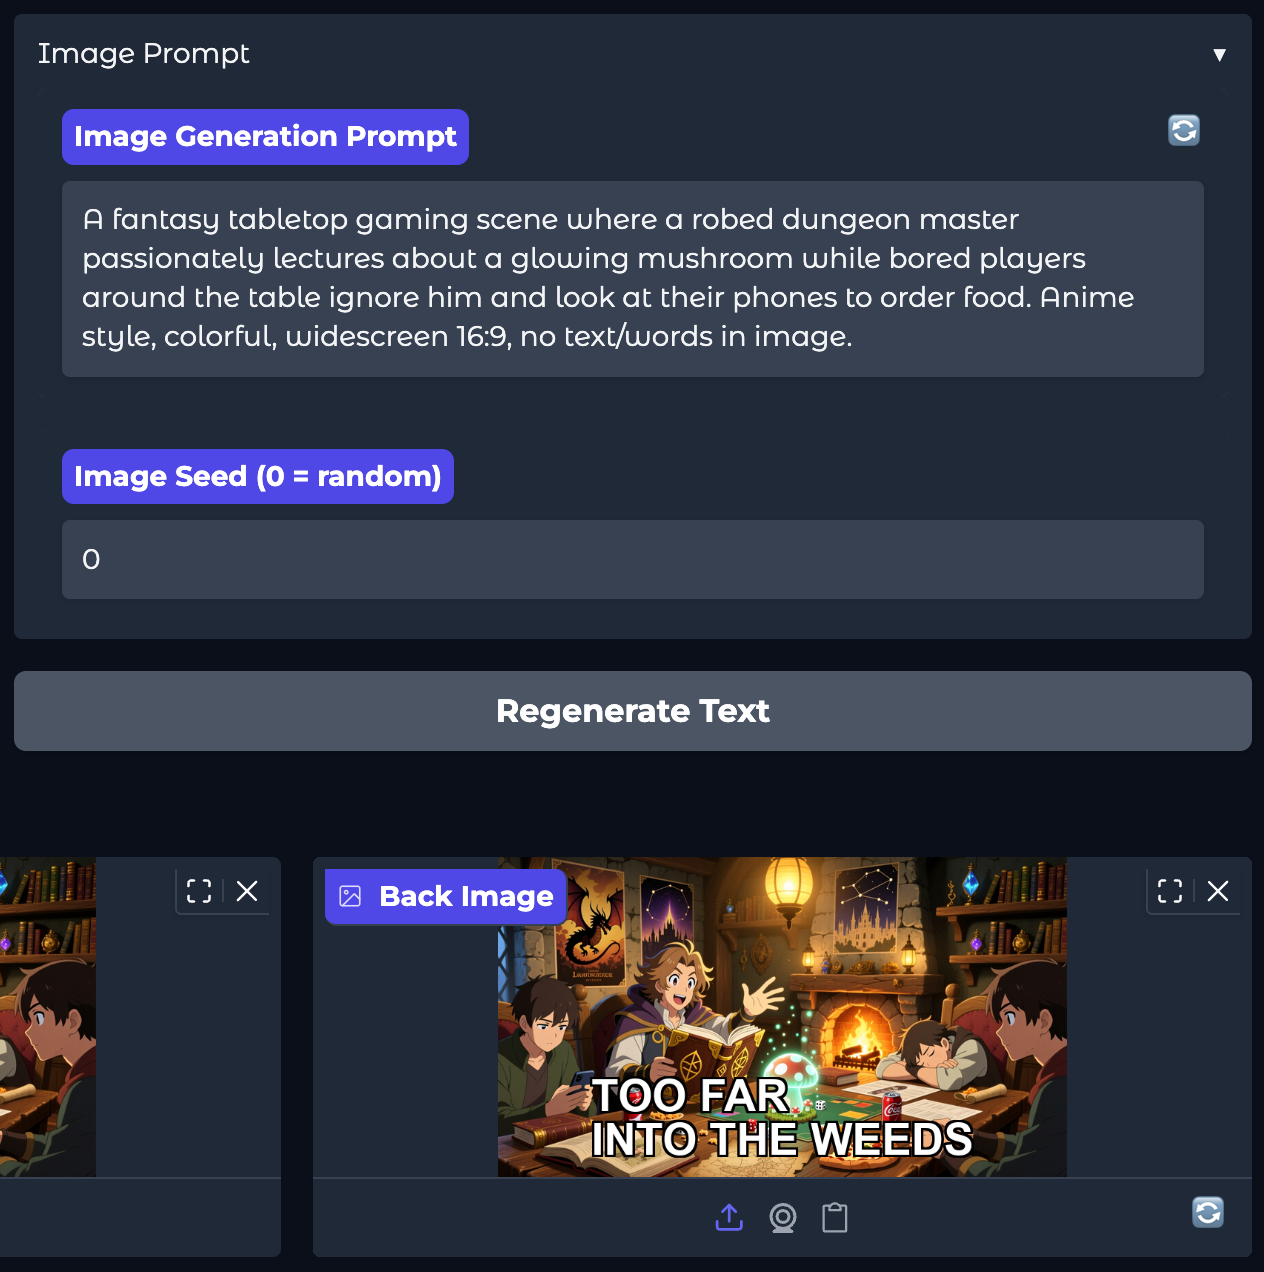
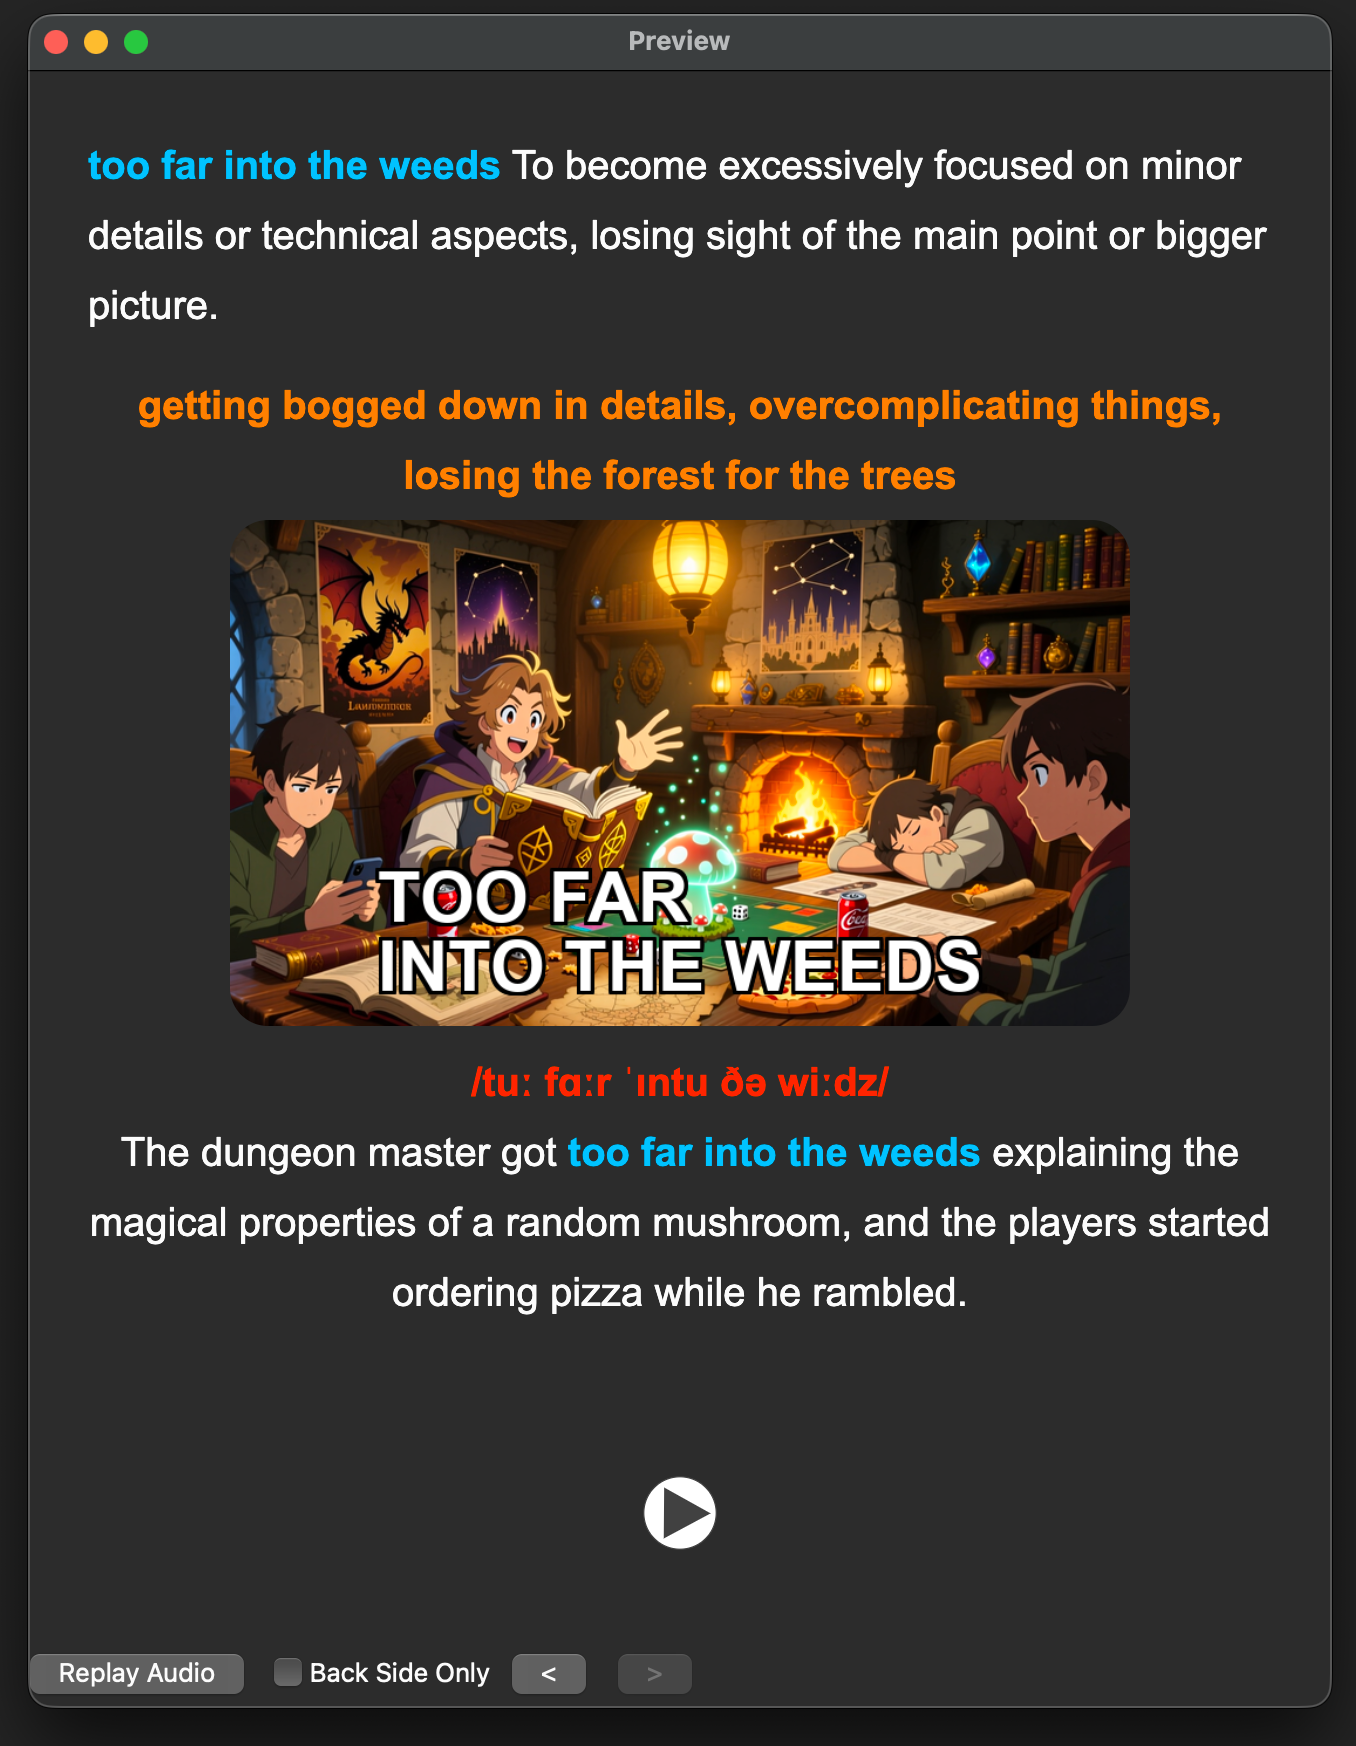
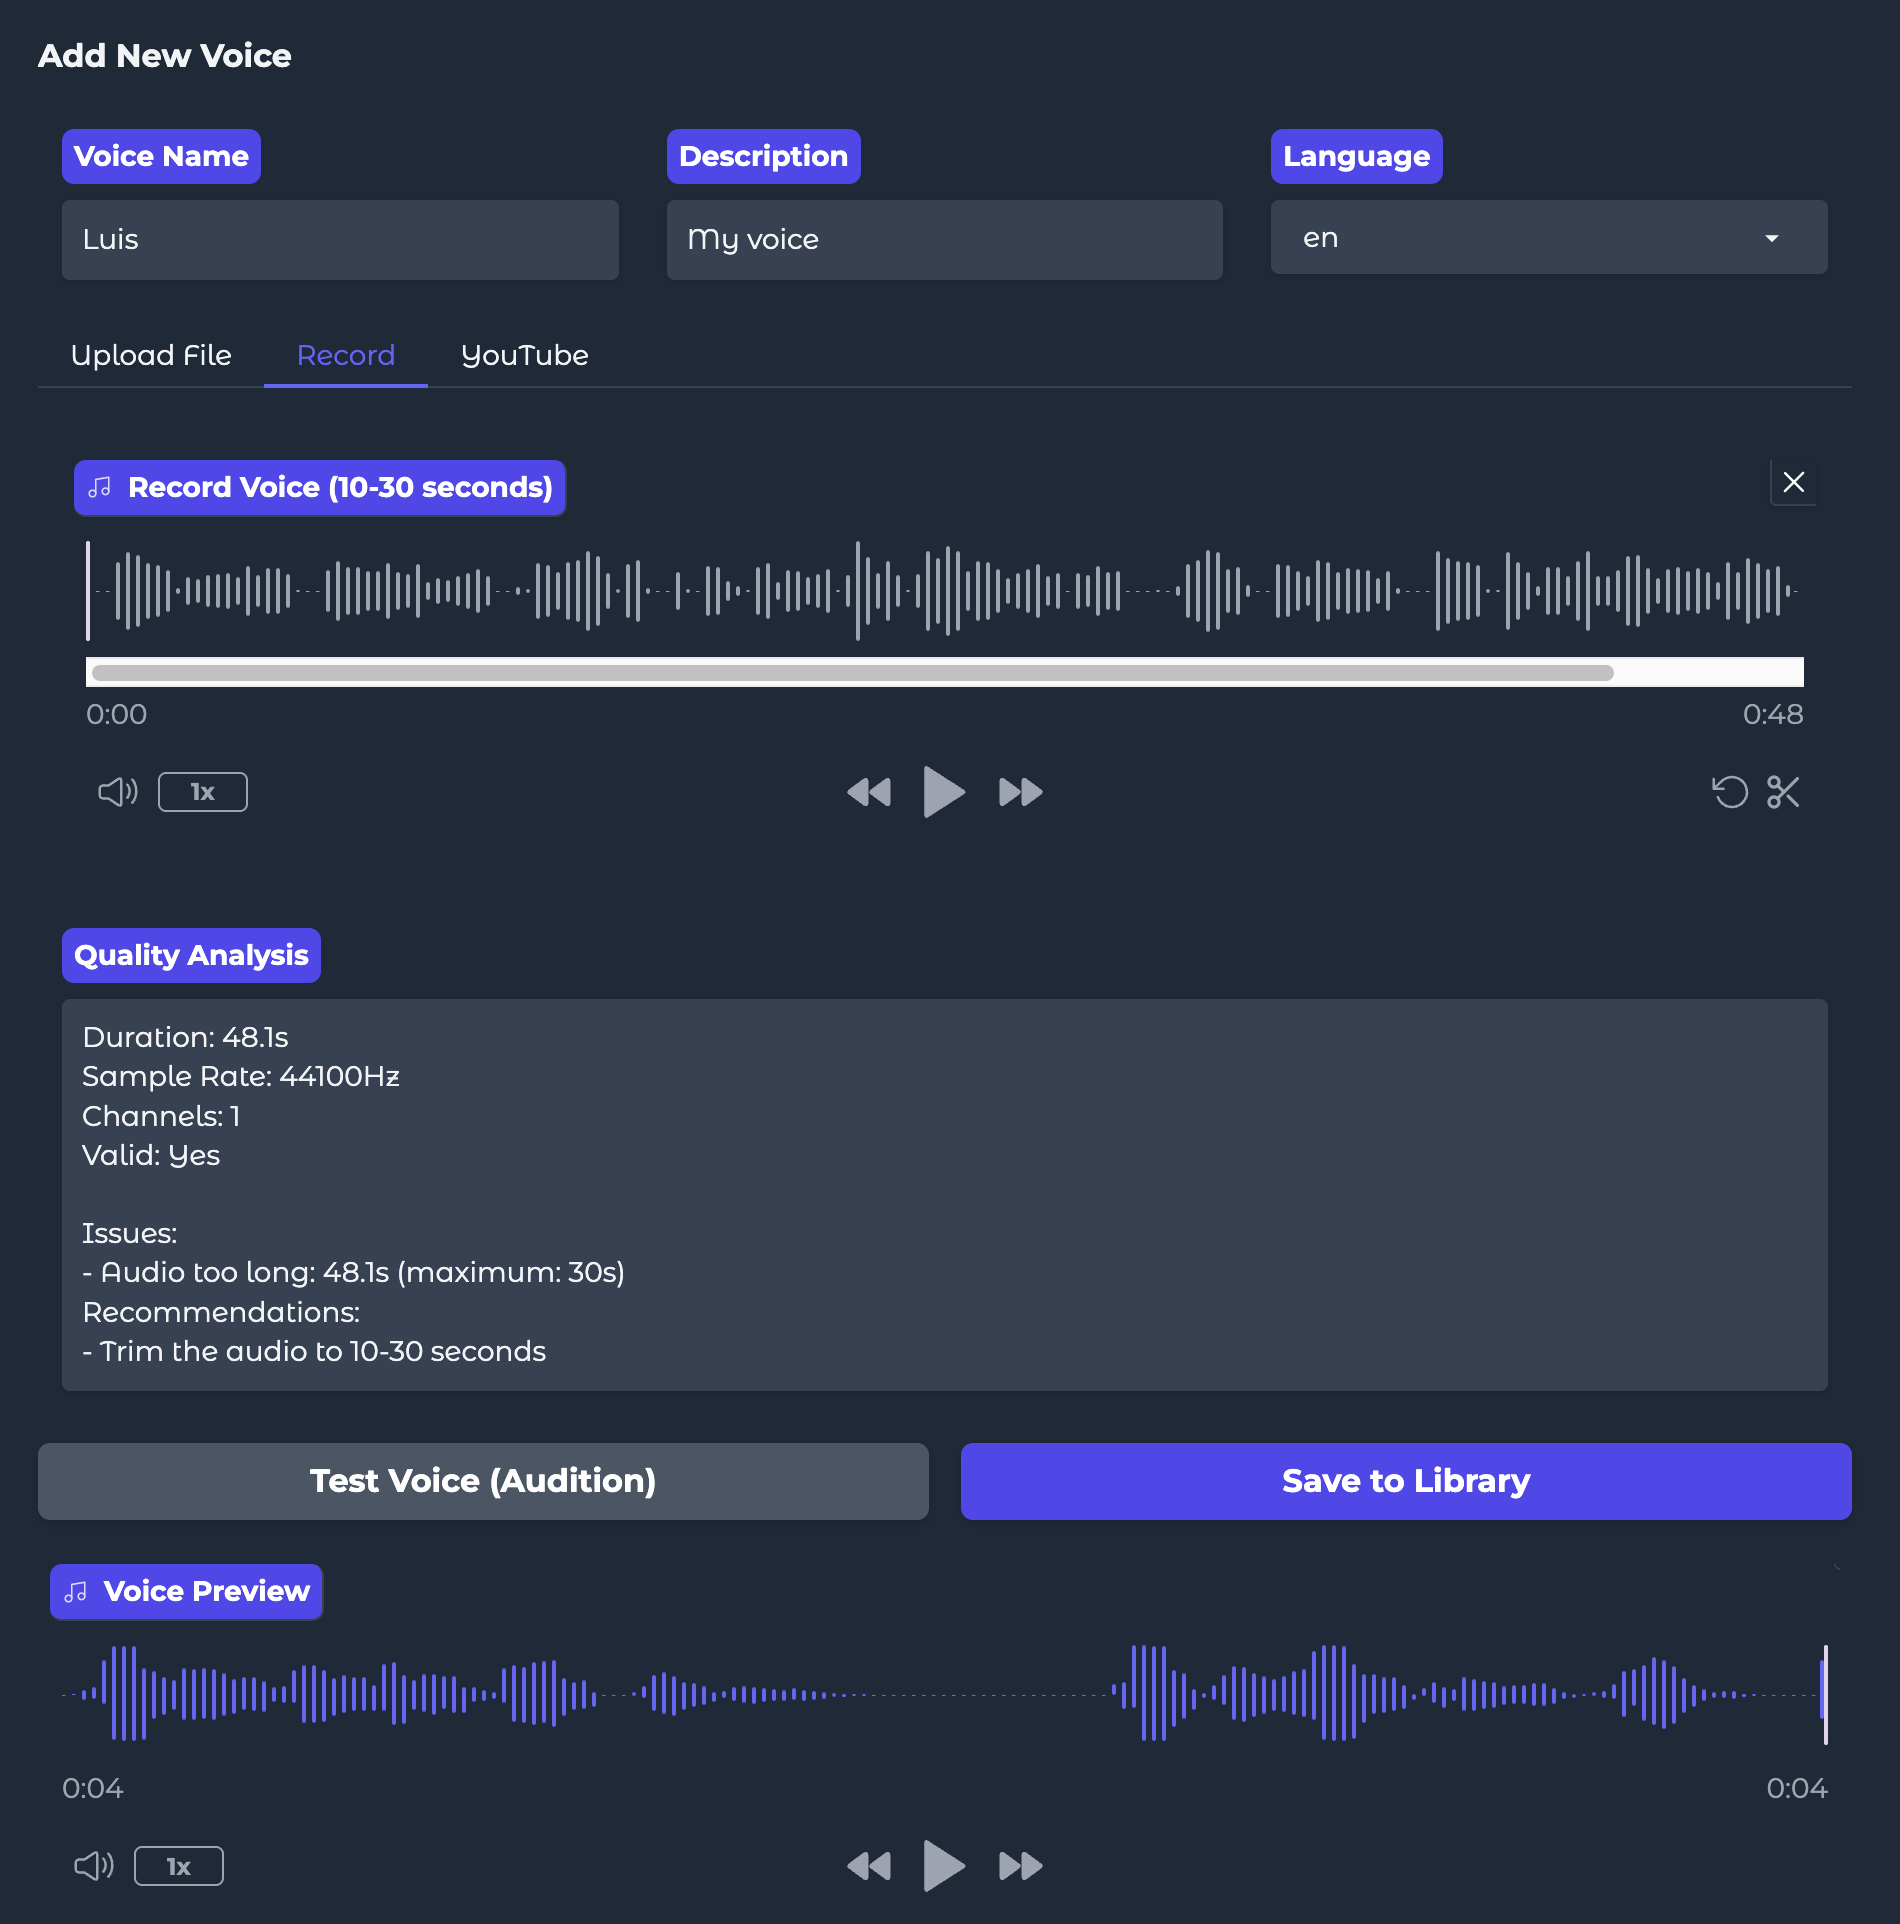
<p>One day, someone mentioned <a href="https://github.com/resemble-ai/chatterbox">Chatterbox</a>—an open-source TTS model from Resemble AI that runs locally. Free. Unlimited. With voice cloning.</p>

<p>That got me thinking: <strong>What if I could automate the entire process?</strong></p>

<p>So I started vibecoding.</p>

<h2 id="what-is-vibecoding">What is Vibecoding?</h2>

<p>Vibecoding is building software by describing what you want to an AI coding assistant and letting it write the code. You guide the “vibe” of what you want, iterate on the results, and end up with working software—often without writing much code yourself.</p>

<p>I used <a href="https://github.com/anthropics/claude-code">Claude Code</a> (Anthropic’s CLI tool) to build this entire app. The process was conversational: I described features, Claude wrote the code, I tested it, and we iterated.</p>

<h2 id="the-result-one-click-flashcard-generation">The Result: One-Click Flashcard Generation</h2>

<p>Now, creating a card looks like this:</p>

<ol>
  <li>Type a word or phrase</li>
  <li>Click “Generate All”</li>
  <li>Done.</li>
</ol>

<!-- IMAGE: App interface showing "too far into the weeds" example -->
<p><a href="/assets/images/anki-app-too-far-weeds.png" style="display:block; margin-left:auto; margin-right:auto; width:100%"><img src="/assets/images/anki-app-too-far-weeds.png" alt="App generating &quot;too far into the weeds&quot; flashcard" /></a></p>

<p>The app automatically:</p>

<ul>
  <li><strong>Generates a definition</strong> using Cambridge Dictionary style</li>
  <li><strong>Creates a cloze example</strong> with proper  markup</li>
  <li><strong>Produces an image prompt</strong> describing the example scene</li>
  <li><strong>Generates an anime-style image</strong> from the prompt</li>
  <li><strong>Adds text overlay</strong> with the phrase</li>
  <li><strong>Creates audio</strong> with natural pauses using SSML</li>
</ul>

<!-- IMAGE: Generated image prompt for "too far into the weeds" -->
<p><a href="/assets/images/anki-app-image-prompt.png" style="display:block; margin-left:auto; margin-right:auto; width:100%"><img src="/assets/images/anki-app-image-prompt.png" alt="Image prompt generation" /></a></p>

<p>And the final card in Anki:</p>

<!-- IMAGE: Final card preview in Anki -->
<p><a href="/assets/images/anki-card-preview.png" style="display:block; margin-left:auto; margin-right:auto; width:100%"><img src="/assets/images/anki-card-preview.png" alt="Final Anki card preview" /></a></p>

<h2 id="how-it-works-prompt-engineering-on-foundation-models">How It Works: Prompt Engineering on Foundation Models</h2>

<p>The magic is <strong>prompt engineering</strong>—crafting specific instructions that foundation models follow to produce consistent, high-quality outputs.</p>

<h3 id="text-generation-multiple-llm-providers">Text Generation (Multiple LLM Providers)</h3>

<p>The app supports several LLM providers:</p>

<table>
  <thead>
    <tr>
      <th>Provider</th>
      <th>Model</th>
      <th>How It’s Called</th>
    </tr>
  </thead>
  <tbody>
    <tr>
      <td><strong>Anthropic</strong></td>
      <td>Claude</td>
      <td><code class="language-plaintext highlighter-rouge">claude -p</code> CLI</td>
    </tr>
    <tr>
      <td><strong>Google</strong></td>
      <td>Gemini</td>
      <td>Via MCP integration</td>
    </tr>
    <tr>
      <td><strong>OpenAI</strong></td>
      <td>Codex/GPT</td>
      <td><code class="language-plaintext highlighter-rouge">codex exec</code> CLI</td>
    </tr>
    <tr>
      <td><strong>Ollama</strong></td>
      <td>Mistral, Llama, etc.</td>
      <td>Local API</td>
    </tr>
  </tbody>
</table>

<p>Behind the scenes, when you click “Generate All”, the app runs something like:</p>

<div class="language-python highlighter-rouge"><div class="highlight"><pre class="highlight"><code><span class="n">result</span> <span class="o">=</span> <span class="n">subprocess</span><span class="p">.</span><span class="nf">run</span><span class="p">(</span>
    <span class="p">[</span><span class="sh">"</span><span class="s">claude</span><span class="sh">"</span><span class="p">,</span> <span class="sh">"</span><span class="s">-p</span><span class="sh">"</span><span class="p">,</span> <span class="n">prompt</span><span class="p">,</span> <span class="sh">"</span><span class="s">--no-session-persistence</span><span class="sh">"</span><span class="p">],</span>
    <span class="n">capture_output</span><span class="o">=</span><span class="bp">True</span><span class="p">,</span>
    <span class="n">text</span><span class="o">=</span><span class="bp">True</span><span class="p">,</span>
    <span class="n">timeout</span><span class="o">=</span><span class="n">self</span><span class="p">.</span><span class="n">timeout</span>
<span class="p">)</span>
</code></pre></div></div>

<p>The prompt itself is carefully engineered:</p>

<div class="language-yaml highlighter-rouge"><div class="highlight"><pre class="highlight"><code><span class="na">system_prompt</span><span class="pi">:</span> <span class="pi">|</span>
  <span class="s">You are a vocabulary expert creating English learning flashcards.</span>
  <span class="s">You always respond with valid JSON matching the exact schema requested.</span>

  <span class="s">CRITICAL FOR EXAMPLES:</span>
  <span class="s">- Each example MUST correctly demonstrate the definition's meaning</span>
  <span class="s">- For IDIOMS: Use the FIGURATIVE meaning, not the literal meaning</span>
  <span class="s">- Test: "Would a native English speaker use this phrase exactly this way?"</span>
</code></pre></div></div>

<h3 id="image-generation-multiple-providers">Image Generation (Multiple Providers)</h3>

<p>The app generates an image prompt, then sends it to your chosen provider:</p>

<table>
  <thead>
    <tr>
      <th>Provider</th>
      <th>Model</th>
      <th>Cost</th>
    </tr>
  </thead>
  <tbody>
    <tr>
      <td><strong>Pollinations.ai</strong></td>
      <td>FLUX</td>
      <td>Free</td>
    </tr>
    <tr>
      <td><strong>Alibaba</strong></td>
      <td>Qwen</td>
      <td>~$0.015/img</td>
    </tr>
    <tr>
      <td><strong>OpenAI</strong></td>
      <td>DALL-E 3</td>
      <td>~$0.04/img</td>
    </tr>
    <tr>
      <td><strong>Google</strong></td>
      <td>Imagen</td>
      <td>~$0.02/img</td>
    </tr>
    <tr>
      <td><strong>Stability AI</strong></td>
      <td>SDXL</td>
      <td>~$0.002/img</td>
    </tr>
    <tr>
      <td><strong>Local</strong></td>
      <td>Stable Diffusion</td>
      <td>Free</td>
    </tr>
  </tbody>
</table>

<h3 id="audio-generation-tts-providers">Audio Generation (TTS Providers)</h3>

<p>For audio, you can choose between:</p>

<table>
  <thead>
    <tr>
      <th>Provider</th>
      <th>Model</th>
      <th>Cost</th>
    </tr>
  </thead>
  <tbody>
    <tr>
      <td><strong>Chatterbox</strong></td>
      <td>Local TTS</td>
      <td>Free</td>
    </tr>
    <tr>
      <td><strong>ElevenLabs</strong></td>
      <td>Eleven Multilingual v2</td>
      <td>Per character</td>
    </tr>
  </tbody>
</table>

<p>The app handles SSML parsing, pause timing, and audio normalization automatically.</p>

<div class="language-python highlighter-rouge"><div class="highlight"><pre class="highlight"><code><span class="n">audio_generator</span> <span class="o">=</span> <span class="n">self</span><span class="p">.</span><span class="n">client</span><span class="p">.</span><span class="n">text_to_speech</span><span class="p">.</span><span class="nf">convert</span><span class="p">(</span>
    <span class="n">text</span><span class="o">=</span><span class="n">processed_text</span><span class="p">,</span>
    <span class="n">voice_id</span><span class="o">=</span><span class="n">voice_id</span><span class="p">,</span>
    <span class="n">model_id</span><span class="o">=</span><span class="sh">"</span><span class="s">eleven_multilingual_v2</span><span class="sh">"</span><span class="p">,</span>
    <span class="n">voice_settings</span><span class="o">=</span><span class="n">voice_settings</span><span class="p">,</span>
<span class="p">)</span>
</code></pre></div></div>

<h2 id="bonus-custom-voice-cloning">Bonus: Custom Voice Cloning</h2>

<p>Want to learn with a familiar voice? The app supports voice cloning using Chatterbox. You can:</p>

<ol>
  <li><strong>Record your own voice</strong> (or a friend’s with permission)</li>
  <li><strong>Upload an audio file</strong> as a reference sample</li>
  <li><strong>Extract audio from YouTube</strong> for royalty-free content or personal samples</li>
  <li><strong>Generate all your flashcards</strong> with that custom voice</li>
</ol>

<p>The app even analyzes audio quality and recommends optimal clip length (10-30 seconds) for best results.</p>

<!-- IMAGE: Voice cloning interface -->
<p><a href="/assets/images/anki-voice-cloning.png" style="display:block; margin-left:auto; margin-right:auto; width:100%"><img src="/assets/images/anki-voice-cloning.png" alt="Custom voice cloning interface" /></a></p>

<h2 id="what-about-anki">What About Anki?</h2>

<p>Anki is a free, open-source flashcard app that uses <strong>Spaced Repetition System (SRS)</strong> to optimize learning. Based on the forgetting curve research by Hermann Ebbinghaus, SRS shows you cards just before you’re about to forget them.</p>

<!-- IMAGE: Forgetting curve diagram -->
<p><a href="/assets/images/anki-forgetting-curve.png" style="display:block; margin-left:auto; margin-right:auto; width:100%"><img src="/assets/images/anki-forgetting-curve.png" alt="The forgetting curve and spaced repetition" /></a></p>

<p>The app connects directly to Anki via <a href="https://ankiweb.net/shared/info/2055492159">AnkiConnect</a>, so cards are added with one click—no manual import needed.</p>

<h2 id="foundation-models-summary">Foundation Models Summary</h2>

<p>Here’s what powers the app:</p>

<table>
  <thead>
    <tr>
      <th>Provider</th>
      <th>Model</th>
      <th>Type</th>
    </tr>
  </thead>
  <tbody>
    <tr>
      <td><strong>Anthropic</strong></td>
      <td>Claude (via CLI)</td>
      <td>Text/LLM</td>
    </tr>
    <tr>
      <td><strong>Google</strong></td>
      <td>Gemini (via MCP)</td>
      <td>Text/LLM</td>
    </tr>
    <tr>
      <td><strong>OpenAI</strong></td>
      <td>Codex/GPT (via CLI)</td>
      <td>Text/LLM</td>
    </tr>
    <tr>
      <td><strong>OpenAI</strong></td>
      <td>DALL-E 3</td>
      <td>Image</td>
    </tr>
    <tr>
      <td><strong>Google</strong></td>
      <td>Imagen</td>
      <td>Image</td>
    </tr>
    <tr>
      <td><strong>Stability AI</strong></td>
      <td>Stable Diffusion XL</td>
      <td>Image</td>
    </tr>
    <tr>
      <td><strong>Alibaba</strong></td>
      <td>Qwen (DashScope)</td>
      <td>Image</td>
    </tr>
    <tr>
      <td><strong>Pollinations.ai</strong></td>
      <td>FLUX</td>
      <td>Image (Free)</td>
    </tr>
    <tr>
      <td><strong>Hugging Face</strong></td>
      <td>Stable Diffusion v1.5</td>
      <td>Image (Local)</td>
    </tr>
    <tr>
      <td><strong>Hugging Face</strong></td>
      <td>Chatterbox (Resemble AI)</td>
      <td>TTS (Local)</td>
    </tr>
    <tr>
      <td><strong>ElevenLabs</strong></td>
      <td>Eleven Multilingual v2</td>
      <td>TTS</td>
    </tr>
  </tbody>
</table>

<h2 id="conclusion">Conclusion</h2>

<p>What used to take 5-10 minutes per card now takes <strong>10 seconds</strong>. And the quality is better because the prompts are refined and consistent.</p>

<p>This project is a perfect example of what’s possible when you combine:</p>

<ul>
  <li><strong>Prompt engineering</strong> to guide AI behavior</li>
  <li><strong>Foundation models</strong> from multiple providers</li>
  <li><strong>Vibecoding</strong> to build the app itself</li>
  <li><strong>Local and cloud tools</strong> like Gradio, Chatterbox, and AnkiConnect</li>
</ul>

<p>The future of personal productivity tools is building exactly what you need, with AI as your coding partner.</p>

<hr />

<p><em>Have questions or want to discuss AI-powered learning tools? Feel free to reach out on <a href="https://www.linkedin.com/in/lgallard/">LinkedIn</a>.</em></p>]]></content><author><name>Luis Gallardo</name></author><category term="Blog" /><category term="AI" /><category term="Anki" /><category term="Flashcards" /><category term="AI Tools" /><category term="Claude Code" /><category term="Vibecoding" /><category term="Prompt Engineering" /><category term="ElevenLabs" /><category term="Text-to-Speech" /><category term="Spaced Repetition" /><category term="Language Learning" /><summary type="html"><![CDATA[How I vibecoded an Anki flashcard generator that uses multiple AI models (Claude, Gemini, OpenAI, Qwen, ElevenLabs, Chatterbox) to automatically create vocabulary cards with definitions, images, and audio.]]></summary></entry><entry><title type="html">When Claude Goes Silent: Navigating API Timeouts and Model Selection in Claude Code</title><link href="https://lgallardo.com/2025/12/11/claude-code-api-timeouts-model-switching/" rel="alternate" type="text/html" title="When Claude Goes Silent: Navigating API Timeouts and Model Selection in Claude Code" /><published>2025-12-11T00:00:00+00:00</published><updated>2025-12-11T00:00:00+00:00</updated><id>https://lgallardo.com/2025/12/11/claude-code-api-timeouts-model-switching</id><content type="html" xml:base="https://lgallardo.com/2025/12/11/claude-code-api-timeouts-model-switching/"><![CDATA[<p><img src="/assets/images/claude-model-switching.png" alt="Claude Code model selection interface showing Sonnet, Opus, and Haiku options with their respective capabilities and use cases" style="display:block; margin-left:auto; margin-right:auto; width:90%" /></p>

<p>The other day, while working on a critical refactoring task, <strong>Claude Code suddenly stopped responding</strong>. The familiar token consumption animation froze, requests timed out, and my productivity ground to a halt. If you’ve experienced this frustrating scenario—watching tokens not being consumed while your deadline approaches—you’re not alone.</p>

<p>The culprit? API issues with specific Anthropic models. The solution? <strong>Understanding how to diagnose the problem, switch between Claude’s model family, and leverage fallback options</strong>. Here’s what I learned during my unexpected deep dive into Claude Code’s model flexibility.</p>

<h2 id="-the-silent-failure-when-tokens-dont-flow">🔴 The Silent Failure: When Tokens Don’t Flow</h2>

<p>The first sign something was wrong came subtly. I sent a request to refactor a complex Terraform module, and instead of the usual immediate response, I saw:</p>

<ul>
  <li><strong>No token consumption</strong> in the Claude Code interface</li>
  <li><strong>Spinning request indicators</strong> that never resolved</li>
  <li><strong>Failed requests</strong> with vague “API unavailable” messages</li>
</ul>

<p>What made this particularly confusing was that it wasn’t a complete outage—Claude Code was running, authenticated properly, and showed no obvious errors. It was just… silent.</p>

<h3 id="the-investigation-process">The Investigation Process</h3>

<p>My first instinct was to check the usual suspects:</p>

<ol>
  <li><strong>Network connectivity</strong>: Everything else worked fine</li>
  <li><strong>API key validity</strong>: Still active and authenticated</li>
  <li><strong>Claude Code version</strong>: Up to date</li>
  <li><strong>Local configuration</strong>: No recent changes</li>
</ol>

<p>Nothing seemed wrong on my end, which led me to the critical question: <strong>Is this a problem with Anthropic’s services?</strong></p>

<h2 id="-checking-anthropics-status-page">🔍 Checking Anthropic’s Status Page</h2>

<p>This is where many developers get stuck—they assume the problem is local and spend hours troubleshooting their setup. The reality is that cloud services experience issues, and Anthropic is no exception.</p>

<p><strong>The first step in diagnosing mysterious API timeouts: Check the status page.</strong></p>

<p>Head to <a href="https://status.anthropic.com">status.anthropic.com</a> and look for incident reports or degraded performance indicators.</p>

<p><img src="/assets/images/anthropic-status-page-issues.png" alt="Anthropic status page displaying service status for Claude models, showing Opus 4.5 and Haiku 4.5 with elevated error rates while Sonnet 4.5 remains operational" style="display:block; margin-left:auto; margin-right:auto; width:90%" />
<em>Anthropic status page showing Opus 4.5 and Haiku 4.5 experiencing issues</em></p>

<p>In my case, the status page immediately revealed the problem:</p>

<ul>
  <li><strong>Claude Opus 4.5</strong>: Experiencing elevated error rates</li>
  <li><strong>Claude Haiku 4.5</strong>: Partial outage with API timeouts</li>
  <li><strong>Claude Sonnet 4.5</strong>: Operational</li>
</ul>

<p>This explained everything. I was using Opus 4.5 for complex reasoning tasks, and it was currently experiencing service degradation. The tokens weren’t being consumed because the model wasn’t responding—but critically, <strong>other Claude models were still available</strong>.</p>

<h3 id="why-status-pages-matter">Why Status Pages Matter</h3>

<p>In the world of AI-assisted development, we’ve become so dependent on these tools that outages feel catastrophic. But understanding that:</p>

<ol>
  <li><strong>Individual models can experience issues</strong> while others remain operational</li>
  <li><strong>Planned maintenance</strong> happens regularly (check the status page for schedules)</li>
  <li><strong>Partial outages</strong> are often model-specific, not platform-wide</li>
</ol>

<p>This knowledge transforms a productivity-killing mystery into a solvable problem with a clear action plan: <strong>switch models</strong>.</p>

<h2 id="-the-solution-switching-to-sonnet-45">🔄 The Solution: Switching to Sonnet 4.5</h2>

<p>Claude Code offers a powerful feature that many users overlook: <strong>the ability to switch between models on the fly</strong>. Anthropic’s model family includes:</p>

<ul>
  <li><strong>Claude Opus 4.5</strong>: Maximum intelligence, best for complex reasoning, architecture decisions, and multi-step problem solving</li>
  <li><strong>Claude Sonnet 4.5</strong>: Balanced performance and speed, excellent for most development tasks</li>
  <li><strong>Claude Haiku 4.5</strong>: Fast and efficient, ideal for simple queries and quick iterations</li>
</ul>

<p>When Opus and Haiku were experiencing issues, Sonnet became my lifeline.</p>

<h3 id="how-to-switch-models-in-claude-code">How to Switch Models in Claude Code</h3>

<p>The process is straightforward using the <code class="language-plaintext highlighter-rouge">/model</code> command:</p>

<div class="language-bash highlighter-rouge"><div class="highlight"><pre class="highlight"><code><span class="c"># Check current model</span>
/model

<span class="c"># Switch to Sonnet 4.5</span>
/model sonnet

<span class="c"># Switch to Opus 4.5 (when it's working)</span>
/model opus

<span class="c"># Switch to Haiku 4.5 for speed</span>
/model haiku
</code></pre></div></div>

<p><img src="/assets/images/claude-code-model-selection.png" alt="Claude Code CLI showing the /model command output with available models: Opus 4.5, Sonnet 4.5, and Haiku 4.5, with Sonnet highlighted as the current selection" style="display:block; margin-left:auto; margin-right:auto; width:90%" />
<em>Claude Code model selection interface with Sonnet 4.5 highlighted</em></p>

<p>The switch is instantaneous, and Claude Code seamlessly continues your conversation context with the new model. In my case, switching to Sonnet not only restored functionality but also provided surprisingly good results for my refactoring task.</p>

<h3 id="understanding-model-tradeoffs">Understanding Model Tradeoffs</h3>

<p>Each model has distinct characteristics that make it suitable for different scenarios:</p>

<p><strong>Claude Opus 4.5:</strong></p>
<ul>
  <li><strong>Strengths</strong>: Complex architecture, multi-file refactoring, nuanced debugging</li>
  <li><strong>Weaknesses</strong>: Slower responses, higher cost, occasional availability issues</li>
  <li><strong>Best for</strong>: Critical features, architectural decisions, intricate problem-solving</li>
</ul>

<p><strong>Claude Sonnet 4.5:</strong></p>
<ul>
  <li><strong>Strengths</strong>: Fast, reliable, excellent code quality, great balance</li>
  <li><strong>Weaknesses</strong>: May struggle with extremely complex reasoning chains</li>
  <li><strong>Best for</strong>: Most development tasks, feature implementation, bug fixes</li>
</ul>

<p><strong>Claude Haiku 4.5:</strong></p>
<ul>
  <li><strong>Strengths</strong>: Blazing fast, cost-effective, great for iterations</li>
  <li><strong>Weaknesses</strong>: Limited context understanding, simpler reasoning</li>
  <li><strong>Best for</strong>: Quick fixes, documentation, simple queries</li>
</ul>

<p>In my experience, <strong>Sonnet 4.5 handles 80-90% of development tasks brilliantly</strong>, making it the perfect fallback when premium models experience issues.</p>

<h2 id="️-building-resilience-the-value-of-model-options">🛡️ Building Resilience: The Value of Model Options</h2>

<p>This incident highlighted a crucial insight: <strong>having model flexibility isn’t just about optimization—it’s about continuity</strong>. When you’re relying on AI for development work, a single point of failure can derail your entire workflow.</p>

<h3 id="the-three-tier-resilience-strategy">The Three-Tier Resilience Strategy</h3>

<p>I now approach Claude Code with a resilience mindset:</p>

<p><strong>Tier 1: Primary Model Selection</strong></p>
<ul>
  <li>Use Opus 4.5 for genuinely complex tasks requiring deep reasoning</li>
  <li>Default to Sonnet 4.5 for standard development work</li>
  <li>Reserve Haiku 4.5 for rapid iterations and simple queries</li>
</ul>

<p><strong>Tier 2: Model Switching Within Anthropic</strong></p>
<ul>
  <li>Monitor response times and token consumption</li>
  <li>Switch models at first sign of degraded performance</li>
  <li>Check status page when experiencing timeouts</li>
</ul>

<p><strong>Tier 3: Alternative AI Providers</strong> (discussed below)</p>
<ul>
  <li>Have backup providers configured and ready</li>
  <li>Understand which alternatives excel at specific tasks</li>
  <li>Maintain API access to multiple platforms</li>
</ul>

<p>This strategy ensures that an issue with a single model—or even a single provider—doesn’t stop your work.</p>

<h2 id="-beyond-anthropic-fallback-to-other-ai-providers">🌐 Beyond Anthropic: Fallback to Other AI Providers</h2>

<p>While Claude Code is tightly integrated with Anthropic’s models, there are times when you need to go beyond the ecosystem entirely. Perhaps all Anthropic models are experiencing issues, you’ve hit usage limits, or you need capabilities specific to another provider.</p>

<h3 id="available-fallback-options">Available Fallback Options</h3>

<p><strong>Google Gemini:</strong></p>
<ul>
  <li><strong>Access</strong>: Direct API or through Claude Code Router with OpenRouter</li>
  <li><strong>Strengths</strong>: Excellent code generation, strong at structured outputs, competitive pricing</li>
  <li><strong>Best for</strong>: When you need Google’s ecosystem integration or specific Gemini features</li>
  <li><strong>Setup</strong>: Configure via OpenRouter or direct Gemini API</li>
</ul>

<p><strong>OpenAI Codex / GPT Models:</strong></p>
<ul>
  <li><strong>Access</strong>: Through Claude Code Router + OpenRouter</li>
  <li><strong>Strengths</strong>: GPT-4o excels at complex reasoning, GPT-4o-mini is cost-effective</li>
  <li><strong>Best for</strong>: Tasks where you’ve found GPT performs better, or when exploring model differences</li>
  <li><strong>Note</strong>: GPT-5 requires BYOK (Bring Your Own Key) on OpenRouter</li>
</ul>

<p><strong>Qwen (Alibaba):</strong></p>
<ul>
  <li><strong>Access</strong>: Free tier available on OpenRouter</li>
  <li><strong>Strengths</strong>: Qwen3 Coder optimized for development tasks, massive 262K context window</li>
  <li><strong>Best for</strong>: Cost-conscious development, experimenting with Chinese tech stack models</li>
  <li><strong>Surprising quality</strong>: Free doesn’t mean inferior—Qwen handles routine tasks remarkably well</li>
</ul>

<p><strong>DeepSeek:</strong></p>
<ul>
  <li><strong>Access</strong>: Free on OpenRouter, also available through API</li>
  <li><strong>Strengths</strong>: Strong reasoning capabilities, particularly good for debugging</li>
  <li><strong>Best for</strong>: When you need fresh perspective on complex bugs</li>
  <li><strong>Bonus</strong>: Open-weight model with solid general performance</li>
</ul>

<h3 id="setting-up-claude-code-router-for-multi-provider-access">Setting Up Claude Code Router for Multi-Provider Access</h3>

<p>To access these alternatives, you’ll need <a href="https://github.com/musistudio/claude-code-router">Claude Code Router</a>—a powerful proxy that routes Claude Code requests to any compatible LLM provider.</p>

<p><strong>Quick Setup:</strong></p>

<div class="language-bash highlighter-rouge"><div class="highlight"><pre class="highlight"><code><span class="c"># Install Claude Code Router</span>
npm <span class="nb">install</span> <span class="nt">-g</span> @musistudio/claude-code-router

<span class="c"># Start the router</span>
ccr start

<span class="c"># Open the configuration UI to set up providers</span>
ccr ui
</code></pre></div></div>

<p>The router UI at <code class="language-plaintext highlighter-rouge">http://localhost:3456</code> provides visual configuration for routing rules, letting you assign specific models to different scenarios (Default, Background, Think, Long Context).</p>

<p>For a comprehensive guide on setting up Claude Code Router with OpenRouter, including detailed configuration examples and advanced routing strategies, check out my previous post: <strong><a href="/2025/08/20/claude-code-router-openrouter-beyond-anthropic/">Claude Code Router and OpenRouter: Beyond Anthropic</a></strong>.</p>

<h3 id="when-to-use-alternative-providers">When to Use Alternative Providers</h3>

<p><strong>Immediate Fallback Scenarios:</strong></p>
<ul>
  <li>All Anthropic models experiencing issues (check status page)</li>
  <li>Hit Claude usage limits mid-project</li>
  <li>Specific task better suited to another model (e.g., GPT for certain types of creative writing)</li>
</ul>

<p><strong>Strategic Use Cases:</strong></p>
<ul>
  <li><strong>Cost optimization</strong>: Use free Qwen/DeepSeek for routine tasks, save Claude credits for complex work</li>
  <li><strong>Model comparison</strong>: Test same task across providers to find best fit</li>
  <li><strong>Privacy requirements</strong>: Self-hosted Ollama for sensitive code</li>
  <li><strong>Experimentation</strong>: Explore different model capabilities and approaches</li>
</ul>

<p><strong>Important Consideration:</strong>
Not all models support Claude Code’s tool/function calling features. Many free models excel at code generation and explanation but can’t execute file operations or git commands. Route accordingly:</p>
<ul>
  <li><strong>Tool-capable</strong>: Claude models, GPT-4o series, some Gemini models</li>
  <li><strong>Text-only</strong>: Most free models (great for explanations, reviews, documentation)</li>
</ul>

<h2 id="-lessons-learned-best-practices-for-resilient-ai-development">💡 Lessons Learned: Best Practices for Resilient AI Development</h2>

<p>After this experience, I’ve adopted several practices that have made my AI-assisted workflow more robust:</p>

<h3 id="1-monitor-dont-assume">1. Monitor, Don’t Assume</h3>

<p><strong>Before this incident</strong>, I assumed timeouts were always local issues—my network, my configuration, my code.</p>

<p><strong>Now</strong>, my troubleshooting checklist starts with:</p>
<ol>
  <li>Check Anthropic status page</li>
  <li>Test model switching</li>
  <li>Verify network/configuration</li>
  <li>Consider alternative providers</li>
</ol>

<p>This simple reordering saves hours of misdirected debugging.</p>

<h3 id="2-diversify-your-model-strategy">2. Diversify Your Model Strategy</h3>

<p><strong>Don’t over-optimize for a single model.</strong> I used to default to Opus for everything, thinking “more powerful = better results.” This created:</p>
<ul>
  <li>Higher costs</li>
  <li>Slower responses</li>
  <li>Single point of failure</li>
</ul>

<p><strong>Now</strong>, I match models to task complexity:</p>
<ul>
  <li>Haiku for quick iterations and documentation</li>
  <li>Sonnet for standard feature development</li>
  <li>Opus reserved for genuinely complex architectural work</li>
</ul>

<p>This approach is faster, cheaper, and more resilient.</p>

<h3 id="3-maintain-provider-optionality">3. Maintain Provider Optionality</h3>

<p>Even if you primarily use Anthropic models, <strong>having Claude Code Router configured with alternatives</strong> provides peace of mind. I keep:</p>
<ul>
  <li>OpenRouter account with $10 credit (lasts months with free models)</li>
  <li>Gemini API key for Google ecosystem tasks</li>
  <li>Local Ollama for privacy-sensitive work</li>
</ul>

<p>I rarely use these alternatives, but when I need them—during outages or for specific capabilities—they’re immediately available.</p>

<h3 id="4-understand-usage-patterns">4. Understand Usage Patterns</h3>

<p>Track which models you actually need for different tasks. I discovered:</p>
<ul>
  <li>70% of my queries work perfectly with Sonnet</li>
  <li>20% benefit from Opus’s reasoning</li>
  <li>10% are simple enough for Haiku</li>
</ul>

<p>This awareness helps with both model selection and cost management.</p>

<h3 id="5-bookmark-the-status-page">5. Bookmark the Status Page</h3>

<p>Add <a href="https://status.anthropic.com">status.anthropic.com</a> to your bookmarks. When you encounter issues:</p>
<ul>
  <li>Check status page FIRST</li>
  <li>Save time troubleshooting phantom problems</li>
  <li>Understand incident scope and ETA</li>
</ul>

<p>It seems obvious in hindsight, but it’s easy to forget during a frustrating timeout scenario.</p>

<h2 id="-practical-troubleshooting-workflow">🔧 Practical Troubleshooting Workflow</h2>

<p>When you encounter API timeouts or unresponsive behavior in Claude Code, follow this systematic approach:</p>

<h3 id="step-1-quick-diagnostics-2-minutes">Step 1: Quick Diagnostics (2 minutes)</h3>

<div class="language-bash highlighter-rouge"><div class="highlight"><pre class="highlight"><code><span class="c"># Check current model</span>
/model

<span class="c"># Verify Claude Code status</span>
claude status

<span class="c"># Check your usage/limits</span>
<span class="c"># (Available in Claude Code UI or API dashboard)</span>
</code></pre></div></div>

<h3 id="step-2-status-verification-1-minute">Step 2: Status Verification (1 minute)</h3>

<ul>
  <li>Open <a href="https://status.anthropic.com">status.anthropic.com</a></li>
  <li>Look for incidents affecting your current model</li>
  <li>Note any planned maintenance windows</li>
</ul>

<h3 id="step-3-model-switch-test-1-minute">Step 3: Model Switch Test (1 minute)</h3>

<div class="language-bash highlighter-rouge"><div class="highlight"><pre class="highlight"><code><span class="c"># Try switching to different Anthropic model</span>
/model sonnet

<span class="c"># Send a simple test query</span>
<span class="s2">"Hello, are you responding correctly?"</span>
</code></pre></div></div>

<p>If this works, the issue is model-specific. Continue with the working model.</p>

<h3 id="step-4-alternative-provider-if-needed">Step 4: Alternative Provider (if needed)</h3>

<p>If all Anthropic models are affected:</p>

<div class="language-bash highlighter-rouge"><div class="highlight"><pre class="highlight"><code><span class="c"># Launch Claude Code Router (if configured)</span>
ccr start

<span class="c"># Switch to alternative via router</span>
/model openrouter,gemini-2.0-flash-exp

<span class="c"># Continue your work</span>
</code></pre></div></div>

<h3 id="step-5-long-term-resolution">Step 5: Long-term Resolution</h3>

<ul>
  <li>Monitor status page for all-clear</li>
  <li>Switch back to preferred model when available</li>
  <li>Consider adjusting default model based on reliability patterns</li>
</ul>

<h2 id="-final-thoughts-embrace-model-diversity">🧠 Final Thoughts: Embrace Model Diversity</h2>

<p>The myth of the “perfect AI model” is just that—a myth. The reality is more nuanced:</p>

<ul>
  <li><strong>Different models excel at different tasks</strong></li>
  <li><strong>Availability and reliability vary over time</strong></li>
  <li><strong>Cost considerations matter for sustainable usage</strong></li>
  <li><strong>Privacy and security requirements differ by project</strong></li>
</ul>

<p>My API timeout experience was frustrating in the moment, but it led to a valuable realization: <strong>the most powerful feature of Claude Code isn’t access to the best model—it’s the flexibility to choose the right model for right now</strong>.</p>

<h3 id="key-takeaways">Key Takeaways</h3>

<ol>
  <li><strong>Status pages are your friend</strong>: Check <a href="https://status.anthropic.com">status.anthropic.com</a> when issues arise</li>
  <li><strong>Model switching is simple</strong>: Use <code class="language-plaintext highlighter-rouge">/model</code> command to switch between Sonnet, Opus, and Haiku</li>
  <li><strong>Sonnet is underrated</strong>: The “balanced” model handles most tasks brilliantly</li>
  <li><strong>Build fallback options</strong>: Configure Claude Code Router for multi-provider access</li>
  <li><strong>Match models to tasks</strong>: Don’t use Opus for everything just because it’s “premium”</li>
  <li><strong>Systematic troubleshooting saves time</strong>: Follow a consistent diagnostic process</li>
</ol>

<h3 id="whats-next">What’s Next?</h3>

<p>The AI development landscape continues to evolve rapidly. Features I’m watching:</p>

<ul>
  <li><strong>Automatic model failover</strong>: Claude Code detecting issues and switching models automatically</li>
  <li><strong>Usage-based routing</strong>: Intelligent model selection based on remaining quotas</li>
  <li><strong>Performance-based learning</strong>: Systems that learn which models you prefer for specific tasks</li>
  <li><strong>Cross-provider context</strong>: Seamless conversation continuity across different AI providers</li>
</ul>

<p>Until then, knowing how to manually navigate these scenarios keeps you productive regardless of what the status page shows.</p>

<h2 id="-references">📚 References</h2>

<ul>
  <li><a href="https://status.anthropic.com">Anthropic Status Page</a> - Real-time service status for Claude models</li>
  <li><a href="https://docs.anthropic.com/en/docs/claude-code">Claude Code Documentation</a> - Official setup and usage guides</li>
  <li><a href="https://github.com/musistudio/claude-code-router">Claude Code Router</a> - Multi-provider routing for Claude Code</li>
  <li><a href="https://openrouter.ai">OpenRouter</a> - Universal API gateway for 400+ AI models</li>
  <li><a href="https://modelcontextprotocol.io/">Model Context Protocol</a> - Standardized AI tool integration</li>
  <li><a href="https://ollama.ai">Ollama</a> - Run AI models locally for maximum privacy</li>
</ul>

<hr />

<p><em>Have you experienced API timeouts with Claude Code or other AI assistants? What’s your fallback strategy when your primary model isn’t available? Share your experiences and troubleshooting tips in the comments below.</em></p>]]></content><author><name>Luis Gallardo</name></author><category term="Blog" /><category term="DevOps" /><category term="Claude Code" /><category term="AI Tools" /><category term="Anthropic" /><category term="Model Selection" /><category term="API Troubleshooting" /><category term="Opus 4.5" /><category term="Haiku 4.5" /><category term="Sonnet 4.5" /><category term="OpenRouter" /><category term="Gemini" /><category term="Qwen" /><summary type="html"><![CDATA[Guide to troubleshooting Claude Code API timeouts, checking Anthropic status, switching between Sonnet, Opus, and Haiku models, and using fallback AI providers like Google Gemini, OpenAI Codex, or Qwen.]]></summary></entry><entry><title type="html">Code-Vibing with AI: Building a Pico-8 Game Without Learning the Language</title><link href="https://lgallardo.com/2025/11/09/pico8-ai-game-development/" rel="alternate" type="text/html" title="Code-Vibing with AI: Building a Pico-8 Game Without Learning the Language" /><published>2025-11-09T00:00:00+00:00</published><updated>2025-11-09T00:00:00+00:00</updated><id>https://lgallardo.com/2025/11/09/pico8-ai-game-development</id><content type="html" xml:base="https://lgallardo.com/2025/11/09/pico8-ai-game-development/"><![CDATA[<p><img src="/assets/images/pico-8-robot.png" alt="Claude Robot Handheld" style="display:block; margin-left:auto; margin-right:auto; width:90%" /></p>

<p>Last week, I stumbled upon Pico-8 while browsing retro gaming communities. As someone who plays classic games on handheld devices like the Miyoo Mini Plus and Anbernic consoles, the idea of a “fantasy console” immediately caught my attention. But here’s the thing—I had zero interest in learning Lua or spending weeks mastering Pico-8’s constraints.</p>

<p>So I thought: <strong>what if I just “code-vibe” with Claude Code to build a complete game?</strong> No tutorials, no language learning, just pure AI-assisted development. The result? A fully functional Mastermind game where the code works flawlessly but the art… well, let’s just say AI hasn’t figured out pixel art yet.</p>

<p>This isn’t about AI replacing developers. It’s about understanding what AI can do exceptionally well (code logic) and where it completely falls apart (artistic creativity). Here’s what I learned from building a Pico-8 game without knowing the language.</p>

<h2 id="-what-is-pico-8">🎮 What is Pico-8?</h2>

<p>Pico-8 is a <strong>fantasy console</strong>—an imaginary video game system with intentional limitations that spark creativity. Think of it as what the Game Boy could have been if it had perfect programming tools and a vibrant online community.</p>

<p><img src="/assets/images/pico-8.png" alt="Pico-8 Console" style="display:block; margin-left:auto; margin-right:auto; width:80%" /></p>

<h3 id="the-beautiful-constraints">The Beautiful Constraints</h3>
<ul>
  <li><strong>Display</strong>: 128x128 pixels</li>
  <li><strong>Colors</strong>: 16-color palette</li>
  <li><strong>Sound</strong>: 4-channel chip tune synthesizer</li>
  <li><strong>Code</strong>: 8,192 tokens of Lua</li>
  <li><strong>Sprites</strong>: 256 8x8 pixel sprites</li>
  <li><strong>Map</strong>: 128x64 tile map</li>
</ul>

<p>These limitations aren’t bugs—they’re features. They force you to be creative, to make every pixel count, and to build games that feel genuinely retro. The Pico-8 community has created thousands of games, from platformers to RPGs to puzzle games, all within these constraints.</p>

<p>What really appealed to me was that <strong>Pico-8 games run everywhere</strong>—not just on desktop, but on handheld retro gaming devices like the Miyoo Mini Plus, Anbernic RG35XX, and other pocket-sized consoles that support custom firmware. There’s something magical about creating a game on your laptop and playing it on a tiny handheld device an hour later.</p>

<h2 id="-the-experiment-code-vibing-with-claude-code">🤖 The Experiment: Code-Vibing with Claude Code</h2>

<p>I wanted to build a Mastermind game—the classic code-breaking puzzle where you guess a secret pattern of colored pegs. The game gives you feedback after each guess: black pegs for correct colors in correct positions, white pegs for correct colors in wrong positions.</p>

<p>My approach was simple: <strong>describe what I wanted, let Claude Code do the heavy lifting, and iterate based on testing.</strong></p>

<h3 id="the-development-process">The Development Process</h3>

<p><strong>Phase 1: Core Game Logic</strong></p>
<div class="language-plaintext highlighter-rouge"><div class="highlight"><pre class="highlight"><code>Me: "Create a Pico-8 Mastermind game with 4 colors and 6 attempts."
Claude: *Generates complete game logic with initialization, input handling, and feedback*
</code></pre></div></div>

<p>Within minutes, I had working code that:</p>
<ul>
  <li>Generated random secret codes</li>
  <li>Handled player input for selecting colors</li>
  <li>Calculated feedback (correct position vs correct color)</li>
  <li>Managed game state (playing, won, lost)</li>
  <li>Displayed the game board and attempts</li>
</ul>

<p>Here’s a simplified snippet of what Claude Code generated:</p>

<div class="language-lua highlighter-rouge"><div class="highlight"><pre class="highlight"><code><span class="k">function</span> <span class="nf">_init</span><span class="p">()</span>
    <span class="n">secret</span><span class="o">=</span><span class="p">{</span><span class="n">flr</span><span class="p">(</span><span class="n">rnd</span><span class="p">(</span><span class="mi">6</span><span class="p">))</span><span class="o">+</span><span class="mi">1</span><span class="p">,</span><span class="n">flr</span><span class="p">(</span><span class="n">rnd</span><span class="p">(</span><span class="mi">6</span><span class="p">))</span><span class="o">+</span><span class="mi">1</span><span class="p">,</span>
            <span class="n">flr</span><span class="p">(</span><span class="n">rnd</span><span class="p">(</span><span class="mi">6</span><span class="p">))</span><span class="o">+</span><span class="mi">1</span><span class="p">,</span><span class="n">flr</span><span class="p">(</span><span class="n">rnd</span><span class="p">(</span><span class="mi">6</span><span class="p">))</span><span class="o">+</span><span class="mi">1</span><span class="p">}</span>
    <span class="n">attempts</span><span class="o">=</span><span class="p">{}</span>
    <span class="n">current_guess</span><span class="o">=</span><span class="p">{</span><span class="mi">1</span><span class="p">,</span><span class="mi">1</span><span class="p">,</span><span class="mi">1</span><span class="p">,</span><span class="mi">1</span><span class="p">}</span>
    <span class="n">cursor</span><span class="o">=</span><span class="mi">1</span>
    <span class="n">game_state</span><span class="o">=</span><span class="s2">"playing"</span>
<span class="k">end</span>

<span class="k">function</span> <span class="nf">_update</span><span class="p">()</span>
    <span class="k">if</span> <span class="n">game_state</span><span class="o">==</span><span class="s2">"playing"</span> <span class="k">then</span>
        <span class="k">if</span> <span class="n">btnp</span><span class="p">(</span><span class="err">⬅️</span><span class="p">)</span> <span class="k">then</span> <span class="n">cursor</span><span class="o">=</span><span class="n">max</span><span class="p">(</span><span class="mi">1</span><span class="p">,</span><span class="n">cursor</span><span class="o">-</span><span class="mi">1</span><span class="p">)</span> <span class="k">end</span>
        <span class="k">if</span> <span class="n">btnp</span><span class="p">(</span><span class="err">➡️</span><span class="p">)</span> <span class="k">then</span> <span class="n">cursor</span><span class="o">=</span><span class="n">min</span><span class="p">(</span><span class="mi">4</span><span class="p">,</span><span class="n">cursor</span><span class="o">+</span><span class="mi">1</span><span class="p">)</span> <span class="k">end</span>
        <span class="k">if</span> <span class="n">btnp</span><span class="p">(</span><span class="err">⬆️</span><span class="p">)</span> <span class="k">then</span> <span class="n">current_guess</span><span class="p">[</span><span class="n">cursor</span><span class="p">]</span><span class="o">=</span><span class="p">(</span><span class="n">current_guess</span><span class="p">[</span><span class="n">cursor</span><span class="p">]</span><span class="o">%</span><span class="mi">6</span><span class="p">)</span><span class="o">+</span><span class="mi">1</span> <span class="k">end</span>
        <span class="k">if</span> <span class="n">btnp</span><span class="p">(</span><span class="err">⬇️</span><span class="p">)</span> <span class="k">then</span> <span class="n">current_guess</span><span class="p">[</span><span class="n">cursor</span><span class="p">]</span><span class="o">=</span><span class="p">((</span><span class="n">current_guess</span><span class="p">[</span><span class="n">cursor</span><span class="p">]</span><span class="o">-</span><span class="mi">2</span><span class="p">)</span><span class="o">%</span><span class="mi">6</span><span class="p">)</span><span class="o">+</span><span class="mi">1</span> <span class="k">end</span>
        <span class="k">if</span> <span class="n">btnp</span><span class="p">(</span><span class="err">🅾️</span><span class="p">)</span> <span class="k">then</span> <span class="n">submit_guess</span><span class="p">()</span> <span class="k">end</span>
    <span class="k">end</span>
<span class="k">end</span>
</code></pre></div></div>

<p><strong>Phase 2: Polish and Features</strong></p>
<div class="language-plaintext highlighter-rouge"><div class="highlight"><pre class="highlight"><code>Me: "Add a title screen and instructions."
Claude: *Implements menu system with game flow*

Me: "Show the secret code when the game ends."
Claude: *Adds reveal logic with proper game state handling*

Me: "Make the feedback clearer with different symbols."
Claude: *Updates rendering to use distinct visual indicators*
</code></pre></div></div>

<p>The code just… worked. Every iteration was functional. No syntax errors, no logic bugs, no weird edge cases. <strong>Claude Code understood Pico-8’s limitations and API perfectly.</strong></p>

<h3 id="what-impressed-me-about-the-code">What Impressed Me About the Code</h3>

<ol>
  <li><strong>Proper Pico-8 conventions</strong>: Used <code class="language-plaintext highlighter-rouge">_init()</code>, <code class="language-plaintext highlighter-rouge">_update()</code>, <code class="language-plaintext highlighter-rouge">_draw()</code> correctly</li>
  <li><strong>Efficient token usage</strong>: Code stayed well under the 8,192 token limit</li>
  <li><strong>Clean state management</strong>: Game states transitioned smoothly</li>
  <li><strong>Input handling</strong>: Button presses felt responsive and natural</li>
  <li><strong>Edge cases handled</strong>: Prevented invalid moves and game state corruption</li>
</ol>

<p>I literally wrote zero lines of Lua. I just described features in natural language, and Claude Code translated my intent into working game logic.</p>

<h2 id="-where-ai-hit-the-wall-the-art-problem">🎨 Where AI Hit the Wall: The Art Problem</h2>

<p>Now here’s where things got interesting—and by interesting, I mean hilariously broken.</p>

<div class="language-plaintext highlighter-rouge"><div class="highlight"><pre class="highlight"><code>Me: "Let's make the UI look more retro, give it that 80s arcade style."
Claude: *Generates updated graphics with retro styling*

Me: "The lines are overlapping and the chips look weird."
Claude: *Tries again, visual bugs persist*

Me: "Can you fix the overlapping elements?"
Claude: *Third attempt, still introducing visual glitches*
</code></pre></div></div>

<p><img src="/assets/images/pico-8-overlaping.png" alt="Overlapping Sprites" style="display:block; margin-left:auto; margin-right:auto; width:75%" /></p>

<p>The sprites were a mess. Colors bled into each other, shapes didn’t align properly, and the overall aesthetic looked like a glitch art project gone wrong.</p>

<p><img src="/assets/images/pico-8-chips-overlaping.png" alt="Chip Overlapping" style="display:block; margin-left:auto; margin-right:auto; width:75%" /></p>

<h3 id="why-ai-fails-at-pixel-art">Why AI Fails at Pixel Art</h3>

<p>After multiple iterations, I realized the fundamental problem: <strong>Claude Code (and current general-purpose AI models) lack spatial-visual reasoning for pixel-level design.</strong></p>

<p>The AI could:</p>
<ul>
  <li>✅ Generate perfect code logic</li>
  <li>✅ Understand game mechanics</li>
  <li>✅ Handle complex state management</li>
  <li>✅ Optimize for Pico-8’s constraints</li>
</ul>

<p>But it couldn’t:</p>
<ul>
  <li>❌ Visualize how pixels form recognizable shapes</li>
  <li>❌ Understand aesthetic coherence</li>
  <li>❌ Apply consistent design language</li>
  <li>❌ Create sprites that “feel” like game assets</li>
</ul>

<p><strong>Important distinction</strong>: This limitation is specific to <strong>current general-purpose AI models</strong> like Claude Sonnet 4.5. Specialized AI art tools like Stable Diffusion, DALL-E, or Midjourney excel at image generation, but they aren’t integrated into coding workflows and don’t understand Pico-8’s specific pixel format constraints.</p>

<h3 id="the-pragmatic-decision">The Pragmatic Decision</h3>

<p>Here’s where the “code-vibing” philosophy hit a wall. Fixing the visual bugs would have required diving deep into the sprite code, understanding how AI had structured the graphics, and manually debugging pixel-level issues. <strong>That’s the opposite of code-vibing</strong>—it defeats the whole purpose of building without learning the underlying implementation.</p>

<p>So I made a practical choice: <strong>I published the game with the original, clean design</strong> from before I asked for the 80s retro styling. The initial AI-generated graphics were simple but functional. The “improved” versions introduced bugs I couldn’t easily fix without breaking the code-vibing approach.</p>

<p>This taught me something crucial: <strong>AI dramatically accelerates code development, but artistic “improvements” can introduce complexity that requires deep technical knowledge to fix.</strong> When AI visual changes break things, you either need to understand the code deeply (losing the code-vibing benefit) or revert to what worked. I chose the latter.</p>

<h2 id="️-what-i-actually-learned-the-pico-8-console">🛠️ What I Actually Learned: The Pico-8 Console</h2>

<p>While Claude Code handled the coding, I still had to learn Pico-8’s development environment. The console commands became my daily tools:</p>

<div class="language-bash highlighter-rouge"><div class="highlight"><pre class="highlight"><code><span class="c"># Load and run your game</span>
load mastermind.p8
run

<span class="c"># Save your work</span>
save

<span class="c"># Export to web or binary</span>
<span class="nb">export </span>mastermind.html
<span class="nb">export </span>mastermind.bin

<span class="c"># Sprite and map editors</span>
<span class="c"># Press ESC to toggle between code and sprite editor</span>

<span class="c"># Sound and music tools</span>
<span class="c"># Use the music editor to create chip tune soundtracks</span>

<span class="c"># Debug commands</span>
printh<span class="o">(</span><span class="s2">"debug: "</span>..tostr<span class="o">(</span>value<span class="o">))</span>  <span class="nt">--</span> Print to console
stop<span class="o">()</span>  <span class="nt">--</span> Pause execution
</code></pre></div></div>

<h3 id="essential-workflow-commands">Essential Workflow Commands</h3>

<p><strong>Development cycle:</strong></p>
<ol>
  <li>Edit code or sprites in Pico-8</li>
  <li>Press <code class="language-plaintext highlighter-rouge">Ctrl+R</code> to run immediately</li>
  <li>Test gameplay and identify issues</li>
  <li>Press <code class="language-plaintext highlighter-rouge">ESC</code> to return to editor</li>
  <li>Iterate</li>
</ol>

<p><strong>Publishing:</strong></p>
<div class="language-bash highlighter-rouge"><div class="highlight"><pre class="highlight"><code><span class="c"># Create web playable version</span>
<span class="nb">export </span>mastermind.html

<span class="c"># Create standalone binary</span>
<span class="nb">export </span>mastermind.bin

<span class="c"># Export to PNG (code + sprites embedded)</span>
save mastermind.p8.png
</code></pre></div></div>

<p>The console became my primary interface. While Claude Code wrote the logic, I was constantly running, testing, and tweaking based on how the game actually felt to play.</p>

<h2 id="-publishing-the-game-from-local-to-lexaloffle">🚀 Publishing the Game: From Local to Lexaloffle</h2>

<p>Once the game was playable and the art was fixed, I published it to the Pico-8 community platform: <strong><a href="https://www.lexaloffle.com/bbs/?pid=177155#p">BBS Lexaloffle</a></strong>.</p>

<p><img src="/assets/images/pico-8-mastermind-game.png" alt="Published Mastermind Game" style="display:block; margin-left:auto; margin-right:auto; width:80%" /></p>

<p>The publishing process was surprisingly straightforward:</p>

<ol>
  <li><strong>Create an account</strong> on Lexaloffle BBS</li>
  <li><strong>Export the cartridge</strong> as a PNG file (<code class="language-plaintext highlighter-rouge">save mastermind.p8.png</code>)</li>
  <li><strong>Upload to BBS</strong> with description and screenshots</li>
  <li><strong>Share with the community</strong> and gather feedback</li>
</ol>

<p>What’s fascinating about Pico-8’s ecosystem is the <strong>cartridge format</strong>. Games are distributed as PNG images that contain the code, sprites, music, and map data. You can literally share a game as an image file, and other Pico-8 users can load and play it immediately.</p>

<h3 id="the-community-response">The Community Response</h3>

<p>Publishing on Lexaloffle gave me immediate access to:</p>
<ul>
  <li><strong>Playable web version</strong>: Anyone can play directly in their browser</li>
  <li><strong>Download options</strong>: Users can grab the <code class="language-plaintext highlighter-rouge">.p8</code> file and run it locally</li>
  <li><strong>Community feedback</strong>: Other developers provide suggestions and bug reports</li>
  <li><strong>Discoverability</strong>: Games appear in the BBS feed and search results</li>
</ul>

<p>The Pico-8 community is incredibly welcoming to newcomers. Despite my game being a simple Mastermind implementation built with AI assistance, people played it, left encouraging comments, and even suggested improvements.</p>

<h2 id="-the-bigger-picture-what-this-means-for-development">🎯 The Bigger Picture: What This Means for Development</h2>

<p>This experiment revealed something important about <strong>AI-assisted development in 2025</strong>: we’re entering an era of <strong>“code-vibing”</strong> where developers can create functional software in languages they don’t formally know.</p>

<h3 id="the-new-development-model">The New Development Model</h3>

<p><strong>Traditional Approach:</strong></p>
<ol>
  <li>Learn language syntax and conventions</li>
  <li>Study framework documentation</li>
  <li>Write code manually</li>
  <li>Debug and iterate</li>
  <li>Optimize and polish</li>
</ol>

<p><strong>AI-Assisted Approach:</strong></p>
<ol>
  <li>Describe what you want in natural language</li>
  <li>AI generates functional code</li>
  <li>Test and provide feedback</li>
  <li>AI iterates based on your input</li>
  <li>You focus on design and experience</li>
</ol>

<h3 id="when-code-vibing-works">When Code-Vibing Works</h3>

<p>This approach excels when:</p>
<ul>
  <li>✅ The problem domain is well-defined (game logic)</li>
  <li>✅ The language has clear conventions (Pico-8 API)</li>
  <li>✅ You can test and validate quickly (run the game)</li>
  <li>✅ Documentation exists for the AI to reference</li>
  <li>✅ Logic matters more than creative assets</li>
</ul>

<h3 id="when-code-vibing-fails">When Code-Vibing Fails</h3>

<p>The approach struggles with:</p>
<ul>
  <li>❌ Visual/artistic creativity (sprites, animations)</li>
  <li>❌ Highly subjective design decisions (UI aesthetics)</li>
  <li>❌ Novel problems without existing patterns</li>
  <li>❌ Domains requiring specialized expertise</li>
  <li>❌ Physical or spatial reasoning tasks</li>
</ul>

<h3 id="the-hybrid-reality">The Hybrid Reality</h3>

<p>The future isn’t “AI replaces developers”—it’s <strong>“AI handles code, humans handle creativity.”</strong></p>

<p>For my Pico-8 game:</p>
<ul>
  <li><strong>AI-generated</strong>: All game logic, state management, input handling</li>
  <li><strong>Human-created</strong>: Sprites, color schemes, game feel, design decisions</li>
</ul>

<p>This division makes sense. AI excels at structured, logical tasks with clear rules. Humans excel at creative, aesthetic, and experiential decisions.</p>

<h2 id="-key-takeaways-for-developers">💡 Key Takeaways for Developers</h2>

<p>After building this game, here’s what I learned about AI-assisted development:</p>

<h3 id="1-ai-coding-is-genuinely-excellent">1. AI Coding is Genuinely Excellent</h3>
<p>Claude Code didn’t just generate working code—it generated <strong>good code</strong>. Proper conventions, clean structure, efficient logic. I could have written this myself after learning Lua, but it would have taken significantly longer.</p>

<h3 id="2-art-is-still-a-human-or-specialized-ai-domain">2. Art is Still a Human (or Specialized AI) Domain</h3>
<p>General-purpose AI models struggle with pixel-level visual design. You’ll need:</p>
<ul>
  <li>Manual sprite creation</li>
  <li>Specialized AI art tools (Stable Diffusion, DALL-E)</li>
  <li>Collaboration with actual artists</li>
</ul>

<h3 id="3-you-still-need-domain-understanding">3. You Still Need Domain Understanding</h3>
<p>Even though I didn’t write Lua, I needed to:</p>
<ul>
  <li>Understand Pico-8’s constraints</li>
  <li>Test the game and identify issues</li>
  <li>Communicate feedback clearly</li>
  <li>Make design decisions</li>
</ul>

<p><strong>Code-vibing isn’t passive</strong>—it’s an active collaboration where you guide the AI’s output.</p>

<h3 id="4-iteration-is-fast-and-painless">4. Iteration is Fast and Painless</h3>
<p>Traditionally, making changes requires:</p>
<ul>
  <li>Finding the right code section</li>
  <li>Understanding existing implementation</li>
  <li>Rewriting logic</li>
  <li>Testing for regressions</li>
</ul>

<p>With AI assistance:</p>
<ul>
  <li>Describe the change in natural language</li>
  <li>AI implements the modification</li>
  <li>Test immediately</li>
  <li>Iterate until perfect</li>
</ul>

<h3 id="5-the-learning-curve-shifts">5. The Learning Curve Shifts</h3>
<p>Instead of learning:</p>
<ul>
  <li>Language syntax</li>
  <li>Framework APIs</li>
  <li>Common patterns</li>
</ul>

<p>You learn:</p>
<ul>
  <li>How to describe problems clearly</li>
  <li>How to test and validate effectively</li>
  <li>How to guide AI iterations</li>
  <li>Domain-specific knowledge</li>
</ul>

<p><strong>This is a different skill set</strong>, but arguably more valuable in an AI-assisted world.</p>

<h2 id="-getting-started-with-pico-8-and-ai-development">🔮 Getting Started with Pico-8 and AI Development</h2>

<p>If this experiment inspired you to try building your own Pico-8 game with AI assistance, here’s how to start:</p>

<h3 id="prerequisites">Prerequisites</h3>
<ol>
  <li><strong>Get Pico-8</strong>: Purchase from <a href="https://www.lexaloffle.com/pico-8.php">Lexaloffle</a> ($15)</li>
  <li><strong>Install Claude Code</strong>: Free for basic usage, Pro for unlimited</li>
  <li><strong>Optional</strong>: Retro handheld device for testing (Miyoo Mini Plus, Anbernic)</li>
</ol>

<h3 id="your-first-ai-generated-game">Your First AI-Generated Game</h3>

<p><strong>Week 1: Simple Game Loop</strong></p>
<div class="language-plaintext highlighter-rouge"><div class="highlight"><pre class="highlight"><code>Prompt: "Create a basic Pico-8 game with player movement and a game over screen."
</code></pre></div></div>

<p><strong>Week 2: Add Mechanics</strong></p>
<div class="language-plaintext highlighter-rouge"><div class="highlight"><pre class="highlight"><code>Prompt: "Add collision detection and score tracking."
</code></pre></div></div>

<p><strong>Week 3: Polish</strong></p>
<div class="language-plaintext highlighter-rouge"><div class="highlight"><pre class="highlight"><code>Prompt: "Add a title screen, instructions, and end game sequence."
</code></pre></div></div>

<p><strong>Week 4: Manual Art Pass</strong></p>
<ul>
  <li>Open Pico-8’s sprite editor</li>
  <li>Create or refine visual assets</li>
  <li>Learn color palette constraints</li>
</ul>

<h3 id="recommended-first-projects">Recommended First Projects</h3>
<ul>
  <li><strong>Flappy Bird clone</strong>: Simple physics and collision</li>
  <li><strong>Snake game</strong>: Grid-based movement and growth</li>
  <li><strong>Memory matching</strong>: Card flipping and state management</li>
  <li><strong>Breakout</strong>: Paddle movement and ball physics</li>
</ul>

<p>Start simple, iterate quickly, and don’t stress about art until the gameplay feels right.</p>

<h2 id="-the-honest-assessment">🧠 The Honest Assessment</h2>

<p>Let me be clear about what this experiment proved and didn’t prove:</p>

<h3 id="what-worked">What Worked</h3>
<ul>
  <li><strong>Code generation</strong>: Claude Code produced production-quality Lua code</li>
  <li><strong>Rapid iteration</strong>: Changes happened in minutes, not hours</li>
  <li><strong>Learning efficiency</strong>: I understood Pico-8 concepts without formal study</li>
  <li><strong>Functional completeness</strong>: The game logic was genuinely good</li>
</ul>

<h3 id="what-didnt-work">What Didn’t Work</h3>
<ul>
  <li><strong>Sprite generation</strong>: AI-created graphics were unusable</li>
  <li><strong>Aesthetic decisions</strong>: AI couldn’t judge “good” vs “bad” design</li>
  <li><strong>Creative direction</strong>: Human judgment was essential for game feel</li>
</ul>

<h3 id="the-limitation-reality">The Limitation Reality</h3>

<p>This isn’t about <strong>current AI being bad at art</strong>—it’s about the type of AI I used. General-purpose language models like Claude Sonnet 4.5 aren’t designed for pixel-perfect visual creation.</p>

<p>Specialized AI art tools exist and work well:</p>
<ul>
  <li><strong>Stable Diffusion</strong>: Excellent for concept art and illustrations</li>
  <li><strong>DALL-E 3</strong>: Great for stylized game assets</li>
  <li><strong>Midjourney</strong>: Perfect for background art and promotional images</li>
</ul>

<p>But these tools:</p>
<ol>
  <li>Aren’t integrated into coding workflows yet</li>
  <li>Don’t understand Pico-8’s specific sprite format</li>
  <li>Require manual export and conversion processes</li>
</ol>

<p><strong>The future is hybrid workflows</strong>: AI for code, specialized tools or humans for assets, and human judgment for design decisions.</p>

<h2 id="-resources-and-community">📚 Resources and Community</h2>

<p>If you’re interested in exploring Pico-8 or AI-assisted game development further:</p>

<h3 id="pico-8-learning">Pico-8 Learning</h3>
<ul>
  <li><strong>Official Manual</strong>: <a href="https://www.lexaloffle.com/dl/docs/pico-8_manual.html">Pico-8 User Manual</a></li>
  <li><strong>Community Forums</strong>: <a href="https://www.lexaloffle.com/bbs/">BBS Lexaloffle</a></li>
  <li><strong>Game Collection</strong>: <a href="https://www.lexaloffle.com/bbs/?cat=7">Pico-8 Carts</a></li>
  <li><strong>YouTube Tutorials</strong>: Lazy Devs Academy, Nerdy Teachers</li>
</ul>

<h3 id="ai-coding-tools">AI Coding Tools</h3>
<ul>
  <li><strong>Claude Code</strong>: <a href="https://www.anthropic.com/claude">Anthropic Claude</a></li>
  <li><strong>GitHub Copilot</strong>: <a href="https://github.com/features/copilot">GitHub Copilot</a></li>
  <li><strong>Cursor</strong>: <a href="https://cursor.sh/">Cursor IDE</a></li>
</ul>

<h3 id="retro-handhelds">Retro Handhelds</h3>
<ul>
  <li><strong>Miyoo Mini Plus</strong>: Compact, affordable, great Pico-8 support</li>
  <li><strong>Anbernic RG35XX</strong>: Popular choice with active community</li>
  <li><strong>Retro Game Corps</strong>: <a href="https://retrogamecorps.com/">Setup guides and reviews</a></li>
</ul>

<hr />

<p><strong>Have you tried building games with AI assistance? What’s been your experience with AI-generated art versus code?</strong> I’d love to hear about your experiments and whether you’ve found better workflows for handling creative assets in AI-assisted development. Share your thoughts and projects in the comments below.</p>]]></content><author><name>Luis Gallardo</name></author><category term="Blog" /><category term="Game Development" /><category term="Pico-8" /><category term="Claude Code" /><category term="AI Coding" /><category term="Game Development" /><category term="Retro Gaming" /><category term="Fantasy Console" /><summary type="html"><![CDATA[Using Claude Code (Sonnet 4.5) to build a functional Pico-8 Mastermind game without learning the language. Exploring AI's coding excellence and artistic limitations in fantasy console game development.]]></summary></entry><entry><title type="html">GitHub Copilot CLI: Terminal-Native AI with Seamless GitHub Integration</title><link href="https://lgallardo.com/2025/10/02/github-copilot-cli-terminal-native-ai/" rel="alternate" type="text/html" title="GitHub Copilot CLI: Terminal-Native AI with Seamless GitHub Integration" /><published>2025-10-02T00:00:00+00:00</published><updated>2025-10-02T00:00:00+00:00</updated><id>https://lgallardo.com/2025/10/02/github-copilot-cli-mcp-integration</id><content type="html" xml:base="https://lgallardo.com/2025/10/02/github-copilot-cli-terminal-native-ai/"><![CDATA[<p><a href="/assets/images/copilot-cli-robots.png" target="_blank"><img src="/assets/images/copilot-cli-robots.png" alt="GitHub Copilot CLI Terminal" style="display:block; margin-left:auto; margin-right:auto; width:95%" /></a></p>

<p>I stumbled upon GitHub Copilot CLI while catching up on tech news, and the <strong>native GitHub integration</strong> immediately caught my attention. A terminal-native AI assistant that can interact directly with repositories, issues, and PRs? I decided to give it a try to have in my AI toolbox.</p>

<p>Copilot CLI is the latest addition to GitHub’s Copilot ecosystem, joining <strong>Copilot in the IDE</strong> (code completion and chat), <strong>GitHub Copilot Workspace</strong> (issue-to-PR automation), and <strong>Copilot Extensions</strong> (custom integrations). This CLI component brings the Copilot experience directly to the terminal, complementing the ecosystem with command-line workflows. Here’s what I learned after testing it.</p>

<h2 id="-what-is-github-copilot-cli">🚀 What is GitHub Copilot CLI?</h2>

<p>GitHub Copilot CLI is GitHub’s terminal-native AI assistant that brings conversational AI directly to your command line. Think of it as ChatGPT for your terminal, but with <strong>direct access to your file system, MCP servers, and development context</strong>.</p>

<h3 id="what-makes-it-different">What Makes It Different</h3>

<ul>
  <li><strong>Terminal-native interface</strong>: No browser, no context switching</li>
  <li><strong>Interactive mode</strong>: Natural conversations with <code class="language-plaintext highlighter-rouge">/</code> commands</li>
  <li><strong>MCP integration</strong>: Connect to Context7, GitHub, and custom MCP servers</li>
  <li><strong>Model flexibility</strong>: Support for GPT-4o, GPT-5, and other OpenAI models</li>
  <li><strong>Session management</strong>: Resume conversations and maintain context</li>
  <li><strong>File system access</strong>: Direct file reading and analysis</li>
</ul>

<h3 id="current-status-public-preview">Current Status: Public Preview</h3>

<p>Copilot CLI is in <strong>public preview</strong> (version 0.0.332 at the time of writing), which means:</p>
<ul>
  <li>Features are actively evolving</li>
  <li>Available to GitHub Copilot subscribers</li>
  <li>Some capabilities may change as it approaches stable release</li>
  <li>Feedback directly shapes the product direction</li>
</ul>

<h2 id="-quick-start-installation--first-run">🔧 Quick Start: Installation &amp; First Run</h2>

<p>Getting started with Copilot CLI is straightforward:</p>

<div class="language-bash highlighter-rouge"><div class="highlight"><pre class="highlight"><code><span class="c"># Install globally via npm</span>
npm <span class="nb">install</span> <span class="nt">-g</span> @github/copilot

<span class="c"># Launch interactive mode</span>
copilot

<span class="c"># Or use specific model</span>
copilot <span class="nt">--model</span> gpt-5

<span class="c"># Quick one-shot queries</span>
copilot <span class="nt">-p</span> <span class="s2">"analyze terraform module"</span> <span class="nt">--allow-all-tools</span>
</code></pre></div></div>

<h3 id="understanding-the-configuration">Understanding the Configuration</h3>

<p>Copilot CLI creates a configuration directory at <code class="language-plaintext highlighter-rouge">~/.copilot/</code> with the following structure:</p>

<div class="language-plaintext highlighter-rouge"><div class="highlight"><pre class="highlight"><code>~/.copilot/
├── command-history-state.json  # Command history tracking
├── config.json                  # User preferences and settings
├── history-session-state/       # Session state management
├── logs/                        # Debug and activity logs
└── mcp-config.json             # MCP server configurations
</code></pre></div></div>

<p>The <code class="language-plaintext highlighter-rouge">mcp-config.json</code> file is where MCP server integrations are stored. Each time you add an MCP server via <code class="language-plaintext highlighter-rouge">/mcp add</code>, this file is updated automatically.</p>

<h2 id="-mcp-integration-the-game-changer">💡 MCP Integration: The Game Changer</h2>

<p>Here’s where Copilot CLI really shines—<strong>native MCP support</strong> that lets you connect to specialized AI servers and tools directly from your terminal.</p>

<h3 id="interactive-mcp-commands">Interactive MCP Commands</h3>

<p>Once you’re in interactive mode (<code class="language-plaintext highlighter-rouge">copilot</code>), you have access to these MCP management commands:</p>

<div class="language-bash highlighter-rouge"><div class="highlight"><pre class="highlight"><code>/mcp add      <span class="c"># Add new MCP server interactively</span>
/mcp show     <span class="c"># Display configured MCP servers</span>
/mcp disable  <span class="c"># Temporarily disable a server</span>
/mcp <span class="nb">enable</span>   <span class="c"># Re-enable a disabled server</span>
</code></pre></div></div>

<h3 id="adding-mcp-servers-the-interactive-way">Adding MCP Servers: The Interactive Way</h3>

<p>The <code class="language-plaintext highlighter-rouge">/mcp add</code> command provides a guided setup experience. Let me show you how I added Context7 and GitHub MCP servers:</p>

<p><a href="/assets/images/copilot-cli-mcp-add-command.png" target="_blank"><img src="/assets/images/copilot-cli-mcp-add-command.png" alt="MCP Add Command" style="display:block; margin-left:auto; margin-right:auto; width:95%" /></a></p>

<p>The interactive prompt walks you through:</p>

<ol>
  <li><strong>Server Name</strong>: Unique identifier for the MCP server</li>
  <li><strong>Server Type</strong>: Local, HTTP, or SSE (Server-Sent Events)</li>
  <li><strong>Connection Details</strong>:
    <ul>
      <li><strong>Local</strong>: Command to start the server (e.g., <code class="language-plaintext highlighter-rouge">npx</code>)</li>
      <li><strong>HTTP</strong>: Remote server URL</li>
      <li><strong>SSE</strong>: Server-sent events endpoint</li>
    </ul>
  </li>
  <li><strong>Arguments</strong>: Command-line arguments for local servers</li>
  <li><strong>Environment Variables</strong>: Optional environment configuration</li>
  <li><strong>Tools Selection</strong>: Choose which tools to expose (<code class="language-plaintext highlighter-rouge">*</code> for all)</li>
</ol>

<h3 id="real-world-example-adding-context7">Real-World Example: Adding Context7</h3>

<p>Here’s the actual workflow for adding Context7 MCP server:</p>

<p><a href="/assets/images/copilot-cli-mcp-add.png" target="_blank"><img src="/assets/images/copilot-cli-mcp-add.png" alt="Context7 MCP Configuration" style="display:block; margin-left:auto; margin-right:auto; width:95%" /></a></p>

<div class="language-plaintext highlighter-rouge"><div class="highlight"><pre class="highlight"><code>Server Name: Context7
Server Type: [2] HTTP
URL: https://mcp.context7.com/mcp
HTTP Headers: (optional, for authentication)
Tools: * (all tools)
</code></pre></div></div>

<p>Once configured, Context7’s documentation search capabilities are immediately available in your Copilot CLI sessions.</p>

<h3 id="adding-github-mcp-server">Adding GitHub MCP Server</h3>

<p>The GitHub MCP server provides repository access and operations:</p>

<p><a href="/assets/images/copilot-cli-mcp-github-server.png" target="_blank"><img src="/assets/images/copilot-cli-mcp-github-server.png" alt="GitHub MCP Server Connected" style="display:block; margin-left:auto; margin-right:auto; width:95%" /></a></p>

<p>As shown in the screenshot, once configured, you’ll see:</p>
<ul>
  <li><strong>Connected to GitHub MCP Server</strong> confirmation</li>
  <li>Server listed in your MCP configuration</li>
  <li>Available tools and capabilities</li>
</ul>

<p>This gives you direct access to:</p>
<ul>
  <li>Repository information and file access</li>
  <li>Pull request and issue operations</li>
  <li>GitHub Actions workflow data</li>
  <li>Commit history and branch management</li>
</ul>

<h3 id="mcp-configuration-persistence">MCP Configuration Persistence</h3>

<p>All MCP servers are saved to <code class="language-plaintext highlighter-rouge">~/.copilot/mcp-config.json</code>, making them available across all sessions. Your configuration persists and automatically loads when you start Copilot CLI.</p>

<h2 id="-essential-interactive-commands">🎯 Essential Interactive Commands</h2>

<p>Beyond MCP management, Copilot CLI provides powerful session control commands:</p>

<h3 id="model-selection">Model Selection</h3>
<div class="language-bash highlighter-rouge"><div class="highlight"><pre class="highlight"><code>/model gpt-5              <span class="c"># Switch to GPT-5 for current session</span>
/model gpt-4o             <span class="c"># Use GPT-4o for general tasks</span>
/model gpt-5 <span class="nt">--reasoning</span>  <span class="c"># Enable extended reasoning mode</span>
</code></pre></div></div>

<h3 id="file-system-access">File System Access</h3>
<div class="language-bash highlighter-rouge"><div class="highlight"><pre class="highlight"><code>/add-dir ~/projects       <span class="c"># Grant access to specific directory</span>
/add-dir ~/terraform      <span class="c"># Add Terraform configurations</span>
/add-file config.yaml     <span class="c"># Add individual file to context</span>
</code></pre></div></div>

<h3 id="session-management">Session Management</h3>
<div class="language-bash highlighter-rouge"><div class="highlight"><pre class="highlight"><code>/cwd ~/terraform          <span class="c"># Change working directory</span>
/session                  <span class="c"># View current session info</span>
/resume                   <span class="c"># Resume previous session</span>
/history                  <span class="c"># Show command history</span>
</code></pre></div></div>

<h3 id="feedback--help">Feedback &amp; Help</h3>
<div class="language-bash highlighter-rouge"><div class="highlight"><pre class="highlight"><code>/feedback                 <span class="c"># Provide feedback to GitHub</span>
/help                     <span class="c"># Show all available commands</span>
/exit                     <span class="c"># Exit interactive mode</span>
</code></pre></div></div>

<h2 id="️-real-world-devops-workflow">🛠️ Real-World DevOps Workflow</h2>

<p>Here’s a practical scenario showing Copilot CLI in action:</p>

<h3 id="scenario-terraform-module-analysis">Scenario: Terraform Module Analysis</h3>

<div class="language-bash highlighter-rouge"><div class="highlight"><pre class="highlight"><code><span class="c"># Start Copilot CLI in your Terraform directory</span>
<span class="nb">cd</span> ~/git/terraform-aws-ecrpublic
copilot <span class="nt">--model</span> gpt-5

<span class="c"># Interactive session begins</span>
<span class="o">&gt;</span> <span class="s2">"Analyze the module structure and suggest improvements"</span>

<span class="c"># Use MCP to fetch documentation</span>
<span class="o">&gt;</span> <span class="s2">"Using Context7, find AWS ECR Public best practices"</span>

<span class="c"># Check GitHub workflows</span>
<span class="o">&gt;</span> <span class="s2">"Show me the GitHub Actions workflows for this repo"</span>

<span class="c"># Generate summary</span>
<span class="o">&gt;</span> <span class="s2">"Create a summary of potential security improvements"</span>

<span class="c"># Save session for later</span>
<span class="o">&gt;</span> /feedback <span class="s2">"This analysis was helpful for security audit"</span>
</code></pre></div></div>

<h3 id="command-line-flags-for-automation">Command-Line Flags for Automation</h3>

<p>For CI/CD or scripted workflows:</p>

<div class="language-bash highlighter-rouge"><div class="highlight"><pre class="highlight"><code><span class="c"># Allow all file system operations (for automation)</span>
copilot <span class="nt">-p</span> <span class="s2">"analyze terraform validation output"</span> <span class="nt">--allow-all-tools</span>

<span class="c"># Resume previous session</span>
copilot <span class="nt">--resume</span> <span class="nt">--model</span> gpt-5

<span class="c"># Add specific directory access</span>
copilot <span class="nt">--add-dir</span> ~/terraform <span class="nt">-p</span> <span class="s2">"review module configuration"</span>

<span class="c"># Specify model and context</span>
copilot <span class="nt">--model</span> gpt-4o <span class="nt">--cwd</span> ~/projects/api <span class="nt">-p</span> <span class="s2">"analyze API performance"</span>
</code></pre></div></div>

<h2 id="️-when-to-use-copilot-cli-vs-claude-code-vs-cursor-cli">⚖️ When to Use: Copilot CLI vs Claude Code vs Cursor CLI</h2>

<p>After using all three terminal-based AI tools, here’s my decision framework:</p>

<h3 id="github-copilot-cli">GitHub Copilot CLI</h3>
<p><strong>Best for:</strong></p>
<ul>
  <li>✅ Terminal-native workflows (no context switching)</li>
  <li>✅ MCP server integration and orchestration</li>
  <li>✅ GitHub-centric development workflows</li>
  <li>✅ Interactive debugging sessions</li>
  <li>✅ OpenAI model ecosystem (GPT-4o, GPT-5)</li>
</ul>

<p><strong>Characteristics:</strong></p>
<ul>
  <li><strong>Strong MCP support</strong>: Native integration with interactive management</li>
  <li><strong>GitHub integration</strong>: Direct repository and Actions access</li>
  <li><strong>Model selection</strong>: Easy model switching during sessions</li>
  <li><strong>Session persistence</strong>: Resume and continue conversations</li>
</ul>

<h3 id="claude-code">Claude Code</h3>
<p><strong>Best for:</strong></p>
<ul>
  <li>✅ Complex multi-step reasoning and planning</li>
  <li>✅ Code implementation with tool use</li>
  <li>✅ Sequential thinking workflows</li>
  <li>✅ Anthropic’s Claude models (Sonnet, Opus)</li>
  <li>✅ Extensive file editing and refactoring</li>
</ul>

<p><strong>Characteristics:</strong></p>
<ul>
  <li><strong>Agentic capabilities</strong>: Can use tools and implement changes</li>
  <li><strong>Claude models</strong>: Access to Anthropic’s model family</li>
  <li><strong>Rich context</strong>: Strong codebase understanding</li>
  <li><strong>Subagents</strong>: Specialized agent workflows</li>
</ul>

<h3 id="cursor-cli">Cursor CLI</h3>
<p><strong>Best for:</strong></p>
<ul>
  <li>✅ Quick code generation and snippets</li>
  <li>✅ Cursor IDE integration</li>
  <li>✅ Simple terminal queries</li>
  <li>✅ Fast model responses</li>
</ul>

<p><strong>Characteristics:</strong></p>
<ul>
  <li><strong>IDE integration</strong>: Works with Cursor editor</li>
  <li><strong>Speed focus</strong>: Quick responses for simple tasks</li>
  <li><strong>Cursor ecosystem</strong>: Part of Cursor’s suite of tools</li>
</ul>

<h3 id="decision-matrix">Decision Matrix</h3>

<table>
  <thead>
    <tr>
      <th>Use Case</th>
      <th>Copilot CLI</th>
      <th>Claude Code</th>
      <th>Cursor CLI</th>
    </tr>
  </thead>
  <tbody>
    <tr>
      <td><strong>Terminal debugging</strong></td>
      <td>✅ Perfect</td>
      <td>✅ Good</td>
      <td>⚠️ Basic</td>
    </tr>
    <tr>
      <td><strong>MCP orchestration</strong></td>
      <td>✅ Excellent</td>
      <td>✅ Good</td>
      <td>❌ Limited</td>
    </tr>
    <tr>
      <td><strong>GitHub workflows</strong></td>
      <td>✅ Native</td>
      <td>⚠️ Via MCP</td>
      <td>❌ Limited</td>
    </tr>
    <tr>
      <td><strong>Complex reasoning</strong></td>
      <td>✅ GPT-5 capable</td>
      <td>✅ Best with Claude</td>
      <td>⚠️ Basic</td>
    </tr>
    <tr>
      <td><strong>Code implementation</strong></td>
      <td>⚠️ Guidance only</td>
      <td>✅ Best</td>
      <td>✅ Good</td>
    </tr>
    <tr>
      <td><strong>Quick queries</strong></td>
      <td>✅ Great</td>
      <td>✅ Good</td>
      <td>✅ Fastest</td>
    </tr>
    <tr>
      <td><strong>Session continuity</strong></td>
      <td>✅ Native resume</td>
      <td>✅ Context aware</td>
      <td>⚠️ Limited</td>
    </tr>
  </tbody>
</table>

<h2 id="-pro-tips-for-maximum-productivity">🔥 Pro Tips for Maximum Productivity</h2>

<h3 id="1-leverage---allow-all-tools-for-cicd">1. Leverage <code class="language-plaintext highlighter-rouge">--allow-all-tools</code> for CI/CD</h3>

<p>In automated environments, grant full access to avoid interactive prompts:</p>

<div class="language-bash highlighter-rouge"><div class="highlight"><pre class="highlight"><code><span class="c"># CI/CD pipeline usage</span>
copilot <span class="nt">-p</span> <span class="s2">"analyze test coverage report"</span> <span class="se">\</span>
  <span class="nt">--allow-all-tools</span> <span class="se">\</span>
  <span class="nt">--model</span> gpt-5 <span class="se">\</span>
  <span class="nt">--add-dir</span> ./coverage
</code></pre></div></div>

<h3 id="2-use---resume-for-session-continuation">2. Use <code class="language-plaintext highlighter-rouge">--resume</code> for Session Continuation</h3>

<p>Don’t start from scratch—resume your previous context:</p>

<div class="language-bash highlighter-rouge"><div class="highlight"><pre class="highlight"><code><span class="c"># Continue where you left off</span>
copilot <span class="nt">--resume</span> <span class="nt">--model</span> gpt-5

<span class="c"># Resume and add new context</span>
copilot <span class="nt">--resume</span> <span class="nt">--add-dir</span> ~/new-project
</code></pre></div></div>

<h3 id="3-combine---add-dir-with-mcp-servers">3. Combine <code class="language-plaintext highlighter-rouge">--add-dir</code> with MCP Servers</h3>

<p>Grant file access and leverage MCP capabilities simultaneously:</p>

<div class="language-bash highlighter-rouge"><div class="highlight"><pre class="highlight"><code>copilot <span class="nt">--add-dir</span> ~/terraform <span class="se">\</span>
  <span class="nt">--model</span> gpt-5 <span class="se">\</span>
  <span class="nt">-p</span> <span class="s2">"Using Context7, analyze this Terraform module against AWS best practices"</span>
</code></pre></div></div>

<h3 id="4-interactive-mcp-commands-for-dynamic-workflows">4. Interactive <code class="language-plaintext highlighter-rouge">/mcp</code> Commands for Dynamic Workflows</h3>

<p>Add MCP servers on-the-fly during interactive sessions:</p>

<div class="language-bash highlighter-rouge"><div class="highlight"><pre class="highlight"><code><span class="c"># In interactive mode</span>
<span class="o">&gt;</span> /mcp add
<span class="c"># Configure new server interactively</span>

<span class="o">&gt;</span> /mcp show
<span class="c"># Verify all connected servers</span>

<span class="o">&gt;</span> <span class="s2">"Now use the newly added server to analyze X"</span>
</code></pre></div></div>

<h3 id="5-model-switching-during-sessions">5. Model Switching During Sessions</h3>

<p>Change models mid-conversation based on task complexity:</p>

<div class="language-bash highlighter-rouge"><div class="highlight"><pre class="highlight"><code><span class="c"># Start with GPT-4o for general analysis</span>
copilot <span class="nt">--model</span> gpt-4o

<span class="c"># Switch to GPT-5 for complex reasoning</span>
<span class="o">&gt;</span> /model gpt-5

<span class="c"># Continue with enhanced reasoning capabilities</span>
<span class="o">&gt;</span> <span class="s2">"Now perform deep security analysis of the authentication flow"</span>
</code></pre></div></div>

<p><a href="/assets/images/copilot-cli-2025-10-02_16-07.png" target="_blank"><img src="/assets/images/copilot-cli-2025-10-02_16-07.png" alt="Copilot CLI in Action" style="display:block; margin-left:auto; margin-right:auto; width:95%" /></a></p>

<h2 id="-quick-takeaways">📊 Quick Takeaways</h2>

<p>After a week of intensive usage, here’s what stands out:</p>

<p>✅ <strong>Terminal-native AI</strong>: Finally, a conversational AI that lives where developers work
✅ <strong>MCP integration</strong>: Best-in-class MCP support with interactive management
✅ <strong>Session persistence</strong>: Resume conversations and maintain context across sessions
✅ <strong>Model flexibility</strong>: Easy switching between GPT-4o, GPT-5, and other models
✅ <strong>GitHub ecosystem</strong>: Native integration with repositories and Actions</p>

<p>⚠️ <strong>Public preview status</strong>: Features evolving, expect some rough edges
⚠️ <strong>Limited to OpenAI models</strong>: No Anthropic Claude or other model providers (yet)
⚠️ <strong>Guidance-focused</strong>: Provides analysis and suggestions rather than direct code implementation</p>

<h2 id="-getting-started-your-first-week">🎯 Getting Started: Your First Week</h2>

<h3 id="day-1-basic-setup">Day 1: Basic Setup</h3>
<div class="language-bash highlighter-rouge"><div class="highlight"><pre class="highlight"><code><span class="c"># Install Copilot CLI</span>
npm <span class="nb">install</span> <span class="nt">-g</span> @github/copilot

<span class="c"># Launch and explore interactive mode</span>
copilot

<span class="c"># Try basic commands</span>
<span class="o">&gt;</span> /help
<span class="o">&gt;</span> /model gpt-5
<span class="o">&gt;</span> <span class="s2">"Hello, analyze my current directory structure"</span>
</code></pre></div></div>

<h3 id="day-2-3-mcp-integration">Day 2-3: MCP Integration</h3>
<div class="language-bash highlighter-rouge"><div class="highlight"><pre class="highlight"><code><span class="c"># Add your first MCP server</span>
copilot
<span class="o">&gt;</span> /mcp add

<span class="c"># Configure Context7 or GitHub MCP</span>
<span class="c"># Server Name: Context7</span>
<span class="c"># Type: HTTP</span>
<span class="c"># URL: https://mcp.context7.com/mcp</span>

<span class="c"># Test the integration</span>
<span class="o">&gt;</span> <span class="s2">"Using Context7, find documentation on Terraform AWS modules"</span>
</code></pre></div></div>

<h3 id="day-4-5-real-workflow-integration">Day 4-5: Real Workflow Integration</h3>
<div class="language-bash highlighter-rouge"><div class="highlight"><pre class="highlight"><code><span class="c"># Use in actual development workflow</span>
<span class="nb">cd</span> ~/your-project
copilot <span class="nt">--model</span> gpt-5 <span class="nt">--add-dir</span> <span class="nb">.</span>

<span class="c"># Analyze, debug, and iterate</span>
<span class="o">&gt;</span> <span class="s2">"Analyze the test coverage in this project"</span>
<span class="o">&gt;</span> <span class="s2">"What security improvements can be made?"</span>
<span class="o">&gt;</span> <span class="s2">"Review the CI/CD workflow configuration"</span>
</code></pre></div></div>

<h3 id="week-1-automate-common-tasks">Week 1: Automate Common Tasks</h3>
<div class="language-bash highlighter-rouge"><div class="highlight"><pre class="highlight"><code><span class="c"># Create aliases for frequent workflows</span>
<span class="nb">alias </span>copilot-tf<span class="o">=</span><span class="s2">"copilot --add-dir . --model gpt-5 -p 'Analyze Terraform configuration'"</span>
<span class="nb">alias </span>copilot-debug<span class="o">=</span><span class="s2">"copilot --resume --allow-all-tools"</span>

<span class="c"># Use in CI/CD</span>
copilot <span class="nt">-p</span> <span class="s2">"analyze build logs"</span> <span class="nt">--allow-all-tools</span> <span class="nt">--model</span> gpt-5
</code></pre></div></div>

<h2 id="-the-bottom-line">🔮 The Bottom Line</h2>

<p>GitHub Copilot CLI represents a significant shift in how we interact with AI during development. By bringing conversational AI directly to the terminal with <strong>native MCP support</strong>, it eliminates context switching and enables truly integrated workflows.</p>

<p><strong>Choose Copilot CLI when you need:</strong></p>
<ul>
  <li>Terminal-native AI without leaving your workflow</li>
  <li>MCP server orchestration with interactive management</li>
  <li>GitHub repository and Actions integration</li>
  <li>Session persistence and resume capabilities</li>
  <li>OpenAI model ecosystem access</li>
</ul>

<p><strong>The public preview status means:</strong></p>
<ul>
  <li>Features are actively improving</li>
  <li>Your feedback shapes the product</li>
  <li>Some rough edges still exist</li>
  <li>Early access to cutting-edge capabilities</li>
</ul>

<p>Copilot CLI is a <strong>valid alternative</strong> for terminal-based development, especially if you’re already using GitHub Copilot. The native GitHub integration, combined with MCP extensibility, makes it a natural choice for workflows that center around GitHub repositories, issues, and pull requests.</p>

<p><strong>Start with the basics, add one MCP server, and see how terminal-native AI changes your workflow.</strong> You might find yourself reaching for the browser less and solving problems faster—right from where you’re already working.</p>

<h2 id="-resources">📚 Resources</h2>

<ul>
  <li><a href="https://docs.github.com/en/copilot/using-github-copilot/using-github-copilot-in-the-command-line">GitHub Copilot CLI Documentation</a></li>
  <li><a href="https://modelcontextprotocol.io/">Model Context Protocol Specification</a></li>
  <li><a href="https://mcp.context7.com/">Context7 MCP Server</a></li>
  <li><a href="https://github.com/modelcontextprotocol/servers/tree/main/src/github">GitHub MCP Server</a></li>
</ul>

<hr />

<p><em>Have you tried GitHub Copilot CLI yet? What MCP servers are you integrating? Share your terminal-native AI workflows in the comments below.</em></p>]]></content><author><name>Luis Gallardo</name></author><category term="Blog" /><category term="DevOps" /><category term="GitHub Copilot" /><category term="CLI" /><category term="AI Tools" /><category term="Terminal" /><category term="DevOps Automation" /><category term="GitHub Integration" /><category term="MCP" /><summary type="html"><![CDATA[Discover GitHub Copilot CLI, a terminal-native AI assistant with native GitHub integration and MCP support. Learn how to leverage interactive commands, manage repositories, and automate DevOps workflows from the terminal.]]></summary></entry><entry><title type="html">GitHub Models: Simple AI Integration for DevOps Workflows</title><link href="https://lgallardo.com/2025/09/19/github-models-simple-ai-workflows/" rel="alternate" type="text/html" title="GitHub Models: Simple AI Integration for DevOps Workflows" /><published>2025-09-19T00:00:00+00:00</published><updated>2025-09-19T00:00:00+00:00</updated><id>https://lgallardo.com/2025/09/19/github-models-simple-ai-workflows</id><content type="html" xml:base="https://lgallardo.com/2025/09/19/github-models-simple-ai-workflows/"><![CDATA[<p><img src="/assets/images/gh-models-robots.png" alt="GitHub Models Simple AI Workflows" style="display:block; margin-left:auto; margin-right:auto; width:90%" /></p>

<p>I stumbled upon GitHub Models while browsing GitHub’s latest features and decided to give it a try. What caught my attention wasn’t just another AI API—it was the <strong>seamless integration with GitHub Actions</strong> and the fact that it’s completely free for most development workflows.</p>

<p>After experimenting with it for a while, I realized GitHub Models fills a specific niche: <strong>simple, direct AI integration</strong> without the complexity of setting up external services or managing API keys. Here’s what I learned and how it compares to more sophisticated solutions.</p>

<h2 id="-what-is-github-models">🚀 What is GitHub Models?</h2>

<p>GitHub Models is GitHub’s native AI inference service that provides <strong>free access to enterprise-grade models</strong> directly within your repositories. Think of it as AI-as-a-Service, but built into the platform where your code already lives.</p>

<h3 id="key-models-available">Key Models Available</h3>
<ul>
  <li><strong>OpenAI GPT-4o</strong>: Best for complex analysis and reasoning</li>
  <li><strong>GPT-4o mini</strong>: Faster, cost-effective for simpler tasks</li>
  <li><strong>Meta Llama 3.1</strong> (8B, 70B, 405B): Open-source alternatives</li>
  <li><strong>Microsoft Phi 3</strong>: Efficient for quick responses</li>
  <li><strong>Mistral Large</strong>: Multilingual and specialized reasoning</li>
</ul>

<h3 id="what-makes-it-different">What Makes It Different</h3>
<ul>
  <li><strong>Zero external setup</strong>: Uses your GitHub credentials</li>
  <li><strong>Free tier</strong>: 50,000 tokens/month across all models</li>
  <li><strong>Native Actions integration</strong>: No API keys in secrets</li>
  <li><strong>Privacy-first</strong>: Your prompts don’t train the models</li>
</ul>

<h2 id="-getting-started-the-official-github-approach">🔧 Getting Started: The Official GitHub Approach</h2>

<p>The simplest way to use GitHub Models is through direct API calls in GitHub Actions. Here’s the basic setup:</p>

<h3 id="authentication-setup">Authentication Setup</h3>

<p>GitHub Models uses your repository’s built-in <code class="language-plaintext highlighter-rouge">GITHUB_TOKEN</code> with the <code class="language-plaintext highlighter-rouge">models: read</code> permission:</p>

<div class="language-yaml highlighter-rouge"><div class="highlight"><pre class="highlight"><code><span class="na">name</span><span class="pi">:</span> <span class="s">AI Analysis Workflow</span>

<span class="na">on</span><span class="pi">:</span> <span class="pi">[</span><span class="nv">push</span><span class="pi">,</span> <span class="nv">pull_request</span><span class="pi">]</span>

<span class="na">permissions</span><span class="pi">:</span>
  <span class="na">contents</span><span class="pi">:</span> <span class="s">read</span>
  <span class="na">models</span><span class="pi">:</span> <span class="s">read</span>  <span class="c1"># Required for GitHub Models</span>

<span class="na">jobs</span><span class="pi">:</span>
  <span class="na">ai-analysis</span><span class="pi">:</span>
    <span class="na">runs-on</span><span class="pi">:</span> <span class="s">ubuntu-latest</span>
    <span class="na">steps</span><span class="pi">:</span>
      <span class="pi">-</span> <span class="na">name</span><span class="pi">:</span> <span class="s">Analyze with AI</span>
        <span class="na">env</span><span class="pi">:</span>
          <span class="na">GITHUB_TOKEN</span><span class="pi">:</span> <span class="s">$</span>
        <span class="na">run</span><span class="pi">:</span> <span class="pi">|</span>
          <span class="s">curl -X POST "https://models.github.ai/inference/chat/completions" \</span>
            <span class="s">-H "Content-Type: application/json" \</span>
            <span class="s">-H "Authorization: Bearer $GITHUB_TOKEN" \</span>
            <span class="s">-d '{</span>
              <span class="s">"model": "openai/gpt-4o",</span>
              <span class="s">"messages": [</span>
                <span class="s">{"role": "user", "content": "Analyze this for potential issues"}</span>
              <span class="s">]</span>
            <span class="s">}'</span>
</code></pre></div></div>

<h3 id="using-actionsai-inference-action">Using actions/ai-inference Action</h3>

<p>GitHub provides an official action that simplifies the API calls:</p>

<div class="language-yaml highlighter-rouge"><div class="highlight"><pre class="highlight"><code><span class="pi">-</span> <span class="na">name</span><span class="pi">:</span> <span class="s">Run AI Analysis</span>
  <span class="na">id</span><span class="pi">:</span> <span class="s">ai-analysis</span>
  <span class="na">uses</span><span class="pi">:</span> <span class="s">actions/ai-inference@v1</span>
  <span class="na">with</span><span class="pi">:</span>
    <span class="na">model</span><span class="pi">:</span> <span class="s1">'</span><span class="s">gpt-4o'</span>
    <span class="na">system-prompt</span><span class="pi">:</span> <span class="s1">'</span><span class="s">You</span><span class="nv"> </span><span class="s">are</span><span class="nv"> </span><span class="s">a</span><span class="nv"> </span><span class="s">DevOps</span><span class="nv"> </span><span class="s">engineer</span><span class="nv"> </span><span class="s">reviewing</span><span class="nv"> </span><span class="s">infrastructure'</span>
    <span class="na">prompt</span><span class="pi">:</span> <span class="pi">|</span>
      <span class="s">Analyze the following Terraform validation results:</span>
      <span class="s">$</span>

      <span class="s">Provide:</span>
      <span class="s">1. Overall assessment</span>
      <span class="s">2. Key findings</span>
      <span class="s">3. Recommendations</span>
      <span class="s">4. Security considerations</span>
</code></pre></div></div>

<h2 id="-real-world-examples">🎯 Real-World Examples</h2>

<h3 id="1-intelligent-bug-report-analysis">1. Intelligent Bug Report Analysis</h3>

<p>This workflow analyzes bug reports to determine if they contain enough information for reproduction:</p>

<div class="language-yaml highlighter-rouge"><div class="highlight"><pre class="highlight"><code><span class="na">name</span><span class="pi">:</span> <span class="s">Bug Report Analysis</span>

<span class="na">on</span><span class="pi">:</span>
  <span class="na">issues</span><span class="pi">:</span>
    <span class="na">types</span><span class="pi">:</span> <span class="pi">[</span><span class="nv">opened</span><span class="pi">,</span> <span class="nv">edited</span><span class="pi">]</span>

<span class="na">permissions</span><span class="pi">:</span>
  <span class="na">issues</span><span class="pi">:</span> <span class="s">write</span>
  <span class="na">models</span><span class="pi">:</span> <span class="s">read</span>

<span class="na">jobs</span><span class="pi">:</span>
  <span class="na">analyze-bug-report</span><span class="pi">:</span>
    <span class="na">if</span><span class="pi">:</span> <span class="s">contains(github.event.issue.labels.*.name, 'bug')</span>
    <span class="na">runs-on</span><span class="pi">:</span> <span class="s">ubuntu-latest</span>

    <span class="na">steps</span><span class="pi">:</span>
    <span class="pi">-</span> <span class="na">name</span><span class="pi">:</span> <span class="s">Analyze Bug Report</span>
      <span class="na">env</span><span class="pi">:</span>
        <span class="na">GITHUB_TOKEN</span><span class="pi">:</span> <span class="s">$</span>
      <span class="na">run</span><span class="pi">:</span> <span class="pi">|</span>
        <span class="s">ISSUE_CONTENT="$ - $"</span>

        <span class="s">ANALYSIS=$(curl -s -X POST "https://models.github.ai/inference/chat/completions" \</span>
          <span class="s">-H "Content-Type: application/json" \</span>
          <span class="s">-H "Authorization: Bearer $GITHUB_TOKEN" \</span>
          <span class="s">-d "{</span>
            <span class="s">\"model\": \"openai/gpt-4o\",</span>
            <span class="s">\"messages\": [</span>
              <span class="s">{</span>
                <span class="s">\"role\": \"system\",</span>
                <span class="s">\"content\": \"Analyze bug reports for reproduction feasibility. Return JSON with reproducible (boolean), missing_info (array), and confidence (0-1).\"</span>
              <span class="s">},</span>
              <span class="s">{</span>
                <span class="s">\"role\": \"user\",</span>
                <span class="s">\"content\": \"$ISSUE_CONTENT\"</span>
              <span class="s">}</span>
            <span class="s">],</span>
            <span class="s">\"max_tokens\": 500</span>
          <span class="s">}")</span>

        <span class="s">REPRODUCIBLE=$(echo "$ANALYSIS" | jq -r '.choices[0].message.content' | jq -r '.reproducible')</span>

        <span class="s">if [ "$REPRODUCIBLE" = "true" ]; then</span>
          <span class="s">gh issue edit $ --add-label "ready-for-reproduction"</span>
        <span class="s">else</span>
          <span class="s">gh issue edit $ --add-label "needs-more-info"</span>
        <span class="s">fi</span>
</code></pre></div></div>

<h3 id="2-infrastructure-validation-with-ai">2. Infrastructure Validation with AI</h3>

<p>Based on your workflow example, here’s how to analyze Terraform validation results:</p>

<div class="language-yaml highlighter-rouge"><div class="highlight"><pre class="highlight"><code><span class="na">name</span><span class="pi">:</span> <span class="s">Infrastructure Review</span>

<span class="na">on</span><span class="pi">:</span>
  <span class="na">pull_request</span><span class="pi">:</span>
    <span class="na">paths</span><span class="pi">:</span> <span class="pi">[</span><span class="s1">'</span><span class="s">**.tf'</span><span class="pi">,</span> <span class="s1">'</span><span class="s">**.tfvars'</span><span class="pi">]</span>

<span class="na">permissions</span><span class="pi">:</span>
  <span class="na">contents</span><span class="pi">:</span> <span class="s">read</span>
  <span class="na">models</span><span class="pi">:</span> <span class="s">read</span>
  <span class="na">pull-requests</span><span class="pi">:</span> <span class="s">write</span>

<span class="na">jobs</span><span class="pi">:</span>
  <span class="na">terraform-ai-review</span><span class="pi">:</span>
    <span class="na">runs-on</span><span class="pi">:</span> <span class="s">ubuntu-latest</span>

    <span class="na">steps</span><span class="pi">:</span>
    <span class="pi">-</span> <span class="na">uses</span><span class="pi">:</span> <span class="s">actions/checkout@v4</span>

    <span class="pi">-</span> <span class="na">name</span><span class="pi">:</span> <span class="s">Terraform Validate</span>
      <span class="na">id</span><span class="pi">:</span> <span class="s">validate</span>
      <span class="na">run</span><span class="pi">:</span> <span class="pi">|</span>
        <span class="s">terraform init</span>
        <span class="s">terraform validate -json &gt; validation.json</span>

    <span class="pi">-</span> <span class="na">name</span><span class="pi">:</span> <span class="s">AI Infrastructure Analysis</span>
      <span class="na">uses</span><span class="pi">:</span> <span class="s">actions/ai-inference@v1</span>
      <span class="na">id</span><span class="pi">:</span> <span class="s">ai-analysis</span>
      <span class="na">with</span><span class="pi">:</span>
        <span class="na">model</span><span class="pi">:</span> <span class="s1">'</span><span class="s">gpt-4o'</span>
        <span class="na">system-prompt</span><span class="pi">:</span> <span class="s1">'</span><span class="s">You</span><span class="nv"> </span><span class="s">are</span><span class="nv"> </span><span class="s">a</span><span class="nv"> </span><span class="s">senior</span><span class="nv"> </span><span class="s">DevOps</span><span class="nv"> </span><span class="s">engineer</span><span class="nv"> </span><span class="s">reviewing</span><span class="nv"> </span><span class="s">Terraform</span><span class="nv"> </span><span class="s">configurations'</span>
        <span class="na">prompt</span><span class="pi">:</span> <span class="pi">|</span>
          <span class="s">Analyze this Terraform validation output:</span>

          <span class="s">$</span>

          <span class="s">Provide:</span>
          <span class="s">1. **Overall Assessment**: Summary of validation status</span>
          <span class="s">2. **Key Findings**: Important issues or successes identified</span>
          <span class="s">3. **Recommendations**: Specific actions to improve the infrastructure</span>
          <span class="s">4. **Security Considerations**: Any security implications</span>
          <span class="s">5. **Best Practices**: Suggestions for following AWS/Terraform best practices</span>

          <span class="s">Format as clear markdown sections.</span>

    <span class="pi">-</span> <span class="na">name</span><span class="pi">:</span> <span class="s">Post Analysis to PR</span>
      <span class="na">if</span><span class="pi">:</span> <span class="s">github.event_name == 'pull_request'</span>
      <span class="na">env</span><span class="pi">:</span>
        <span class="na">GITHUB_TOKEN</span><span class="pi">:</span> <span class="s">$</span>
      <span class="na">run</span><span class="pi">:</span> <span class="pi">|</span>
        <span class="s">gh pr comment $ --body "</span>
        <span class="s">## 🤖 AI Infrastructure Analysis</span>

        <span class="s">**Analyzed by**: $</span>

        <span class="s">$</span>

        <span class="s">---</span>
        <span class="s">*This analysis was generated by AI using GitHub Models. Please review recommendations carefully before implementing.*</span>
        <span class="s">"</span>
</code></pre></div></div>

<h3 id="3-automated-changelog-generation">3. Automated Changelog Generation</h3>

<p>Simplify release management with AI-generated changelogs:</p>

<div class="language-yaml highlighter-rouge"><div class="highlight"><pre class="highlight"><code><span class="na">name</span><span class="pi">:</span> <span class="s">Generate Changelog</span>

<span class="na">on</span><span class="pi">:</span>
  <span class="na">push</span><span class="pi">:</span>
    <span class="na">tags</span><span class="pi">:</span> <span class="pi">[</span><span class="s1">'</span><span class="s">v*'</span><span class="pi">]</span>

<span class="na">permissions</span><span class="pi">:</span>
  <span class="na">contents</span><span class="pi">:</span> <span class="s">write</span>
  <span class="na">models</span><span class="pi">:</span> <span class="s">read</span>

<span class="na">jobs</span><span class="pi">:</span>
  <span class="na">generate-changelog</span><span class="pi">:</span>
    <span class="na">runs-on</span><span class="pi">:</span> <span class="s">ubuntu-latest</span>

    <span class="na">steps</span><span class="pi">:</span>
    <span class="pi">-</span> <span class="na">uses</span><span class="pi">:</span> <span class="s">actions/checkout@v4</span>
      <span class="na">with</span><span class="pi">:</span>
        <span class="na">fetch-depth</span><span class="pi">:</span> <span class="m">0</span>

    <span class="pi">-</span> <span class="na">name</span><span class="pi">:</span> <span class="s">Get Commits Since Last Tag</span>
      <span class="na">id</span><span class="pi">:</span> <span class="s">commits</span>
      <span class="na">run</span><span class="pi">:</span> <span class="pi">|</span>
        <span class="s">LAST_TAG=$(git describe --tags --abbrev=0 HEAD^)</span>
        <span class="s">COMMITS=$(git log --pretty=format:"%h %s" $LAST_TAG..HEAD)</span>
        <span class="s">echo "commits&lt;&lt;EOF" &gt;&gt; $GITHUB_OUTPUT</span>
        <span class="s">echo "$COMMITS" &gt;&gt; $GITHUB_OUTPUT</span>
        <span class="s">echo "EOF" &gt;&gt; $GITHUB_OUTPUT</span>

    <span class="pi">-</span> <span class="na">name</span><span class="pi">:</span> <span class="s">Generate Changelog with AI</span>
      <span class="na">env</span><span class="pi">:</span>
        <span class="na">GITHUB_TOKEN</span><span class="pi">:</span> <span class="s">$</span>
      <span class="na">run</span><span class="pi">:</span> <span class="pi">|</span>
        <span class="s">CHANGELOG=$(curl -s -X POST "https://models.github.ai/inference/chat/completions" \</span>
          <span class="s">-H "Content-Type: application/json" \</span>
          <span class="s">-H "Authorization: Bearer $GITHUB_TOKEN" \</span>
          <span class="s">-d "{</span>
            <span class="s">\"model\": \"openai/gpt-4o\",</span>
            <span class="s">\"messages\": [</span>
              <span class="s">{</span>
                <span class="s">\"role\": \"system\",</span>
                <span class="s">\"content\": \"Generate concise changelogs from git commits. Group into Features, Bug Fixes, and Improvements. Use bullet points.\"</span>
              <span class="s">},</span>
              <span class="s">{</span>
                <span class="s">\"role\": \"user\",</span>
                <span class="s">\"content\": \"Generate changelog for these commits:\n$\"</span>
              <span class="s">}</span>
            <span class="s">]</span>
          <span class="s">}")</span>

        <span class="s">CONTENT=$(echo "$CHANGELOG" | jq -r '.choices[0].message.content')</span>

        <span class="s">gh release create $ \</span>
          <span class="s">--title "Release $" \</span>
          <span class="s">--notes "$CONTENT"</span>
</code></pre></div></div>

<h2 id="️-github-models-vs-claude-code-when-to-choose-what">⚖️ GitHub Models vs Claude Code: When to Choose What</h2>

<p>After using both GitHub Models and Claude Code Action, here’s how they compare:</p>

<h3 id="github-models-the-function-call-approach">GitHub Models: The Function Call Approach</h3>

<p><strong>Best for:</strong></p>
<ul>
  <li>✅ Simple analysis and classification tasks</li>
  <li>✅ Text generation and summarization</li>
  <li>✅ Quick decision-making workflows</li>
  <li>✅ Teams wanting zero external dependencies</li>
  <li>✅ Cost-sensitive projects (free tier)</li>
</ul>

<p><strong>Characteristics:</strong></p>
<ul>
  <li><strong>Less agentic</strong>: Direct prompt → response pattern</li>
  <li><strong>Simple integration</strong>: Just API calls in workflows</li>
  <li><strong>Limited context</strong>: Single prompt interactions</li>
  <li><strong>Fast setup</strong>: No external accounts needed</li>
</ul>

<div class="language-yaml highlighter-rouge"><div class="highlight"><pre class="highlight"><code><span class="c1"># GitHub Models pattern</span>
<span class="pi">-</span> <span class="na">name</span><span class="pi">:</span> <span class="s">Simple Analysis</span>
  <span class="na">run</span><span class="pi">:</span> <span class="pi">|</span>
    <span class="s">curl -X POST "https://models.github.ai/inference/chat/completions" \</span>
      <span class="s">-H "Authorization: Bearer $GITHUB_TOKEN" \</span>
      <span class="s">-d '{"model": "gpt-4o", "messages": [...]}'</span>
</code></pre></div></div>

<h3 id="claude-code-action-the-agentic-assistant">Claude Code Action: The Agentic Assistant</h3>

<p><strong>Best for:</strong></p>
<ul>
  <li>✅ Complex code reviews and implementations</li>
  <li>✅ Multi-step reasoning and planning</li>
  <li>✅ Interactive problem-solving</li>
  <li>✅ Code refactoring and improvements</li>
  <li>✅ Context-aware discussions</li>
</ul>

<p><strong>Characteristics:</strong></p>
<ul>
  <li><strong>More agentic</strong>: Can use tools, implement changes, reason through problems</li>
  <li><strong>Interactive</strong>: Responds to @claude mentions in PRs/issues</li>
  <li><strong>Context-aware</strong>: Understands repository structure</li>
  <li><strong>Requires setup</strong>: Anthropic’s API key or Claude Pro / Max subscription</li>
</ul>

<div class="language-yaml highlighter-rouge"><div class="highlight"><pre class="highlight"><code><span class="c1"># Claude Code pattern</span>
<span class="pi">-</span> <span class="na">name</span><span class="pi">:</span> <span class="s">Claude Code Review</span>
  <span class="na">uses</span><span class="pi">:</span> <span class="s">anthropics/claude-code-action@v1</span>
  <span class="na">with</span><span class="pi">:</span>
    <span class="na">anthropic_api_key</span><span class="pi">:</span> <span class="s">$</span>
    <span class="na">mode</span><span class="pi">:</span> <span class="s1">'</span><span class="s">review'</span>
</code></pre></div></div>

<h3 id="decision-matrix">Decision Matrix</h3>

<table>
  <thead>
    <tr>
      <th>Use Case</th>
      <th>GitHub Models</th>
      <th>Claude Code</th>
    </tr>
  </thead>
  <tbody>
    <tr>
      <td>Bug report triage</td>
      <td>✅ Perfect</td>
      <td>❌ Overkill</td>
    </tr>
    <tr>
      <td>Simple code analysis</td>
      <td>✅ Ideal</td>
      <td>❌ Too complex</td>
    </tr>
    <tr>
      <td>Changelog generation</td>
      <td>✅ Great</td>
      <td>❌ Unnecessary</td>
    </tr>
    <tr>
      <td>Infrastructure validation</td>
      <td>✅ Good</td>
      <td>✅ Better for complex cases</td>
    </tr>
    <tr>
      <td>Code implementation</td>
      <td>❌ Limited</td>
      <td>✅ Excellent</td>
    </tr>
    <tr>
      <td>Complex refactoring</td>
      <td>❌ Can’t implement</td>
      <td>✅ Ideal</td>
    </tr>
    <tr>
      <td>Multi-step planning</td>
      <td>❌ Single-shot only</td>
      <td>✅ Excels here</td>
    </tr>
    <tr>
      <td>Interactive debugging</td>
      <td>❌ No conversation</td>
      <td>✅ Great conversations</td>
    </tr>
  </tbody>
</table>

<h3 id="cost-comparison">Cost Comparison</h3>

<table>
  <thead>
    <tr>
      <th>Solution</th>
      <th>Free Tier</th>
      <th>Paid Pricing</th>
      <th>Setup Complexity</th>
    </tr>
  </thead>
  <tbody>
    <tr>
      <td><strong>GitHub Models</strong></td>
      <td>50K tokens/month</td>
      <td>Part of GitHub plan (future)</td>
      <td>⭐⭐⭐⭐⭐ Zero setup</td>
    </tr>
    <tr>
      <td><strong>Claude Code</strong></td>
      <td>None</td>
      <td>$20/month (Claude Pro)</td>
      <td>⭐⭐⭐ API key or subscription</td>
    </tr>
  </tbody>
</table>

<h2 id="-essential-cli-commands">🔧 Essential CLI Commands</h2>

<p>If you want to experiment locally, here are the working CLI commands:</p>

<div class="language-bash highlighter-rouge"><div class="highlight"><pre class="highlight"><code><span class="c"># Install GitHub CLI (if not installed)</span>
brew <span class="nb">install </span>gh  <span class="c"># macOS</span>
<span class="nb">sudo </span>apt <span class="nb">install </span>gh  <span class="c"># Ubuntu</span>

<span class="c"># Install GitHub Models extension</span>
gh extension <span class="nb">install </span>github/gh-models

<span class="c"># List available models</span>
gh models list

<span class="c"># Test a simple prompt</span>
gh models run openai/gpt-5 <span class="s2">"Hello from CLI"</span>
</code></pre></div></div>

<h2 id="-getting-started-your-first-ai-workflow">🚀 Getting Started: Your First AI Workflow</h2>

<h3 id="week-1-pick-one-use-case">Week 1: Pick One Use Case</h3>
<p>Choose the simplest automation opportunity:</p>
<ul>
  <li>Bug report analysis</li>
  <li>PR summary generation</li>
  <li>Simple code review comments</li>
</ul>

<h3 id="implementation-steps">Implementation Steps</h3>
<ol>
  <li><strong>Add permissions</strong> to your workflow:
    <div class="language-yaml highlighter-rouge"><div class="highlight"><pre class="highlight"><code><span class="na">permissions</span><span class="pi">:</span>
  <span class="na">models</span><span class="pi">:</span> <span class="s">read</span>
</code></pre></div>    </div>
  </li>
  <li>
    <p><strong>Copy a basic example</strong> and modify for your needs</p>
  </li>
  <li>
    <p><strong>Test with small prompts</strong> to understand token usage</p>
  </li>
  <li><strong>Iterate and expand</strong> based on results</li>
</ol>

<h3 id="pro-tips">Pro Tips</h3>
<ul>
  <li><strong>Start small</strong>: Begin with 1-2 sentence prompts</li>
  <li><strong>Monitor usage</strong>: Check your token consumption in GitHub settings</li>
  <li><strong>Add fallbacks</strong>: Handle API failures gracefully</li>
  <li><strong>Validate outputs</strong>: AI responses aren’t always correct</li>
</ul>

<h2 id="-the-bottom-line">🎯 The Bottom Line</h2>

<p>GitHub Models excels at <strong>simple, direct AI integration</strong> where you need quick analysis or text generation within your existing workflows. It’s perfect for teams that want AI capabilities without external dependencies or complex setup.</p>

<p>Choose <strong>GitHub Models</strong> when you need:</p>
<ul>
  <li>Simple analysis and classification</li>
  <li>Zero-setup AI integration</li>
  <li>Cost-effective automation</li>
  <li>Direct API control</li>
</ul>

<p>Choose <strong>Claude Code</strong> when you need:</p>
<ul>
  <li>Complex reasoning and planning</li>
  <li>Code implementation capabilities</li>
  <li>Interactive problem-solving</li>
  <li>Multi-step agentic behavior</li>
</ul>

<p>The beauty of GitHub Models lies in its <strong>simplicity and accessibility</strong>. You can add AI capabilities to your workflows in minutes, not hours, and start seeing value immediately.</p>

<p><strong>Start with GitHub Models for simple tasks, then graduate to Claude Code when you need more sophisticated AI assistance.</strong> Both have their place in the modern DevOps toolkit.</p>

<h2 id="-sources">📚 Sources</h2>

<ul>
  <li><a href="https://docs.github.com/en/github-models/about-github-models">GitHub Models Documentation</a></li>
  <li><a href="https://docs.github.com/en/github-models/quickstart">GitHub Models Quickstart Guide</a></li>
  <li><a href="https://github.com/marketplace/models">GitHub Marketplace Models</a></li>
</ul>

<hr />

<p><em>Have you tried GitHub Models in your workflows? What use cases are you most excited about? Share your experiments and results in the comments below.</em></p>]]></content><author><name>Luis Gallardo</name></author><category term="Blog" /><category term="DevOps" /><category term="GitHub Models" /><category term="GitHub Actions" /><category term="AI Integration" /><category term="DevOps Automation" /><category term="GPT-4o" /><category term="Claude Code" /><summary type="html"><![CDATA[Learn how GitHub Models provides free access to GPT-4o and other AI models directly in GitHub Actions, with practical examples and comparison to Claude Code for different use cases.]]></summary></entry></feed>