
How to run Raspberry Pi from a USB hard drive

I’ve been using my Raspberry Pi with a 4 GB - class 4 SD card Kingston until it decided to die (since I burn the image the first time that SD card was a little problematic). Because I didn’t have another 2GB or higher SD card, I decided to do a research to check if I could use the first partition as boot and another partition from an external USB hard drive of 320 GB. Effectively it can be done and I describe the needed steps on this article.
Raspbian Image
I decided to use the Raspbian image Raspbian 2013-02-09-wheezy-raspbian.img, but first I had to do a trick: dump the image to a 8 GB pen drive to be able separate the /boot partition and the remaining file system.
Dumping Raspbian to the pen drive
Just dump the Raspbian image as it were a SD card, but instead of using /dev/mmcblk0 do it on your pen drive:
:~# dd bs=4M if=/home/lgallard/Projects/RaspberryPi/2013-02-09-wheezy-raspbian.img of=/dev/sdb
Extracting the boot image
In order to extract the Raspbian’s boot image just dump the first partition of the pen drive:
:~# dd if=/dev/scb1 of=/home/lgallard/Projects/RaspberryPi/2013-02-09-wheezy-raspbian.boot.img
Extracting the operating system
Do the same to extract the file system where the operating systems resides:
:~# dd if=/dev/sdc2 of=/home/lgallard/Projects/RaspberryPi/2013-02-09-wheezy-raspbian.fsext4.img
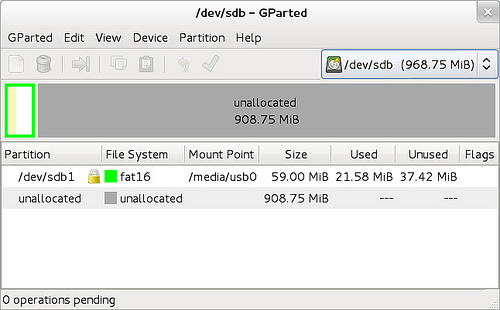
Partition /boot on SD card
You will still need a SD card to boot your Rasberry, but it not longer need to be 2GB, in fact it could be much less, even 64 MB (I use a 1 GB SD card I found). To do so, you need to make a partition with GParted of about 60 MB as show in the next picture:
Now copy the content of the first image you dumped previously:
:~# dd if=/home/lgallard/Projects/RaspberryPi/2013-02-09-wheezy-raspbian.boot.img of=/dev/sdb1
Once you have copied the data you must mount that partition and then edit file /media/usb0/cmdline.txt (change /media/usb0 according to the mounting point), and put the following:
dwc_otg.lpm_enable=0 console=ttyAMA0,115200 kgdboc=ttyAMA0,115200 console=tty1 <strong>root=/dev/sda1</strong> rootfstype=ext4 elevator=deadline rootwait
Here is important to put root=/dev/sda1 so the Raspberry uses the first partition of the external USB hard drive as the root partition, I mean, the “/”; directory at boot.
Partitioning the external USB hard drive
Connect the hard drive to a PC and make the partitions as shown in the next picture. The first partition will content the file system and the second one will be used for saving data (you can define later that in the /etc/fstab of your the RaspBerry Pi).

File system partition “/”
Now you can dump the Raspian image you got to the first partition of the USB hard drive. To do so type this:
:~# dd if=/home/lgallard/Projects/RaspberryPi/2013-02-09-wheezy-raspbian.fsext4.img of=/dev/sdc1
Fixing the size partition
As you can see in the last picture, the partition was created of 9 GB size, but if you mount the partition it will report it as only 2 GB because the Raspian image has that size by default. To fix this you must umount the partition and and resize the file system:
:~# umount /dev/sdc1

:~# e2fsck -f /dev/sdc1

e2fsck 1.42.5 (29-Jul-2012)
Pass 1: Checking inodes, blocks, and sizes
Pass 2: Checking directory structure
Pass 3: Checking directory connectivity
Pass 4: Checking reference counts
Pass 5: Checking group summary information
Raspbian: 66488/114688 files (0.1% non-contiguous), 346538/458240 blocks

:~# resize2fs /dev/sdc1

resize2fs 1.42.5 (29-Jul-2012)
Resizing the filesystem on /dev/sdc1 to 2304000 (4k) blocks.
The filesystem on /dev/sdc1 is now 2304000 blocks long.
After that check the available space. It should report something like this:
:~# df -h

/dev/sdc2 285G 191M 271G 1% /media/Data
/dev/sdc1 8.7G 1.3G 7.0G 16% /media/Raspbian
If you follow these steps, your Raspberry Pi will boot from a USB hard drive.
Final notes
- It’s a fact that a hard drive have a higher price than a SD card but you have to consider the later will suffer more, specially a file system with journal can kill the SD card, so it’s not crazy to think in an external USB hard drive.
- This hard drive and keyword are powered by the Raspberry Pi without problems. But if I connect something more, for instance a mouse, it can’t handle all and the device reboots.
- Using a hard drive can solve the SD card compatibility issue (recommended class 6 type). In my case I used a SanDisk of 1 GB, class 4 and it worked perfectly.
- Probably you can use dd and extract the /boot and file system partitions, but due I didn’t know the exact size and because I was a little lazy a decide to dump the Raspbian image on a pen drive and extract the images that way.