
Logical Volume Manager (LVM)
In the traditional disk partitioning scheme, administrators plan ahead the use of each partition. For instance, a laptop with 120 GB hard drive, 1 GB RAM can have the following partition scheme:
- 1 GB for swap (/dev/sda1),
- 12 GB for root (/dev/sda2),
- 107 GB for /home (/dev/sda3), meaning, the remaining space.
So far so go, but what if the RAM is increased to 2 GB? In order to hibernate the system you must increase the swap, and because the whole hard drive was partitioned leaving no space there isn’t other way than repartitioning the hard drive using a utility, if the file system allows it (for instance, ext2/ext3/ext4 file systems let you resize them).
There isn’t anything more flexible? Yes, it’s called LVM (Logical Volume Manager), and basically it lets you hot resizing of partitions. For example, you can release 1GB from /home (/dev/sda3) and give it to the swap partition (/dev/sda1).
LVM (Logical Volume Manager)
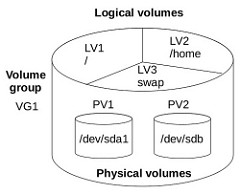
In order to use LVM, first you must assign physical volumes, then volume groups and finally logical groups. All this might be confusing at first, but let’s try to explain each of these terms and how they are related:
-
Physical volumes: This is the support media where the data will be stored, and they can be made of several hard drives or partitions of a drive. They don’t have a direct relation with the mount points. Physical Volume examples: /dev/sda , /dev/sdb1, etc.
-
Volume groups: It’s the grouping of logical volumes in a volume to see them as one device. Physical volume example: /dev/vg00
-
Logical volumes: Here is were the file systems (for example, ext2, ext3,xfs,vfat) will reside and so the mount points (/, /home, swap, /usr, /var, etc). At this level the files systems are formated, and it’s where the data will be distributed logically, as you are costumed to with the traditional partitions. Logical volumes examples: /dev/vg00/lv_rootfs, /dev/vg00/lv_swap, /dev/vg00/lv_home.
Installing LVM
On Debian you can install LVM with this package:
aptitude install lvm2
On other distributions like Fedora, Red Hat or Ubuntu you must search the name of the package for LVM.
LVM commands
In order to create a LVM using physical, groups and logical volumes let’s see some commands available:
Physical volumes
| Command | Description |
| pvcreate | Initialize physical volume(s) for use by LVM |
| pvs | Display information about physical volumes |
| pvdisplay | Display various attributes of physical volume(s) |
| pvresize | Resize physical volume(s) |
| pvmove | Move extents from one physical volume to another |
Volume groups
| Command | Description |
| vgcreate | Create a volume group |
| vgs | Display information about volume groups |
| vgdisplay | Display volume group information such as attributes |
| vgextend | Add physical volumes to a volume group |
| vgreduce | Remove physical volume(s) from a volume group |
| vgremove | Remove volume group(s) |
Logical volumes
| Command |
Description |
| lvcreate | Create a logical volume |
| lvs | Display information about logical volumes |
| lvdisplay | Display information about a logical volume |
| lvresize | lvreduce | lvextend | Resize a logical volume |
| lvmove | Remove logical volume(s) from the system |
Example of how to create a LVM
Let’ s suppose you have free 8 GB hard drive in /dev/sdb , with two partitions of 4 GB each (/dev/sdb1 and /dev/sdb2), and you want to create a LVM on those two partitions to use these mount points: 1 GB for the system’s root (/), 1 GB for swap (swap) and the remaining 6 GB for users directory (/home). To create the LVM you can type the following commands:
root@buckbeak:~# pvcreate /dev/sdb1
Physical volume "/dev/sdb1" successfully created

root@buckbeak:~#pvcreate /dev/sdb2
Physical volume "/dev/sdb2" successfully created

root@buckbeak:~# pvs

PV         VG         Fmt  Attr PSize  PFree
/dev/sdb1                         lvm2 a-    4.00g 4.00g
/dev/sdb2                         lvm2 a-    3.99g 3.99g

root@buckbeak:~# vgcreate vg_group01 /dev/sdb1 /dev/sdb2

Volume group "vg_group01" successfully created

root@buckbeak:~# vgs

VG         #PV #LV #SN Attr   VSize  VFree
vg_group01   2   0   0 wz--n-  7.99g 7.99g

root@buckbeak:~# lvcreate -n lv_rootfs vg_group01 -L 1G
Logical volume "lv_rootfs" created

root@buckbeak:~# lvcreate -n lv_swap vg_group01 -L 1G
Logical volume "lv_swap" created

root@buckbeak:~# lvcreate -n lv_home vg_group01 -L 6G
Volume group "vg_group01" has insufficient free space (1534 extents): 1536 required

root@buckbeak:~# lvcreate -n lv_home vg_group01 -l 1534
Logical volume "lv_home" created

root@buckbeak:~# lvs
LV        VG         Attr   LSize  Origin Snap%  Move Log Copy%  Convert
lv_home   vg_group01 -wi-a-  5.99g
lv_rootfs vg_group01 -wi-a-  1.00g
lv_swap   vg_group01 -wi-a-  1.00g</pre>
Now you can make the file system for each logical volume:
root@buckbeak:~# mkfs.ext4 /dev/vg_group01/lv_rootfs
mke2fs 1.41.12 (17-May-2010)
Filesystem label=
OS type: Linux
Block size=4096 (log=2)
Fragment size=4096 (log=2)
Stride=0 blocks, Stripe width=0 blocks
65536 inodes, 262144 blocks
13107 blocks (5.00%) reserved for the super user
First data block=0
Maximum filesystem blocks=268435456
8 block groups
32768 blocks per group, 32768 fragments per group
8192 inodes per group
Superblock backups stored on blocks:
32768, 98304, 163840, 229376

Writing inode tables: done
Creating journal (8192 blocks): done
Writing superblocks and filesystem accounting information: done

This filesystem will be automatically checked every 34 mounts or
180 days, whichever comes first.  Use tune2fs -c or -i to override.

root@buckbeak:~# mkfs.ext4 /dev/vg_group01/lv_home
mke2fs 1.41.12 (17-May-2010)
Filesystem label=
OS type: Linux
Block size=4096 (log=2)
Fragment size=4096 (log=2)
Stride=0 blocks, Stripe width=0 blocks
393216 inodes, 1570816 blocks
78540 blocks (5.00%) reserved for the super user
First data block=0
Maximum filesystem blocks=1610612736
48 block groups
32768 blocks per group, 32768 fragments per group
8192 inodes per group
Superblock backups stored on blocks:
32768, 98304, 163840, 229376, 294912, 819200, 884736

Writing inode tables: done
Creating journal (32768 blocks): done
Writing superblocks and filesystem accounting information: done

This filesystem will be automatically checked every 20 mounts or
180 days, whichever comes first.  Use tune2fs -c or -i to override.

root@buckbeak:~# mkswap /dev/vg_group01/lv_swap
mkswap: /dev/vg_group01/lv_swap: warning: don't erase bootbits sectors
on whole disk. Use -f to force.
Setting up swapspace version 1, size = 1048572 KiB
no label, UUID=e743b4f3-1c80-4503-be88-6934d575cd55

root@buckbeak:~# swapon /dev/vg_group01/lv_swap

root@buckbeak:~# swapon -s
Filename                Type        Size    Used    Priority
/dev/dm-1                               partition    2064376    8    -1
/dev/dm-5                               partition    1048568    0    -2</pre>
If you want to use these logical volumes, you can mount them using the mount command or add them to the /etc/fstab file to be mount when the system boots.