GitHub Copilot CLI: Terminal-Native AI with Seamless GitHub Integration
I stumbled upon GitHub Copilot CLI while catching up on tech news, and the native GitHub integration immediately caught my attention. A terminal-native AI assistant that can interact directly with repositories, issues, and PRs? I decided to give it a try to have in my AI toolbox.
Copilot CLI is the latest addition to GitHub’s Copilot ecosystem, joining Copilot in the IDE (code completion and chat), GitHub Copilot Workspace (issue-to-PR automation), and Copilot Extensions (custom integrations). This CLI component brings the Copilot experience directly to the terminal, complementing the ecosystem with command-line workflows. Here’s what I learned after testing it.
🚀 What is GitHub Copilot CLI?
GitHub Copilot CLI is GitHub’s terminal-native AI assistant that brings conversational AI directly to your command line. Think of it as ChatGPT for your terminal, but with direct access to your file system, MCP servers, and development context.
What Makes It Different
- Terminal-native interface: No browser, no context switching
- Interactive mode: Natural conversations with
/commands - MCP integration: Connect to Context7, GitHub, and custom MCP servers
- Model flexibility: Support for GPT-4o, GPT-5, and other OpenAI models
- Session management: Resume conversations and maintain context
- File system access: Direct file reading and analysis
Current Status: Public Preview
Copilot CLI is in public preview (version 0.0.332 at the time of writing), which means:
- Features are actively evolving
- Available to GitHub Copilot subscribers
- Some capabilities may change as it approaches stable release
- Feedback directly shapes the product direction
🔧 Quick Start: Installation & First Run
Getting started with Copilot CLI is straightforward:
# Install globally via npm
npm install -g @github/copilot

# Launch interactive mode
copilot

# Or use specific model
copilot --model gpt-5

# Quick one-shot queries
copilot -p "analyze terraform module" --allow-all-tools
Understanding the Configuration
Copilot CLI creates a configuration directory at ~/.copilot/ with the following structure:
~/.copilot/
├── command-history-state.json  # Command history tracking
├── config.json                  # User preferences and settings
├── history-session-state/       # Session state management
├── logs/                        # Debug and activity logs
└── mcp-config.json             # MCP server configurations
The mcp-config.json file is where MCP server integrations are stored. Each time you add an MCP server via /mcp add, this file is updated automatically.
💡 MCP Integration: The Game Changer
Here’s where Copilot CLI really shines—native MCP support that lets you connect to specialized AI servers and tools directly from your terminal.
Interactive MCP Commands
Once you’re in interactive mode (copilot), you have access to these MCP management commands:
/mcp add      # Add new MCP server interactively
/mcp show     # Display configured MCP servers
/mcp disable  # Temporarily disable a server
/mcp enable   # Re-enable a disabled server
Adding MCP Servers: The Interactive Way
The /mcp add command provides a guided setup experience. Let me show you how I added Context7 and GitHub MCP servers:
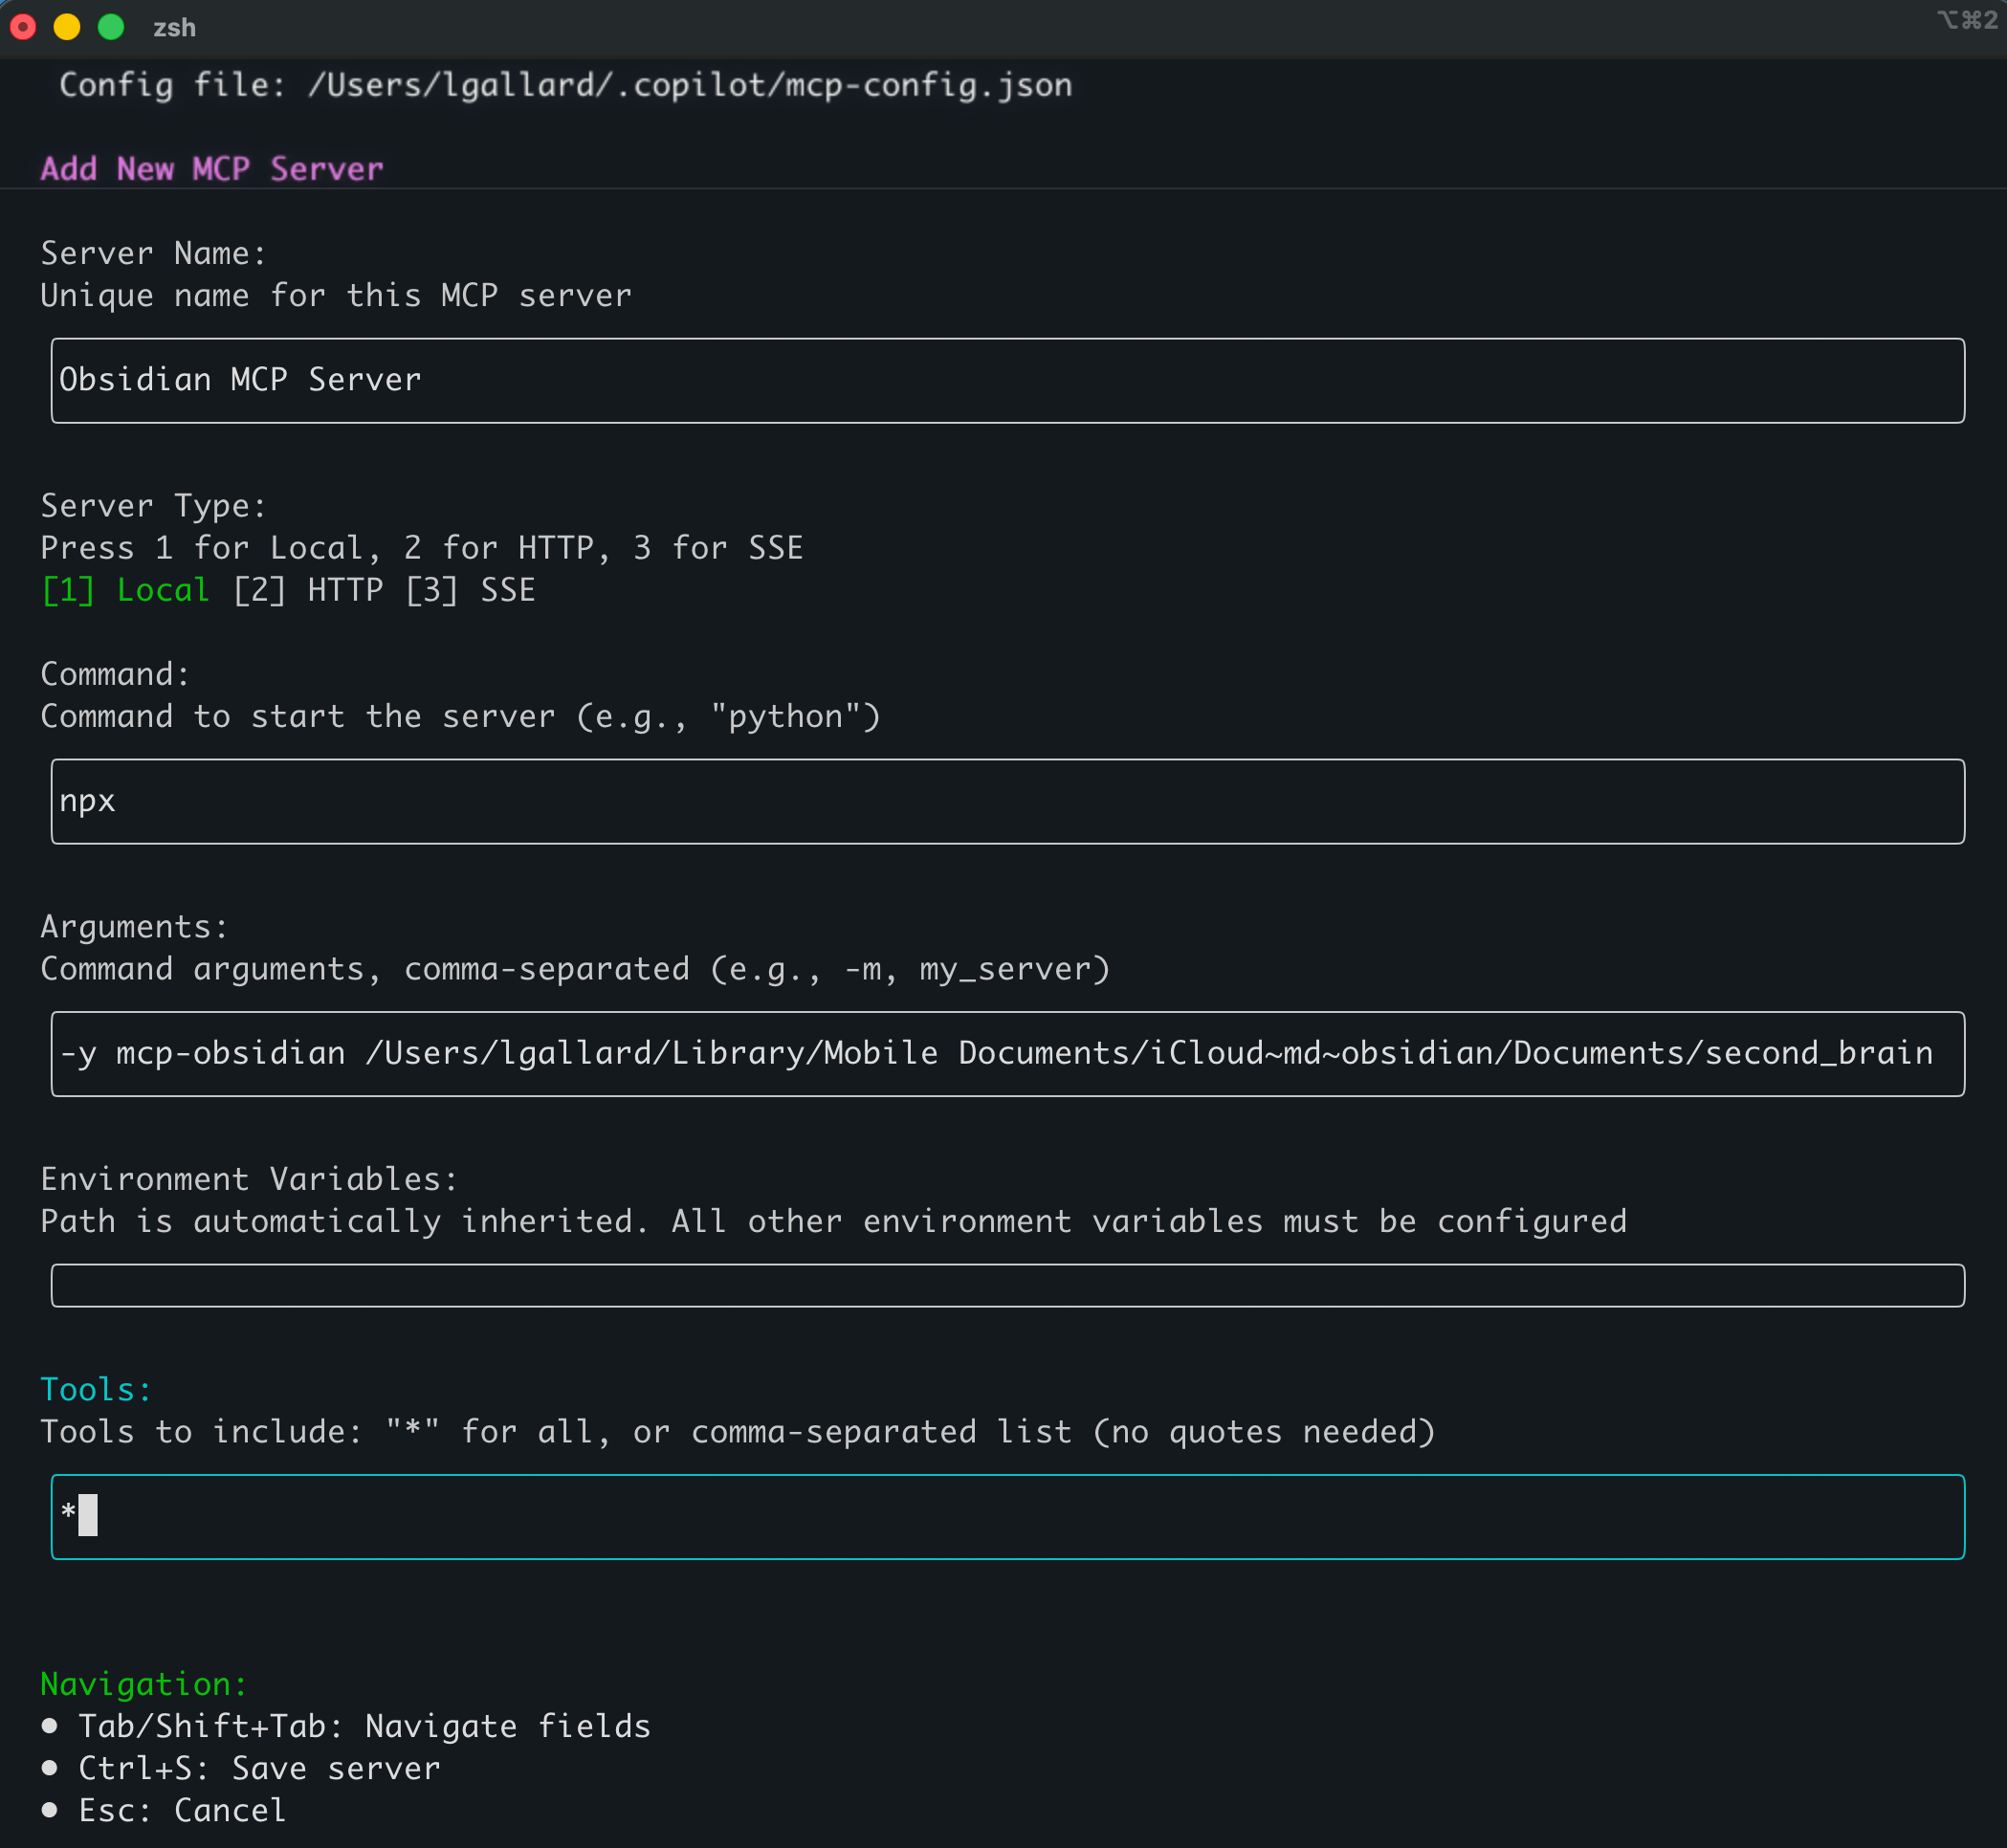
The interactive prompt walks you through:
- Server Name: Unique identifier for the MCP server
- Server Type: Local, HTTP, or SSE (Server-Sent Events)
- Connection Details:
- Local: Command to start the server (e.g.,
npx) - HTTP: Remote server URL
- SSE: Server-sent events endpoint
- Local: Command to start the server (e.g.,
- Arguments: Command-line arguments for local servers
- Environment Variables: Optional environment configuration
- Tools Selection: Choose which tools to expose (
*for all)
Real-World Example: Adding Context7
Here’s the actual workflow for adding Context7 MCP server:
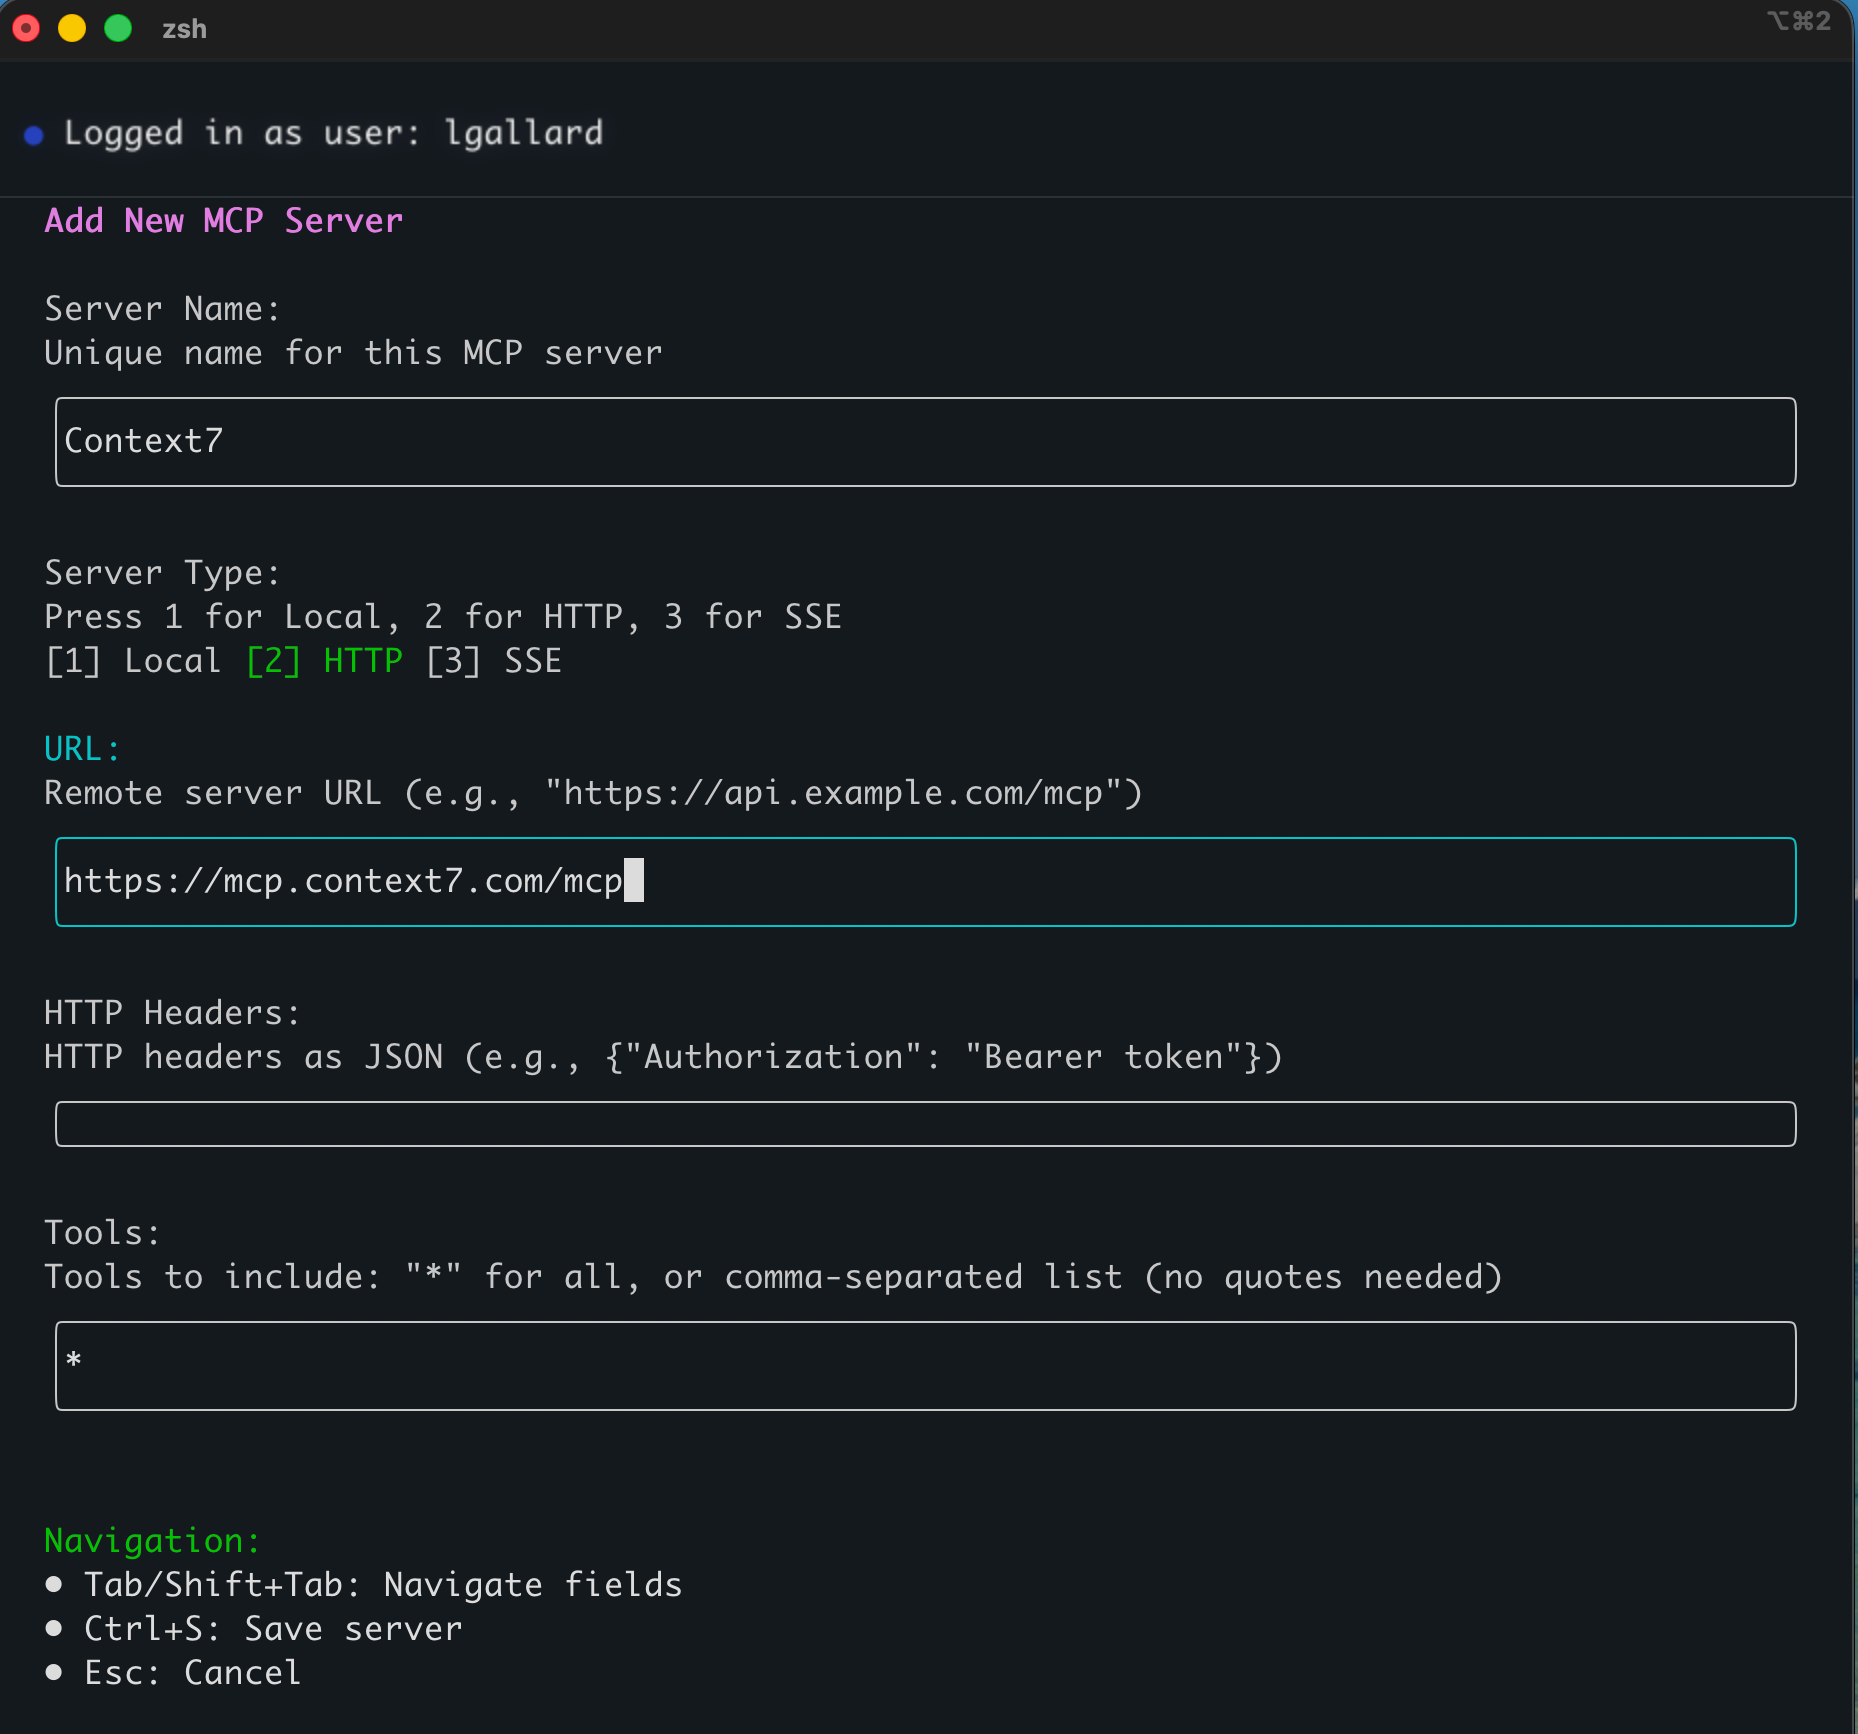
Server Name: Context7
Server Type: [2] HTTP
URL: https://mcp.context7.com/mcp
HTTP Headers: (optional, for authentication)
Tools: * (all tools)
Once configured, Context7’s documentation search capabilities are immediately available in your Copilot CLI sessions.
Adding GitHub MCP Server
The GitHub MCP server provides repository access and operations:
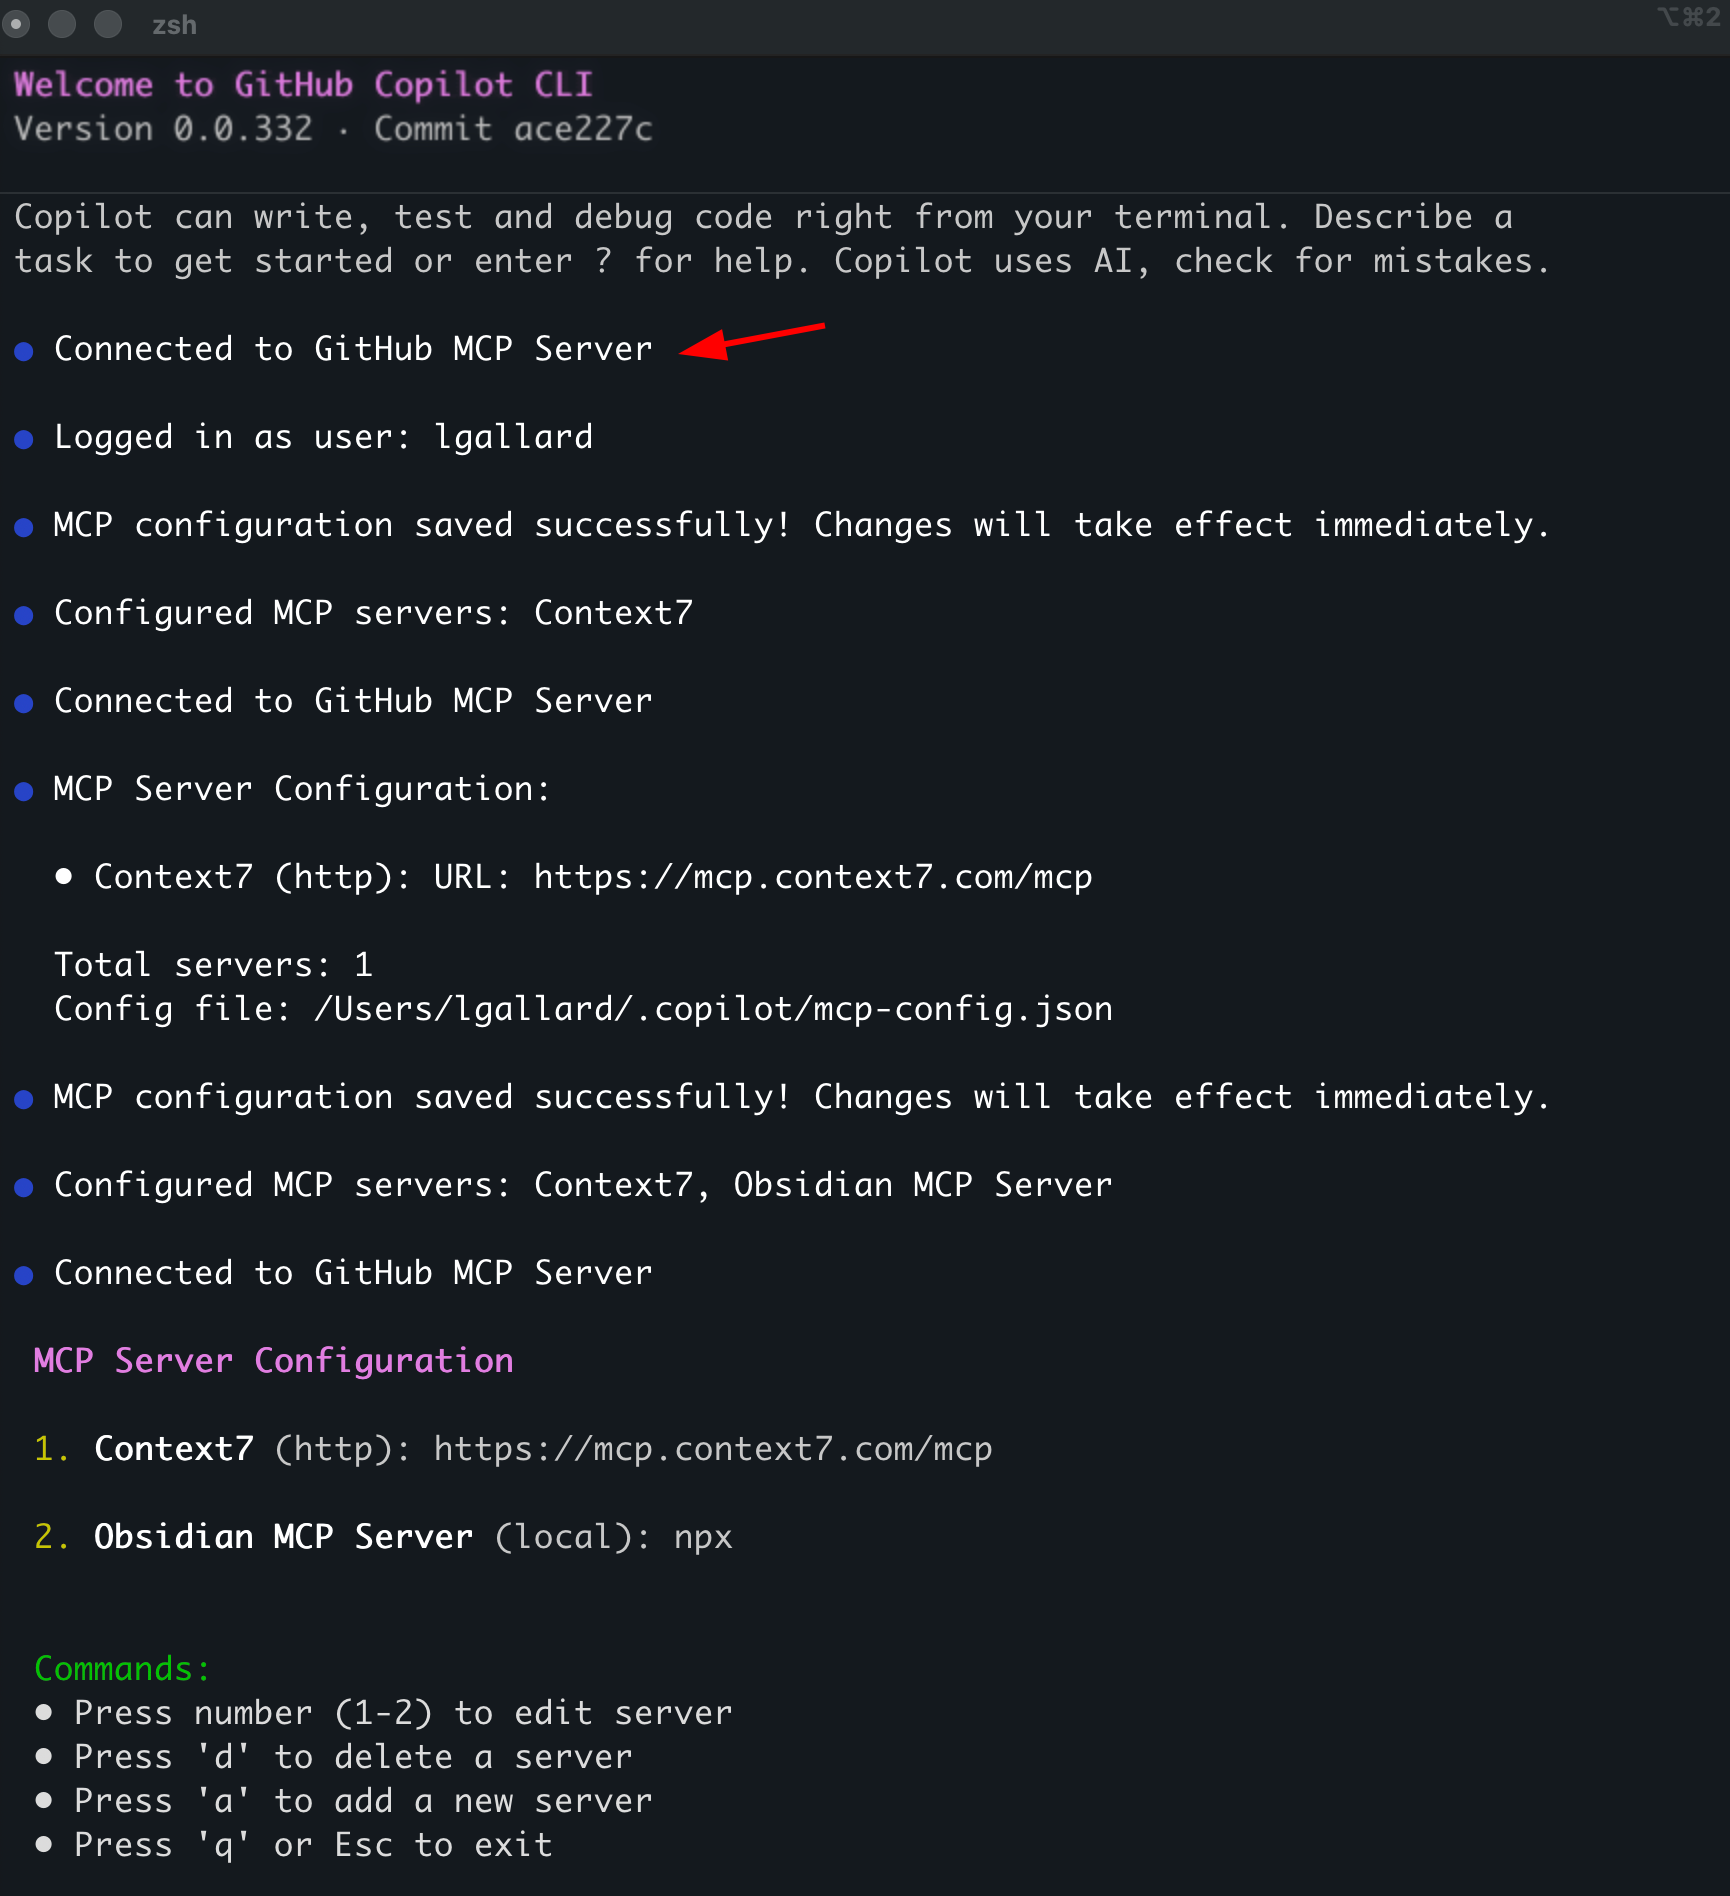
As shown in the screenshot, once configured, you’ll see:
- Connected to GitHub MCP Server confirmation
- Server listed in your MCP configuration
- Available tools and capabilities
This gives you direct access to:
- Repository information and file access
- Pull request and issue operations
- GitHub Actions workflow data
- Commit history and branch management
MCP Configuration Persistence
All MCP servers are saved to ~/.copilot/mcp-config.json, making them available across all sessions. Your configuration persists and automatically loads when you start Copilot CLI.
🎯 Essential Interactive Commands
Beyond MCP management, Copilot CLI provides powerful session control commands:
Model Selection
/model gpt-5              # Switch to GPT-5 for current session
/model gpt-4o             # Use GPT-4o for general tasks
/model gpt-5 --reasoning  # Enable extended reasoning mode
File System Access
/add-dir ~/projects       # Grant access to specific directory
/add-dir ~/terraform      # Add Terraform configurations
/add-file config.yaml     # Add individual file to context
Session Management
/cwd ~/terraform          # Change working directory
/session                  # View current session info
/resume                   # Resume previous session
/history                  # Show command history
Feedback & Help
/feedback                 # Provide feedback to GitHub
/help                     # Show all available commands
/exit                     # Exit interactive mode
🛠️ Real-World DevOps Workflow
Here’s a practical scenario showing Copilot CLI in action:
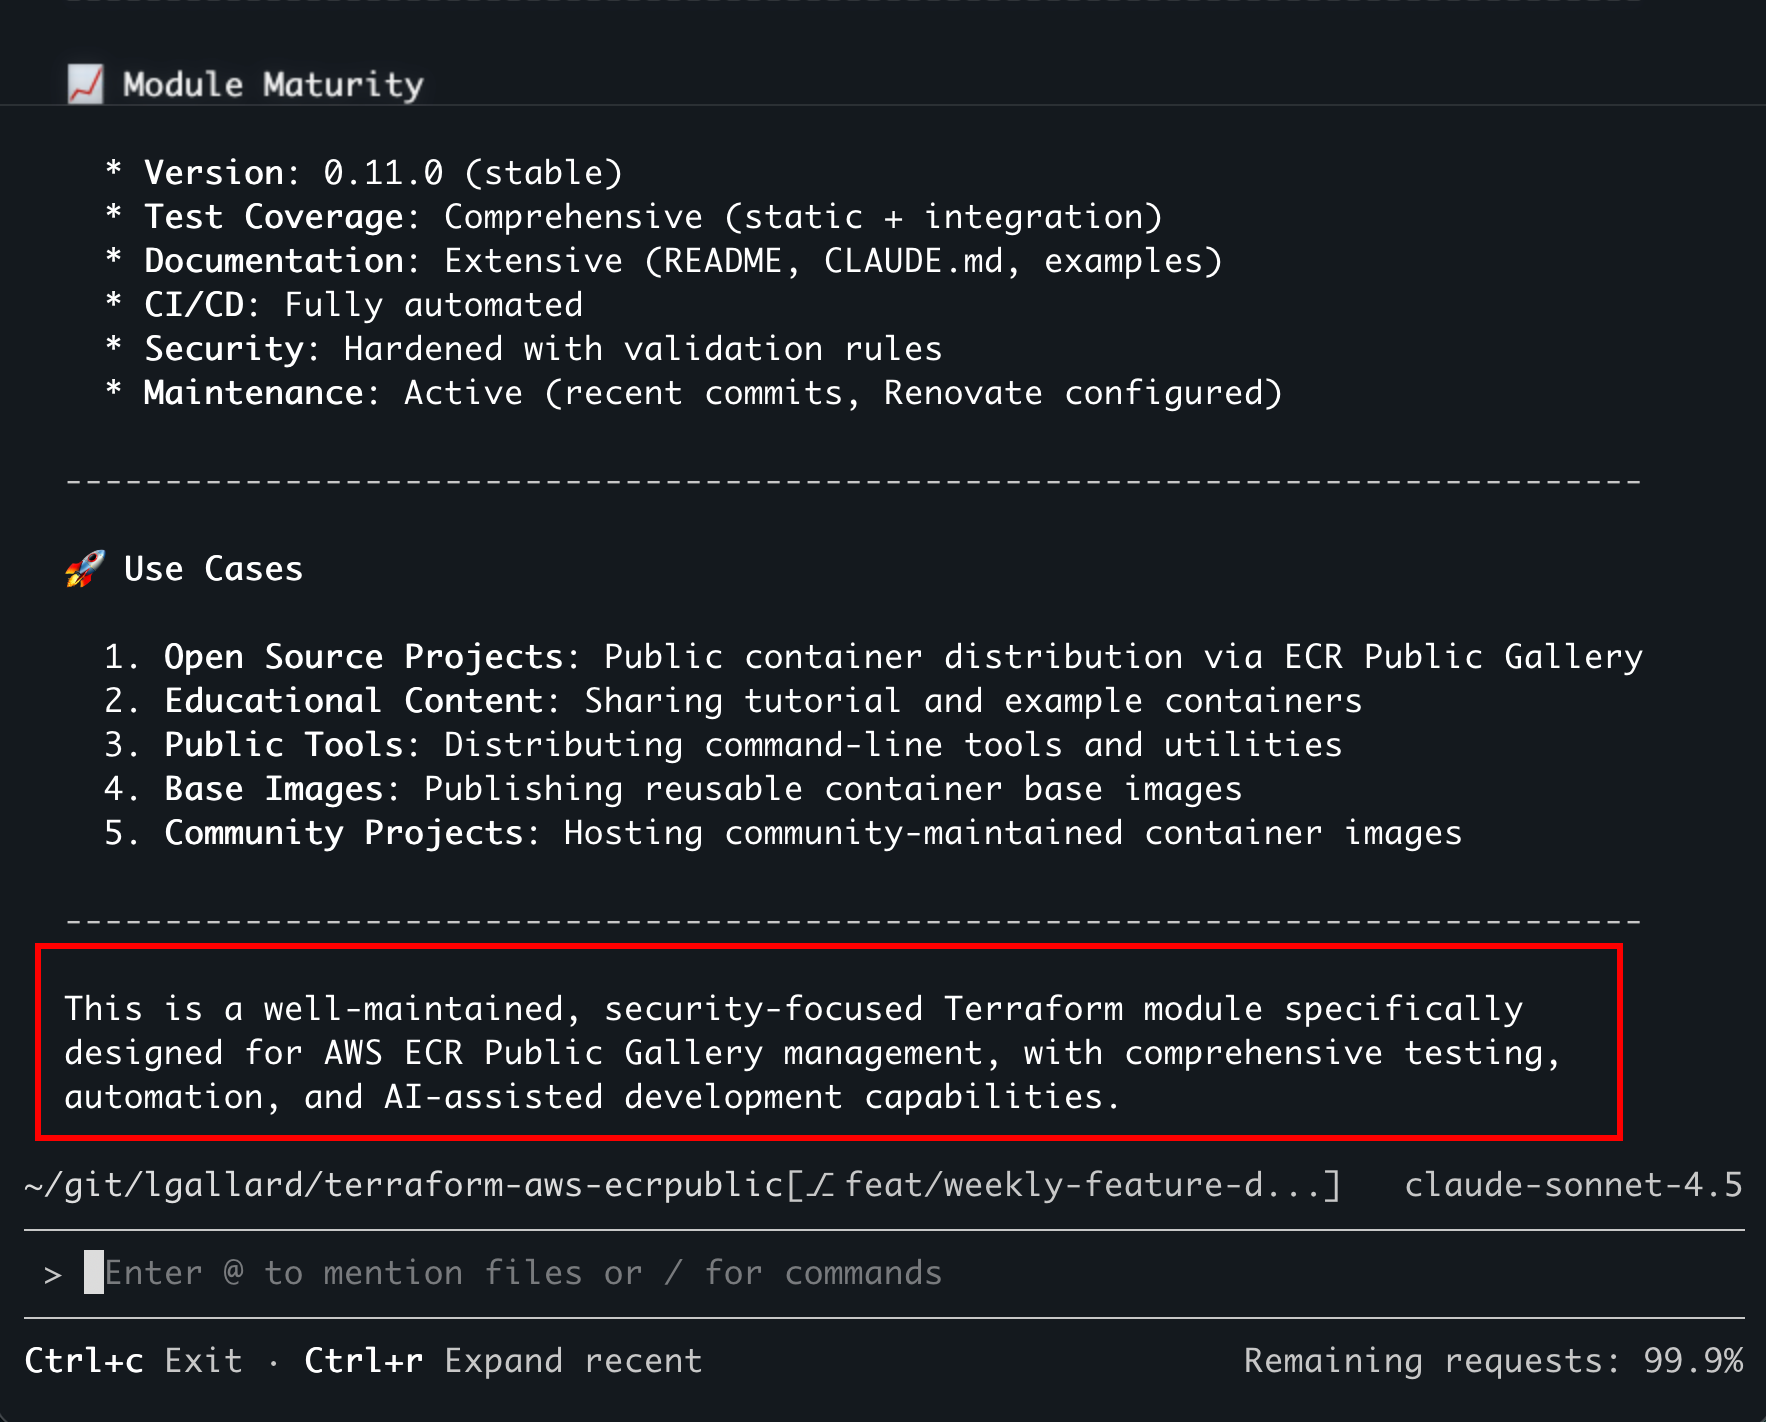
Scenario: Terraform Module Analysis
# Start Copilot CLI in your Terraform directory
cd ~/git/terraform-aws-ecrpublic
copilot --model gpt-5

# Interactive session begins
> "Analyze the module structure and suggest improvements"

# Use MCP to fetch documentation
> "Using Context7, find AWS ECR Public best practices"

# Check GitHub workflows
> "Show me the GitHub Actions workflows for this repo"

# Generate summary
> "Create a summary of potential security improvements"

# Save session for later
> /feedback "This analysis was helpful for security audit"
Command-Line Flags for Automation
For CI/CD or scripted workflows:
# Allow all file system operations (for automation)
copilot -p "analyze terraform validation output" --allow-all-tools

# Resume previous session
copilot --resume --model gpt-5

# Add specific directory access
copilot --add-dir ~/terraform -p "review module configuration"

# Specify model and context
copilot --model gpt-4o --cwd ~/projects/api -p "analyze API performance"
⚖️ When to Use: Copilot CLI vs Claude Code vs Cursor CLI
After using all three terminal-based AI tools, here’s my decision framework:
GitHub Copilot CLI
Best for:
- ✅ Terminal-native workflows (no context switching)
- ✅ MCP server integration and orchestration
- ✅ GitHub-centric development workflows
- ✅ Interactive debugging sessions
- ✅ OpenAI model ecosystem (GPT-4o, GPT-5)
Characteristics:
- Strong MCP support: Native integration with interactive management
- GitHub integration: Direct repository and Actions access
- Model selection: Easy model switching during sessions
- Session persistence: Resume and continue conversations
Claude Code
Best for:
- ✅ Complex multi-step reasoning and planning
- ✅ Code implementation with tool use
- ✅ Sequential thinking workflows
- ✅ Anthropic’s Claude models (Sonnet, Opus)
- ✅ Extensive file editing and refactoring
Characteristics:
- Agentic capabilities: Can use tools and implement changes
- Claude models: Access to Anthropic’s model family
- Rich context: Strong codebase understanding
- Subagents: Specialized agent workflows
Cursor CLI
Best for:
- ✅ Quick code generation and snippets
- ✅ Cursor IDE integration
- ✅ Simple terminal queries
- ✅ Fast model responses
Characteristics:
- IDE integration: Works with Cursor editor
- Speed focus: Quick responses for simple tasks
- Cursor ecosystem: Part of Cursor’s suite of tools
Decision Matrix
| Use Case | Copilot CLI | Claude Code | Cursor CLI |
|---|---|---|---|
| Terminal debugging | ✅ Perfect | ✅ Good | ⚠️ Basic |
| MCP orchestration | ✅ Excellent | ✅ Good | ❌ Limited |
| GitHub workflows | ✅ Native | ⚠️ Via MCP | ❌ Limited |
| Complex reasoning | ✅ GPT-5 capable | ✅ Best with Claude | ⚠️ Basic |
| Code implementation | ⚠️ Guidance only | ✅ Best | ✅ Good |
| Quick queries | ✅ Great | ✅ Good | ✅ Fastest |
| Session continuity | ✅ Native resume | ✅ Context aware | ⚠️ Limited |
🔥 Pro Tips for Maximum Productivity
1. Leverage --allow-all-tools for CI/CD
In automated environments, grant full access to avoid interactive prompts:
# CI/CD pipeline usage
copilot -p "analyze test coverage report" \
  --allow-all-tools \
  --model gpt-5 \
  --add-dir ./coverage
2. Use --resume for Session Continuation
Don’t start from scratch—resume your previous context:
# Continue where you left off
copilot --resume --model gpt-5

# Resume and add new context
copilot --resume --add-dir ~/new-project
3. Combine --add-dir with MCP Servers
Grant file access and leverage MCP capabilities simultaneously:
copilot --add-dir ~/terraform \
  --model gpt-5 \
  -p "Using Context7, analyze this Terraform module against AWS best practices"
4. Interactive /mcp Commands for Dynamic Workflows
Add MCP servers on-the-fly during interactive sessions:
# In interactive mode
> /mcp add
# Configure new server interactively

> /mcp show
# Verify all connected servers

> "Now use the newly added server to analyze X"
5. Model Switching During Sessions
Change models mid-conversation based on task complexity:
# Start with GPT-4o for general analysis
copilot --model gpt-4o

# Switch to GPT-5 for complex reasoning
> /model gpt-5

# Continue with enhanced reasoning capabilities
> "Now perform deep security analysis of the authentication flow"
📊 Quick Takeaways
After a week of intensive usage, here’s what stands out:
✅ Terminal-native AI: Finally, a conversational AI that lives where developers work ✅ MCP integration: Best-in-class MCP support with interactive management ✅ Session persistence: Resume conversations and maintain context across sessions ✅ Model flexibility: Easy switching between GPT-4o, GPT-5, and other models ✅ GitHub ecosystem: Native integration with repositories and Actions
⚠️ Public preview status: Features evolving, expect some rough edges ⚠️ Limited to OpenAI models: No Anthropic Claude or other model providers (yet) ⚠️ Guidance-focused: Provides analysis and suggestions rather than direct code implementation
🎯 Getting Started: Your First Week
Day 1: Basic Setup
# Install Copilot CLI
npm install -g @github/copilot

# Launch and explore interactive mode
copilot

# Try basic commands
> /help
> /model gpt-5
> "Hello, analyze my current directory structure"
Day 2-3: MCP Integration
# Add your first MCP server
copilot
> /mcp add

# Configure Context7 or GitHub MCP
# Server Name: Context7
# Type: HTTP
# URL: https://mcp.context7.com/mcp

# Test the integration
> "Using Context7, find documentation on Terraform AWS modules"
Day 4-5: Real Workflow Integration
# Use in actual development workflow
cd ~/your-project
copilot --model gpt-5 --add-dir .

# Analyze, debug, and iterate
> "Analyze the test coverage in this project"
> "What security improvements can be made?"
> "Review the CI/CD workflow configuration"
Week 1: Automate Common Tasks
# Create aliases for frequent workflows
alias copilot-tf="copilot --add-dir . --model gpt-5 -p 'Analyze Terraform configuration'"
alias copilot-debug="copilot --resume --allow-all-tools"

# Use in CI/CD
copilot -p "analyze build logs" --allow-all-tools --model gpt-5
🔮 The Bottom Line
GitHub Copilot CLI represents a significant shift in how we interact with AI during development. By bringing conversational AI directly to the terminal with native MCP support, it eliminates context switching and enables truly integrated workflows.
Choose Copilot CLI when you need:
- Terminal-native AI without leaving your workflow
- MCP server orchestration with interactive management
- GitHub repository and Actions integration
- Session persistence and resume capabilities
- OpenAI model ecosystem access
The public preview status means:
- Features are actively improving
- Your feedback shapes the product
- Some rough edges still exist
- Early access to cutting-edge capabilities
Copilot CLI is a valid alternative for terminal-based development, especially if you’re already using GitHub Copilot. The native GitHub integration, combined with MCP extensibility, makes it a natural choice for workflows that center around GitHub repositories, issues, and pull requests.
Start with the basics, add one MCP server, and see how terminal-native AI changes your workflow. You might find yourself reaching for the browser less and solving problems faster—right from where you’re already working.
📚 Resources
- GitHub Copilot CLI Documentation
- Model Context Protocol Specification
- Context7 MCP Server
- GitHub MCP Server
Have you tried GitHub Copilot CLI yet? What MCP servers are you integrating? Share your terminal-native AI workflows in the comments below.